Tag Archives: Silhouette Cameo

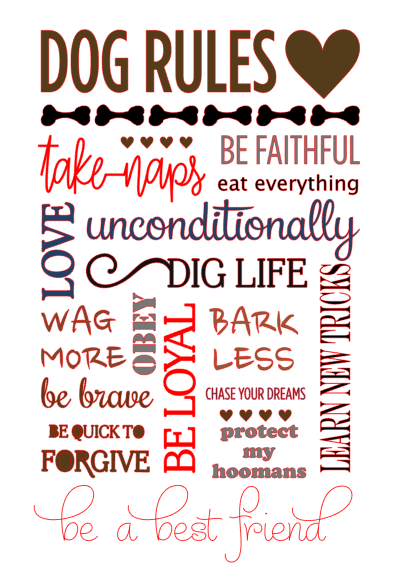
Free Dog Rules Poster Cutting File

07-22-2018

A new updated file can be downloaded here~

dog poster.jpg

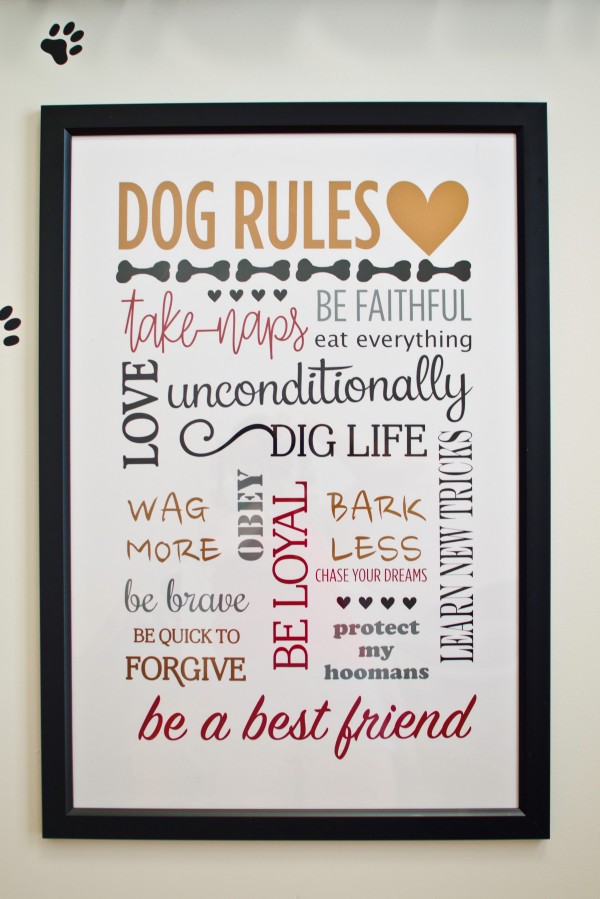
A new cutting file for the silhouette cameo! I have been planning to make a poster for my pooch Trigger for some time now! I was contacted by Shopcraftables shortly before I started my project and the following design is in collaboration with them.  Check them out for all your vinyl and heat transfer material needs!

Screen Shot 2018-06-10 at 10.25.05 PM

Download the file here.

The design is for a 20×30 inch poster and in a .studio format. If other formats are desired, please post a message below!

I will be posting pictures of the completed project using vinyl from Shopcraftables soon!

Tutorial – 3D light up marquee letters

If you’re just looking for the cutting file, the edited version of the letter “G” can be downloaded here

For tutorial, please see below!

Hello! It’s been some time since my last blog post! So much has happened and it’s been a whirlwind of activity. I finished my doctorate degree, moved across the continent to the east coast where I’ve set up my new home and started a post-doc fellowship. But I couldn’t leave without bringing with me my precious crafting supplies! I even packed my Silhouette Cameo in my luggage (I’d forgotten to pack it in the shipping cube…oops!).

After we got set up in our new home, our baby came join us in the east coast and he had a big road trip all the way from Vancouver!

IMG-5962

To welcome him home, I decorated his own little corner. I wanted to make it really special write his name out in lights! So I made 3D marquee letters that actually light up by remote control! It took a whole week’s worth of evenings but it was well worth it. It turned out better than I imagined!

I used paper to make the 3D letters using Carina Gardner’s marquee 3D letters cutting files from the Silhouette design store. The files and a tutorial from Carina Gardner can be found here.

In general, I really liked these letters; however, I found that some of the letters were somewhat confusing to assemble and some pieces were sized a little strangely so they weren’t the same size as the other letters. I don’t know if I assembled them erroneously as I found the that there were minimal instructions. There were some guidelines on Carina Gardner’s website. As a perfectionist, this bothered me a lot so I edited some of the pieces. For example, for the letter “G”, one piece was too long so I shortened it, and rounded out a bit more the front piece. This 3D “G” letter can be downloaded here. 

Some of the other rounded type letters like the R could also be shaped a bit better but the straight letters like the “I” or the “T” could very easily be assembled. For additional questions on assembly, check out Carina Gardner’s website or leave a comment below.

To make the letters light up, I purchased dimmable fairy lights from Amazon

The fairy lights came with a remote control too so that I could control brightness of the lights. The wire also bends so that I can make it into any shape I like. I really LOVE these fairy lights!!! Also they’re LED lights so they don’t heat up even after being on a long time so that there’s virtually no fire hazard. Remember that the letters are made of paper and if you use non-LED lights, they may heat up and burn the paper and cause a fire.

To attach the fairy lights, I lined up the lights with the holes in the marquee letters and just used a strong tape (here I used masking tape) to adhere the wire part to the back of the letters.

To hang the letters on the wall, made holes using a hole punch on the sides at the top of each letter and just strung a string through all the letters. I hung the letters to the wall using a dozen and half of these Command decorating tips. These are great because they don’t damage the wall.

And here’s the final product:

IMG-5932

IMG-5930


Hope this tutorial was easy enough to follow! Leave a comment below and let me know how you liked this tutorial!


Copic marker-colored Christmas cards

It’s been some time since I made a post, almost half a year in fact. My time flies! Life has been eventful in many good ways and I’m looking forward to sharing with you all many of my creations these past few months.

This slideshow requires JavaScript.

But first off, I’d like display some of the Christmas cards I’d made for my friends and family this past Christmas. Copic colouring has become a new hobby of mine and because they’re so pricey, I managed to snag a few cheaper knock off alcohol markers on Aliexpress. I’ll put up a blog post about that soon but from my initial foray into alcohol markers, they seem to work quite well!

I wanted a cute and wintery theme for my cards so I used my Hampton Art Stamp and Die set – Penguins.
SC0714 Stamp & Die Set - Penguins

In order to use this die you need to have a Sizzix or cuttlebug die-cutting machine.

I stamped the image of the penguins using Memento in Tuxedo black by Tsukineko which is one of the best dye inks for alcohol marker coloring. After coloring the penguins, I cut them out using the penguin die.

To decorate the cards I used a few different kinds of backgrounds, here are a few:

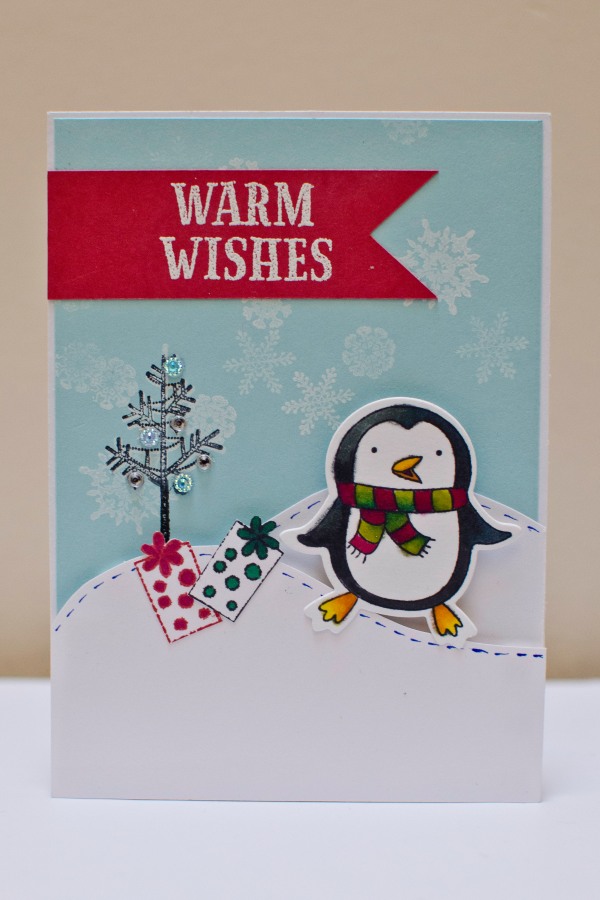
1. staggered snow fields. I used foam dots to create dimension on the snow fields. I used a blue cardstock as the background and stamped white snow flakes .

dsc_0585

2.  A fat ornament on an embossed background. I purposely made the ornament enormous so that it would take up half the card. I cut the ornaments out using my silhouette cameo to the size I wanted. Finally I decorated the ornaments with rhinestones or ribbons.

Finally I used a banner with a white embossed greeting and attached the penguins with a foam dot to make it 3D.

I loved the rhinestone-embellished ornament so much that I made card featuring just the ornament on an embossed background!

Well that’s it I hope you enjoyed these cards and stay tuned for more!


Cheap Thrills and Pretty Frills – Scrapbooking on a Budget

As a student, I don’t have a lot of extra cash to splurge on expensive embellishments, fancy papers or even foam tape. Over the years, I’ve come to be very adept at looking for deals and cheap thrills when it comes to paper crafting. And who’s noticed that it’s almost impossible to get decently priced shipping of anything to Canada? The US economy would be booming if only they shipped to Canada at reasonable prices! So more often than not, I and my crafty friends opt out of cheap US prices and pay the premium at Michaels. It’s still cheaper than paying for shipping. But don’t worry, below are some ways I get around these problems.

So if you love to craft but can’t afford to splurge, there are still ways to achieve beautiful creations using thriftier methods. Read on to see my tips:

*Disclaimer, I am not paid to advertise these companies, these are just the ones I use and in my opinion the cheapest products I can get in Canada and I wanted to share these money saving tips with other scrapbookers.

  1. ATG double sided tape
    Who doesn’t love ATG tape or just using double sided tape in general? But at 16.99 CAD for two rolls, I used to tape just the corners of a square and pray that my paper would stick…
    So here’s a cheaper alternative to ATG tape, check out The Tape Depot

    For ~$26 USD, you can get 12 rolls of ATG-compatible double sided tape at a variety of sizes. My favorite size is 1/4 inch. This comes out to just over 2 bucks a roll! Much better than $8.50 per roll from Michaels and many other scrapbookers claim that this tape works even better than 3M brand ATG tape!

  2. Silhouette Cameo Accessories and ProductsThe Silhouette online store has a full line of silhouette products but they’re usually slightly more expensive than other online stores (but still half what they charge at Michaels).Some of the best prices I’ve found in Canada are on amazon. You can usually get mats, blades and tools for a few dollars cheaper and they’re often part of amazon prime or offered as part of a free shipping deal. For example, I can often buy blades for 10-12 dollars each.

    Others have used Silhouette “compatible” blades like the Graphtec CB09 which can cost only 2 dollars a blade. I’ve personally not tried this before but many claim that the blade stays sharper even longer than the silhouette brand ones.

    BLACK FRIDAY DEALS on the Silhouette online store
    There are really no silhouette deals like the silhouette black friday machine and accessory bundles. For example, a portrait bundle for $99. If ever my cameo broke, I’d wait until black friday to replace it, or if I wanted to try one of their new machines like the Mint. It’s the same price as normal but they throw in extra accessories.

    Check out the silhouette online store here.

    The Silhouette Design store has monthly design sales for up to 50% off. Sign up for their newsletter to be notified of all their deals.

  3. Heat Transfer Fabric/Vinyl       Heat transfer material is so awesome but they cost 16.99 a roll on the Silhouette website and $24 bucks at Michaels and you only get about 3 feet of the stuff. I can usually make…maybe 2-3 T shirts per roll.Well, there are a ton of websites out there that sell high quality heat transfer material or adhesive craft vinyl (not heated, just for sticking on smooth surfaces) for much cheaper. One I’ve used recently is Flex Heat Transfer Vinyl.
    Heat transfer and craft vinyl for $3-4 dollars a sheet and it comes in a 12″x 20″ sheet so that it feeds directly into my silhouette cameo.

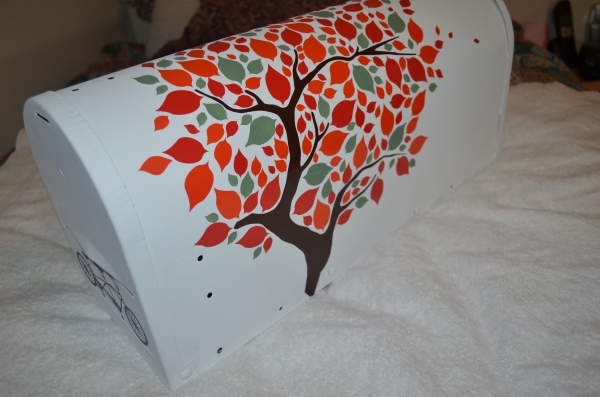
    Check out the mailbox I made for my friends for their wedding using the craft vinyl: DSC_0403

  4. EmbellishmentsStickers and gemstones can be quite pricey but there are many nice adhesive rhinestones and 3D stickers, ribbons and storage containers from your local dollar store.
  5. Eyelets and BradsEyelets are commonly used in sewing and fashion and you can often find a variety of simple eyelets from fabric stores for very cheap. I get mine from Dressew for 25 cents for 50-100 eyelets. Yes, that’s 25 cents! They also sell a plethora of ribbons, beads and flowers for all your crafting needs. They also have a scrapbooking section but I find the quality of the products not up to my standards. But they would certainly be useful to someone trying out scrapbooking for the first time because they’re very cheap.
  6. Michaels CouponsMichaels sends out coupons every week and their best ones are the 50% off one regular priced item or the 25-30% off entire regular and sale purchase. Never buy anything from Michaels for full price because they mark up their items by like 300%.Best part is you don’t have to print out the coupons, just show them on your smartphone. You can find Michaels coupons on their website flyer.
  7. Pay US shipping prices (often free) even if you live in Canada.                   This tip only applies to people who live close to the US border. Ship your items to a shipping and receiving company (like Hagen’s of Blaine) and drive across the border to pick it up. And fill up on the cheap gas while you’re there!


There are many other cost cutting methods I use but they typically involve keeping an eye out for clearance items and finding deals. There are lots of deals at Michaels but the best ones usually sell out immediately so check back often or just be lucky!

What are some of your money-saving tips? Share them below!


Hack: Prevent wet paper from wrinkling when dry using a sticky mat

As a lover of multiple forms of media when I do my crafting, I thoroughly enjoy using Tim Holtz’s distress mediums, adding water, watching the inks react. I also enjoy water coloring on my cards and projects. But the worst thing is when your wet media wrinkles the paper you’re working on.

Here’s another trick I discovered to prevent your paper from wrinkling.

  1. Obtain a Silhouette Cameo, Cricut or Sizzix adhesive cutting mat.

  1. Use either watercolour paper or multimedia paper. These can be purchased from any art store.

    Here is an example of a watercolor pad. I recommend getting the ones without the coil binding or getting the ones with the easy to rip little dotted cut marks on the inside. I forget what those are called.
  2. Apply your watercolor paper to the sticky mat. Make sure the edges are tacked down. If your mat is old, use a little temporary double sided adhesive on the underside of your paper to stick down the edges. Make sure ALL THE EDGES have adhered to the mat otherwise you’ll get wrinkles. The body of the paper does not need to be sticking to the mat so don’t worry if you have an older mat.
  3. Apply wet media. Inks, paints, water, etc.
  4. Let dry completely.
  5. Carefully remove the sheet from the sticky mat.

Troubleshooting:

  1. The paper wrinkled when I applied wet media.
    Solution: This is normal, the paper will wrinkle as it absorbs the liquid and expands. Just let it dry, it will contract and shrink back to be flat again just as long as you do not remove the paper from the mat before it fully dries.
  2. The paper is still wrinkly even though I let it dry completely on the mat.
    Solution: Always ensure the edges of the paper are all completely adhered to the mat. Check the paper you’re using. Watercolor paper is a heavier weight paper, unlike most cardstocks that don’t work very well with wet media even if you use any variety of methods to prevent wrinkling. The paper just wasn’t designed for media work like watercolor artist paper is.
    Solution: Try ironing it with a cloth between the paper and the iron to prevent burning.

Post a comment below if you have any questions or need help with this method!

Hack for the Silhouette Cameo Print and Cut – Read Registration Marks Fail

silhouettemainimage1

09-13-15 UPDATED SOLUTION AT THE BOTTOM
To avoid making the same silly mistake I did haha!

I don’t know why after the recent Silhouette studio software overhaul to version 3 there have been so many issues with my print and cut feature that I never experienced before with the old Studio software. Even with the most recent update V3.36 I still encounter the same issues. Looking around on the web hasn’t really fixed my problem because most people claim something magical and random happens when they try a combination of different things like load and unload or turn the machine on or off.

But with my issue, I found that the laser scanner just wasn’t moving the cutting mat far enough to even read the registration marks.

I’ve tried to do the whole manual registration function but I’ve never managed to get it to work, I’m not sure if I’m just doing it wrong or if this manual read function is just bogus.

Regardless, I found a solution to my problem and here’s my hack for getting the silhouette cameo to read the registration marks every time:

  1. Select image to print and cut.
  2. Print image with registration marks.
  3. Adhere printed sheet with registration marks to cutting mat.
  4. Feed/load the cutting mat into the machine.
  5. Turn off the machine. Yes, turn off the machine. Do not remove the cutting mat from the machine when you do this.
  6. Once the light is off, turn the machine back on.
  7. Press “enter” to load the cutting mat again. This will feed the mat a little further in, tricking the machine to think that it’s feeding it the first time around but this time the mat will actually feed more than if you unloaded and loaded again.
  8. In the Silhouette Studio software, press “send to silhouette”.
  9. Sit back and watch the magic happen.

I hope that this hack is useful to some of you who are having a heap of trouble with the print and cut feature like I was. There must be a solution to this problem that I’m missing, perhaps a calibration issue. I’ll keep doing my research and once I find out a solution, I’ll post it.
But in the meantime, if you were having the same problem as I was, perhaps this will solve your issues.

Another thing to consider is that I had to calibrate my cameo to work with my Pixscan mat as well which may have dislocated some virtual limb inside the machine.

Post your solutions/hacks to the Silhouette Cameo print and cut – registration marks fails below!

*UPDATE September 13, 2015
I figured it out.

Turns out on the machine before you even feed your material into the rollers, you use the up and down arrow keys to select whether you want to feed the cutting mat or other media not requiring cutting mat.

2015-09-13 15.49.53

On cutting mat option, the rollers feed the mat into further than with the “media” option. The “cutting mat” option is required for the print and cut function to work. I had selected the “media” option by accident and didn’t realize it, that’s why the rollers weren’t feeding my cutting mat far enough into the back of the machine for the registration marks to read. So there you go. If ever you run into the same problem as me, just double check your selection on the machine control screen. (See where that big black dot is on the upper left side of the screen? That’s the option you’ve currently selected.) Use the arrow keys to change it to the correct type of media.

I’ve tried manually reading the registration marks. I don’t quite understand why they have this function because it has never worked for me even when I have the correct feeding function selected.

Lucky St. Patty’s freebie – Nespresso grand crus holder/organizer

*update May 20, 2018
A nice visitor to my blog informed me that my old link no longer works so I’ve transferred the file to Dropbox. Just click the link here or below to access the free dispenser file! 


Happy March!

It’s the happiest month of the year, there is no better better month than March!

So in celebration of March and Saint Patrick’s day, I’ve created an organizer/holder for the nespresso grand crus. I didn’t want to shell out the money to pay for one because they’re so expensive.

Download the Nespresso dispenser here!

So I used my silhouette cameo to print 4 of them and then I assembled them by folding along the dotted lines.

2014-1

You can also line them up one next to the other so you have a row of them. You just insert the rectangular tubes in after opening. Every time you want to have a nespresso, just lift the box of the flavour you want and one capsule will pop out!

So easy! So this is how I’ve been storing my nespresso capsules!

2014-2

I would love to hear your comments or suggestions for improvement!

Enjoy~

Kitty Cat Silhouette Christmas Card

I’ve been meaning to upload a few last minute christmas cards that you could whip up really quickly. If you’re anything like me, you’ll likely be trying to pump these out the night before you meet your loved ones and friends so burning the midnight oil well into the night isn’t ideal. But not to worry this next card is so simple to complete, it is literally just choosing a design, some pasting work, add a little bling and you’re done!

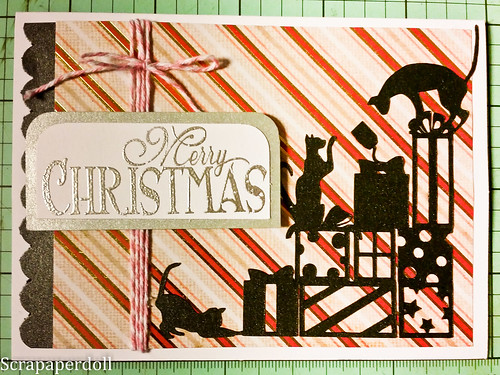
Kitty cat christmas card

For this project I used my silhouette studio with the following design from the design studio: Cats on stack of presents.

I cut it out on shimmery black cardstock to give it some vibrancy for the holiday season. Likewise my scalloped border was punched out using the same shimmery cardstock.

Kitty cat christmas card

Then I selected a festive background from my stash of Christmas papers and applied the cat silhouette on top and scalloped border on the back. I then wrapped the piece in pink baker’s twine.

Afterwards, I stamped merry christmas with one of my hero arts christmas stamps using clear versamark and heat embossed with fine silver powder. I adhered this sentiment on a back piece of silver cardstock and then used foam dots to apply the sentiment on top of the baker’s twine.

Finally, I applied the whole piece to a 4.5×5 inch cream card using double sided tape.

Bingo Embossed Christmas Card

This card was so simple and easy to make using my Silhouette Cameo and quite frankly a lot of fun since I love cats. I had a great time being able to incorporate some of my favorite pets in a craft project.

But if you don’t like cats or you don’t have this particular sihouette cut out on hand, essentially any silhouette shape can work with a patterned background. Then a sentiment placed on top using foam dots to make it more 3D.

Have fun making this card, it’s great as a last minute card creation!

Graphic Tees using my Silhouette Cameo!

A few weeks ago, my boyfriend and I celebrated our anniversary and being the nerdy scientist I am, I decided to make us some couple T shirts with a video game theme.

So I hopped over to Michaels to pick up a box of white heat transfer material and picked a few simple cotton tees from Joe Fresh at superstore.

White Heat Transfer Material

I found this really fabulous idea from Matt Allison’s blog for couples tees where one wears pacman and the other wears ghost! I couldn’t use the template that’s on his site but I did find some similar images which I imported into silhouette studio. There are lots of tutorials on youtube which show how to do this. Here’s one from Kristina Werner from KWerner designs.

After cutting out the heat transfer material, I eyeballed where the designs should go and ironed these babies on! Initially I had a really tough time trying to iron the cut outs. The box says to use a piece of cotton over top but scrapbook bloggers online suggest using a thin heat proof material like the liners that you use to cover the bottom of your oven. Alternatively you can also use the Ranger nonstick mat.

A neat trick if you want to save a few bucks is just go to a hardware/department store and pick up a sheet of oven liner. It’s essentially the same thing as a the much more expensive Ranger non stick mat.

Here are the T-shirts I made:
Graphic Tee Design JW 2014-1
I just love how these Tshirts turned out! They’re so vintage and simple! I loved the white on black because that’s how the video games used to be, just white characters on a black screen and this totally embraces that era.

Soon after, a few of my friends were having birthdays and I thought it would be totally fun and personal to gift them a graphic tee. These were my friends from highschool, then university and everyone’s moved onto bigger and better things. But being science majors we all still have a bit of nerdy inside of us.

So I made them these:

This T shirt features the elements oxygen and magnesium off the periodic table.
Graphic Tee Design JW 2014-3
And my other friend loves playing video games, we used to play our Nintendo DS together during breaks from class and her favourite game was super mario world!

So I thought this 1 up mushroom tee was super suitable for her:
Graphic Tee Design JW 2014-4


I loved it so much I couldn’t help but try it on hahahahaha

Graphic Tee Design JW 2014-2

Ignore the weird light spot on my nose…THIS IS NOT A NOSESTRIP hahaha

I’m so excited about exploring the possibilities and combining different colours and more elaborate patterns! So look forward to my next creations!


Calendar Style Birthday Card

Calendar Style Birthday Card

I made this card for my BFF a few months back for her birthday but just got around to uploading it. Sorry for being MIA for a while, my studies have been so super busy! I went away to present my research at a conference and although it was probably one of the best experiences of my life, it also left me very little free time for a while.

But I’m back in the game and super excited to share with you all my most recent creations, starting with the least recent haha!

I really wanted to showcase when my BFF’s birthday was which is the 29th of December so I printed out, stained and distressed a calendar that I found online.

I used some glimmer mist in Rouge and Cork using my technique on how to prevent paper from wrinkling after soaking it in wet media and letting it dry. You can find that tutorial here.

Once it dried, I stamped some swirls using Versamark and transparent embossing powder. You can see the glimmer mist underneath of it that way.

Then I just finished up the card by adding a gemstone over the top of the 29th of December because that’s the date of her birthday. And then I just embellished with a flower (I don’t remember what it’s called, an accordion flower? Somebody help!) I cut out with my Silhouette Cameo, but you can also use a Tim Holtz die to do that.

I mounted the calendar onto another piece of cardstock which I punched with a Martha Stewart doily punch just on one edge and then distressed the edges with Vintage Photo. 

Finally I mounted everything onto a card with a pretty pink background I dug out from my scraps stash from DCWV Garden Tea Party Stack.

Share your comments below!