Category Archives: Christmas

Copic marker-colored Christmas cards

It’s been some time since I made a post, almost half a year in fact. My time flies! Life has been eventful in many good ways and I’m looking forward to sharing with you all many of my creations these past few months.

This slideshow requires JavaScript.

But first off, I’d like display some of the Christmas cards I’d made for my friends and family this past Christmas. Copic colouring has become a new hobby of mine and because they’re so pricey, I managed to snag a few cheaper knock off alcohol markers on Aliexpress. I’ll put up a blog post about that soon but from my initial foray into alcohol markers, they seem to work quite well!

I wanted a cute and wintery theme for my cards so I used my Hampton Art Stamp and Die set – Penguins.
SC0714 Stamp & Die Set - Penguins

In order to use this die you need to have a Sizzix or cuttlebug die-cutting machine.

I stamped the image of the penguins using Memento in Tuxedo black by Tsukineko which is one of the best dye inks for alcohol marker coloring. After coloring the penguins, I cut them out using the penguin die.

To decorate the cards I used a few different kinds of backgrounds, here are a few:

1. staggered snow fields. I used foam dots to create dimension on the snow fields. I used a blue cardstock as the background and stamped white snow flakes .

dsc_0585

2.  A fat ornament on an embossed background. I purposely made the ornament enormous so that it would take up half the card. I cut the ornaments out using my silhouette cameo to the size I wanted. Finally I decorated the ornaments with rhinestones or ribbons.

Finally I used a banner with a white embossed greeting and attached the penguins with a foam dot to make it 3D.

I loved the rhinestone-embellished ornament so much that I made card featuring just the ornament on an embossed background!

Well that’s it I hope you enjoyed these cards and stay tuned for more!


New Year’s sticky toffee pudding recipe

The only way to bring in the new year or the holiday season in general is sticky toffee pudding! I had my first taste of this sweet gooey goodness was at a craftfair where a burly Scottish brute of a man decked in full kilt attire shoved an enormous mouthful of the stuff in my face. When a big burly scotsman shoves pudding in your face, you don’t say no! But I fell in love instantly…with the pudding, not the scotsman haha!

So I rushed home to search for a recipe that would capture the intricate mix of flavours I tasted in that pudding for the satisfaction of my enjoyment all year round. But most of the recipes I found were brown sugar-based but I wanted the deep and intense flavour of molasses. Admittedly some recipes did have some molasses but only a tablespoon or 2 in the whole recipe which in my opinion…is just weak sauce.

So I made my own and adapted it from a few different recipes.

sticky toffee pudding

Sticky Toffee Pudding Recipe – Scrapaperdoll Edition

Cake

1 cup chopped dates

2/3 cup hot water

1/4 cup butter – softened

1/4 cup brown sugar

1 large egg – room temperature

4 tablespoons dark molasses

2 tsp vanilla extract

1 cup cake flour (very important to use cake flour, not all purpose flour)

1 tsp salt

1/2 tsp baking powder

1/4 tsp baking soda

Sauce

1/4 cup brown sugar

2 tbsp butter

2 tbsp dark molasses

pinch of salt

1/2 cup heavy cream – heated slightly so as not to be as cold as the fridge

Instructions

  1. Preheat oven to 350°F. Butter 4 small baking cups. I recommend the Michaels ceramic baking dishes.

    ceramic baking dish

  2. Add hot water to chopped dates to soften the dates. Set aside.
  3. Cream butter and brown sugar using a spatula until well combined.
  4. Beat the egg, add the molasses and vanilla. Combine with the butter mixture.
  5. Sift Flour, baking powder, salt and baking soda in a separate bowl. Mix well. Gently fold the flour mixture with the butter/egg mixture until the batter is just combined.
  6. Use a blender or food processor to purée the dates and hot water. It doesn’t have to be the consistency of butternut squash soup, just smaller pieces with a few chunks is fine. The chunks add a bit of texture differences in the cake but not too much so that it interferes with the normal chemistry of the cake-baking.
    Fold the dates into the cake batter.
  7. Pour batter into the ceramic baking dishes and set the baking dishes onto a baking sheet. Pop into oven and bake for 25 minutes or until the a toothpick inserted in the top comes out clean.
  8. While the cake is baking, make the sauce. Add the brown sugar, butter, salt and molasses to a sauce pan and cook the sugar mixture on medium heat with gentle stirring every 30 seconds until the mixture thickens. It’s difficult to tell when the sugar caramelizes because it’s already dark coloured but use your nose. You can smell when it begins to caramelize but be sure not to burn the sugar.
  9. Once the mixture thickens to your liking, gently stir in 1/4 cup of the warmed cream. Reserve the other 1/4 cup. Don’t use cream directly from the fridge because it may cause the sugar to sieze. Heat the cream in a separate sauce pan slightly to bring it to room temperature.
    Gently add 2 more tablespoons of cream after a few minutes from the reserved 1/4 cup. Once the mixture has thickened, bring it off the heat and let it sit until the cake has finished baking.

    Troubleshooting: If the butter separates from the mixture, gently stir in more of the reserved cream on the stove one tbsp at a time until the butter incorporates into the sauce and it thickens again.

  10. When the cake is done baking, invert while still hot onto a plate and generously pour the hot sauce over the cake. Serve with a piping mug of coffee…or spiced rum haha!

This cake is the softest moistest cake I’ve ever made, even without the toffee sauce, this is an amazing cake, the sauce just pushes it over the edge! I can definitely use the cake with a glaze or ganache. It is just so flexible! Instead of dates, I can even use figs or cranberries as well.

Enjoy and leave your comments below!

5 craft fair treasures for the thrifty crafter in need of inspiration

I recently visited a few craft fairs before Christmas. One was at the PNE forum called Make It! and the other was at the local Croatian Cultural Centre which was jovially called the “Last Minute Christmas Market” as it was held quite close to Christmas day. I love attending craft fairs because they’re so full of ideas, creativity, imagination and inspiration. I’m always amazed by what people can accomplish using simple every day materials. Below are a few examples of the wonderful things I saw.

*Disclaimer: I don’t make royalties for posting the following vendors on my blog, I just thought they were pretty awesome and I would like to share them with the world.

List of awesome inspiring creations found at the craft fairs:

1. Repurposed books and book covers

Someone was selling journals and coasters and intricate hanging art made from repurposed old books. Below is an example from another person’s online store…I couldn’t find the original one that I saw, but you get the idea.

repurposed book cover journal

Here’s a link for more ideas and instructions on how to make your creations from old books you have lying around.

2. Vanilla Beans

Lots of people were selling cheap vanilla beans, some places were 2 beans for $5, I even saw 5 beans for $12 which is really a steal considering they can go for $12 per bean in some places. So I definitely recommend stocking up on vanilla beans when you visit craft fairs. They’re usually hidden in random food stands but you’ll find them.

3. Coconama Gourmet Chocolates

A japanese chef has been spreading the love of gourmet ganache chocolates all over town at basically every craft fair I’ve been to. And let me tell you, his chocolates are divine!

They’re creamy, soft, delicate and bursting with flavour. He takes draws on a lot of his asian roots and creates really unique flavours like lemon basil, cherry blossom, dark chilli but the best by far is matcha. You can tell that the chef uses only the finest ingredients and even the white chocolates were very flavourful. Usually I don’t like white chocolates because they’re just overwhelmingly sweet, but not these ones, these are mostly just full of flavour with just the right amount of sweetness.

I definitely recommend trying out these chocolates or you may find some other delicious gourmet chocolates you might find at your local craft fairs. But if you’d like a taste of these gourmet goodies, you can purchase them online here at www.coconama.com.

4. Essential Oils

Essential oils are generally pretty pricey, if any of you make your own soap or own a nebulizer, you’d know what I’m talking about. In general, a 5 ml bottle costs between 12-30 dollars at places like Saje and Escents. But at craft fairs, a multitude of people will some sell them at a 10-50% discount. You can usually find them at the stands for homemade soaps, lotions, and candles.

For example I bought a 20 ml bottle of 100% lavender oil sourced from France for 15 dollars. It has a nice intense scent, not weak like other lavender oils I’ve sniffed.

lavender oil

I even found a stand devoted solely to selling essential oils. But I do have to warn that you should go into some trusted stores like Saje to have a sniff of the essential oils so you know what you’re looking for. Make sure to check:

1. where they sourced the oils

2. pricing from one oil to the next, different oils should cost differently. It should be a clear flag for fraudulence if the oils all cost the same price.

3. storage bottles – the bottles should be dark coloured to protect from light which damages the oils and reduces their quality.

4. how they smell – You should have some idea of how each oil is supposed to smell, if something smells foul or funky, it’s probably been contaminated or not what it’s advertised to be. Just trust your senses.

5. Crochet Garments

Scarves, hats, mittens, coats, mug cozies galore!

If you’re looking for some hand knit ideas and inspirations craft fairs are chock full of them. I didn’t want to take pictures of any of the wares because I wasn’t planning to buy so it would look really bad if I did. Therefore I’ll show pictures that look like the creations I saw some of which are located at this 9gag post.

but you can find other things like cozies for your mugs and mason jars like these:

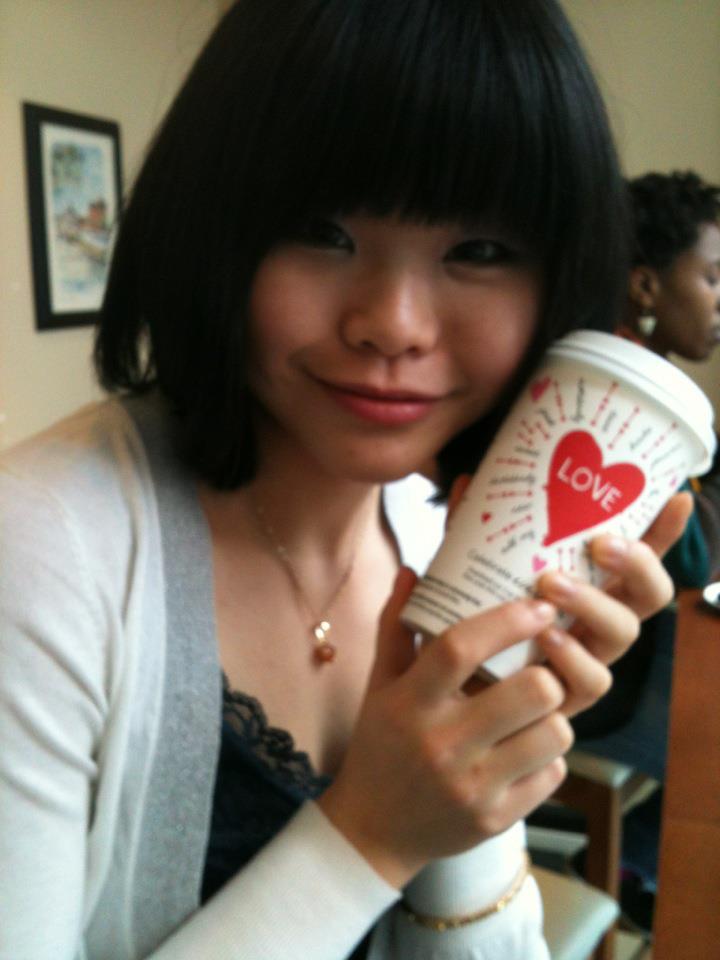
Here’s a cup cozy my BFF made for me for Christmas:

Cup Cozy

My caramel brule latte all warm and fuzzy coated in sheep. Hahaha, I call it sheep because she used real wool, not acrylic.

And there were so many knit items for babies, everything from blankets, to bibs to jackets and booties. If you don’t knit for babies, you will after attending a craft fair haha!

Bonus!

As soon as I saw these, I was instantly intrigued and in love with them:

Giggle

They’re called giggles and they’re a puppet that wraps around your arm. Sort of reminded me of a sloth wanting some cuddles. Feeling lonely? Need a friend? Need a hug? Not to worry, you’ve got all a cuddly friend in a Giggle!

You just put your arm through the puppet, then wrap the arms and legs around you which clip together likely via a Velcro attachment.

You can check them out here.

That’s it for now, so stop reading and go find a craft fair! They often come in the spring, fall and winter.

Kitty Cat Silhouette Christmas Card

I’ve been meaning to upload a few last minute christmas cards that you could whip up really quickly. If you’re anything like me, you’ll likely be trying to pump these out the night before you meet your loved ones and friends so burning the midnight oil well into the night isn’t ideal. But not to worry this next card is so simple to complete, it is literally just choosing a design, some pasting work, add a little bling and you’re done!

Kitty cat christmas card

For this project I used my silhouette studio with the following design from the design studio: Cats on stack of presents.

I cut it out on shimmery black cardstock to give it some vibrancy for the holiday season. Likewise my scalloped border was punched out using the same shimmery cardstock.

Kitty cat christmas card

Then I selected a festive background from my stash of Christmas papers and applied the cat silhouette on top and scalloped border on the back. I then wrapped the piece in pink baker’s twine.

Afterwards, I stamped merry christmas with one of my hero arts christmas stamps using clear versamark and heat embossed with fine silver powder. I adhered this sentiment on a back piece of silver cardstock and then used foam dots to apply the sentiment on top of the baker’s twine.

Finally, I applied the whole piece to a 4.5×5 inch cream card using double sided tape.

Bingo Embossed Christmas Card

This card was so simple and easy to make using my Silhouette Cameo and quite frankly a lot of fun since I love cats. I had a great time being able to incorporate some of my favorite pets in a craft project.

But if you don’t like cats or you don’t have this particular sihouette cut out on hand, essentially any silhouette shape can work with a patterned background. Then a sentiment placed on top using foam dots to make it more 3D.

Have fun making this card, it’s great as a last minute card creation!

Tutorial: fast last minute cards for every occasion

Have you ever gotten ready for bed on a Sunday night, hopped under the covers and curled up with a good book and then all of a sudden, you realized…you forgot to make an extra Christmas card for none other than your boss. So you bounce out of bed in a panic, what do you do? It’s already close to midnight!

So…being the clueless nut I often am I usually find myself in these awkward positions right before bedtime haha!

So I’ve designed a series of cards that follow a very basic pattern and they’re very easy to reproduce for many different occasions using the same basic pattern.

1. The banner bow card

20131222_014816-1

You need one banner piece that runs down the length of the card. Make it 1 to 1.5 inches wide and the length of your card minus 1/8th of an inch. Cut the bottom of the banner into an upside down “V”.

Tie a fat ribbon around the banner and adhere the knotted part of the ribbon onto the paper with a dot of glue.

Take a sheet of glimmery cardstock, such as Recollections shimmery paper lines including “gemstones” or “precious metals”. Make it 1/8th inch smaller than the size of your card on all four sides. Place the paper in an embossing folder of your choice and run it through a die-cut or embossing machine.

Then adhere the embossed sheet down to your card using your ATG.

20131222_014905-2

For the banner, I like to apply the “Rule of Thirds”, which is a photography/videography term. Imagine 2 lines diving the card vertically into thirds. Place the banner centred on one of the two lines. This makes the card look aesthetically appealing. Try this with other embellishments as well and you’ll notice that hey, your design looks really gorgeous.

2. Framed picture banner card

DSC_0161-1

This card follow the same pattern of banner placement as above. But this time instead of an embossed background, I just used a printed background, with a banner color that matched the background. Then i stamped an image of a snowman on a piece of vintage printed cardstock with a beige background and made a frame. Then I propped the framed snowman on the card using foam dots.

You can also embellish afterwards. I’ve put an eyelet on the top of the banner. but you can also embellish with other things like gemstones, flowers, etc.

3. Vellum double embossed card

20131222_015007-4

This card uses the same embossed background piece of metallic shimmery cardstock as the first card. Instead of a banner though, a die-cut piece of vellum is used to highlight the card. Stamp and heat emboss the vellum with any expression or image you’d like. then glue the vellum with small dots of glue to adhere it to the cardstock.

I’ve embellished the vellum with a holly sticker and 2 brass brads.

20131222_015002-3


These cards are all very easy to make and easy to reproduce. These patterns will come in handy in the event of an emergency and you need a last minute card.

Hope you have fun making and enjoying these cards and please share your creations too!

Next time, I’ll be doing a technique post on how to avoid wrinkly paper after using wet media.

Until then, tata!

How to make vintage manly holiday cards tutorial

Vintage Christmas Cards

I made a series of vintage-styled Christmas cards that would be perfect for a male recipient if ever you needed a Christmas card for a dude or maybe just a manly female?

These cards deviate from my normal use of scraps to make cards as the only scraps I used were for the inside of the card for writing a message. However many of the embellies you may want to use for these card styles.

Tools you’ll need:

1. Christmas printed paper

2. Black cards and envelopes

3. Scissors

4. Glue/ATG gun

5. Paper cutter

6. Foam dots

7. Border punch – EK success film strip punch

8. Corner punch

I used a paper stack from Recollections called “Joyful Christmas“. I’ve really been enjoying a lot of the recollections prints, their Christmas collections are really quite well done, maybe better done than many other designer brands out there. So if you’re looking for a versatile paper stack where all the papers just match up really well, try a Recollections stack.

All these cards were made using black cardstock for the card base which I bought at Michaels.

Vintage Christmas Cards

I made three different card styles and 4 cards using just one sheet of 12×12 striped cardstock for the background of all 4 cards! To decorate the background pieces, I used a corner punch from Fiskars.

Style 1: 

Vintage Christmas Cards

Vintage Christmas Cards

I used a fat strip of border paper but then realized that it was too…cream-colored and blended in with the background color. So to make it pop, there was a paper in the collection that was black with white polka dots and I used 2 strips of the black to border the strip of cream. I cut V’s into the ends of the each of the border papers.

The “Joyful Christmas” stack has many sheets of tags and frames that can be cut out. Many of them  have holiday sentiments that just fit so perfectly for a card front. You can also make your own, but I really liked these tags that I didn’t bother making my own.  Vintage Christmas Cards

style 2:
Vintage Christmas Cards

Vintage Christmas Cards
This card just has a fat band through the middle and a sentiment tag slipped into the middle of the band at an angle. I then cut out a glittery santa and used 3D foam dots to adhere it to the band. Super easy right?

Style 3:
Vintage Christmas Cards

Notice that the background of this card is a little different as it has a strip of red printed and glittered paper at the bottom. Go ahead, mix it up a bit!

For this card, I used my EK success film strip punch to punch long black strips of film to overlay the general card template of sentiment tag over background. Then you I used a “tis the season” sentiment on foam dots to add a sentiment to just above the middle of the card.

And there you are, 3 gorgeous, easy, simple and fast vintage cards for all your vintage needs! 

Have fun making these and please LIKE MY FACEBOOK PAGE if you enjoyed this tutorial!

Until next time!

Ribbon Card – Christmas style

DSC_0132-14

So I have a whole bunch of scrap ribbons that I always feel too attached to to throw out. Plus it’s such a waste and ribbon is not cheap!

Sometimes, when I’m working on a project and there’s just a little bit that I need to snip off except that it’s not long enough for a new project…I would save it in a small zip-lock bag and then create a card like this!

just snip little V’s into the ends of each piece of ribbon. It’s actually better if the pieces of ribbon are different in lengths. Then just put together a few pieces of ribbons that seem to match together.

Use double-sided tape or an ATG gun to glue down the ribbon because wet glue will seep through the fabric of the ribbons and show through.

Here I’ve made a Christmas style one using scraps of Christmas-colored ribbon from other projects.

Then I used a spellbinders frame die and my sizzix big shot to cut out half a frame to use as a border and put a Christmas sentiment on it.

That’s it! So simple and fast! I think i finished this card in about 15 minutes! The hard part was cutting the ribbon by hand haha~

Merry Christmas Ornaments Card

DSC_0098-1

This week I present one of my favourite Christmas cards, which is a great way to use up some chunks of scrap printed papers from other projects as you only need bits and pieces of prints. I recycle this style of card pretty much every year because it’s just so versatile and helps to creatively recycle pretty bits of papers.

DSC_0099-2

I cut the card front out of green metallic cardstock using my Silhouette Cameo by just cutting out circles of different sizes. This can also be achieved if you have movers and shapers die from Sizzix or a circle cutter from EK success or Martha Stewart.

I used a Martha Stewart punch to punch out white sparkly snowflakes out of a white metallic paper by Recollections.

And all the papers I used are from the Recollections Sugar Plums paper pad which I purchase from Michaels last year and created a cute Christmas mini album. I adhered medium silver gems onto the centre of the snowflakes.

DSC_0104-4

One of the papers was this quilted pattern, I glued these tiny silver gems on the crosses of the paper. I bought these silver embellies from the Michael’s 1.50 rack. Wish I’d bought more hahaha! They’re so versatile!

DSC_0102-2

Finally, I stamped “Noel” on the last ornament and embossed it in silver. This is a Studio G stamp which I purchased on sale for a dollar at Michaels last year. Then I tied a sparkly green ribbon on top. I wanted to tie a silver one, but I realized that I don’t have silver ribbon haha!

Then to finish everything off, I used a silver sharpie and just embellished the tops and bottoms of the ornaments and drew curly string so that it looks like it’s being hung from a tree. I guess taught string would have been more realistic but I’m not good at drawing straight lines hahaha!

So that’s it, so simple and versatile. You can do just about anything with the ornaments and use any variety of papers. Be creative and have fun with it!

You know those little strips of patterned paper that we often just toss away? Save them! Next up is a holiday card that highlights the use of scrap strips of pretty patterned paper. Look forward to it!

Thanks so much for enjoying this card and please “LIKE” my Facebook page in the upper right hand corner if you enjoyed this card and support my blog!

Christmas Card Tutorial: Peace Love Joy

DSC_0090-6

Today’s tutorial brings in elements of Christmas that really represent the holiday season. Everyone looks forward to reuniting with families and celebrating together, whether for religious reasons or simply to celebrate bring together over lots of turkey and pumpkin pie~ mmm yumm!

But sometimes these things are obscured by the glitz, the glam and bright lights. Which are beautiful but I wanted to look a little deeper past the surface at the joy, peace and love that give Christmas real meaning.

Thus I created this card which features a translucent centre piece with underlying embossing underneath.

So for this card, you’ll need the following materials:

DSC_0061-1

1. One 4 x 5.5 inch card in white

2. One sheet of coloured vellum 4.5 x 5.5 inches

3. Crop-a-dile or other hole punch

4. Holiday sentiment stamp

5. Versamark stamp pad

6. Heat tool

7. Champagne embossing powder

8. EK success embossing white powder to avoid nonspecific embossing powder from sticking to the paper (optional)

9. Champagne or gold ribbon 22 inches

10. Christmas-themed embossing folder, I’m using a pointsetta-themed embossing folder. I liked the pattern.

11. Die-cutting machine, I’m using a sizzix big shot

12. Quick-dry glue, I’m using Tombow mono-multi glue

13. Spellbinders Nestabilities in Romantic Rectangles, largest die in the set

Instructions:

1. Emboss the front of the card but only emboss the card 3/4 of the way from the bottom up.

DSC_0069-3

DSC_0066-2

2. Cut the vellum with the Spellbinders die so that it is 5 and 1/8 x 4 inches. This is much shorter than size of the actual die but i needed it to be shorter because otherwise it won’t fit the card! I can post a tutorial on how to do this if anyone needs it.

DSC_0074-4

3. Use the EK success powder tool and run brush all over the front of the vellum to deposit powder to prevent loose embossing powder from sticking to non-stamped regions of the vellum.

4. Ink up the stamp with Versamark embossing stamp pad and stamp the centre of the vellum. Immediately sprinkle champagne embossing powder over the the stamped area and shake off the excess. Use the heat tool to melt the embossing powder.

5. Put drops of wet glue such as Tombow Mono Multi Glue on the back of the vellum on areas where there was stamping/embossing. This is so that when you glue it down to the front of the card, you won’t be able to see the drops of glue since the vellum is see-through. Then glue the vellum to the front centre of the card.

DSC_0083-5

6. Punch 2 holes, 3/4 inch from the top and bottom of the card and half an inch from the left fold of the card. Run the ribbon through the back of the card and through the 2 holes so that the two ends of the ribbon come out through the front. Tie a bow along running from top to bottom of the card. Dab a small dot of glue under the ribbon so that the ribbon doesn’t flop around.

And that’s it! A very simple and easy card that can be whipped together in a half an hour!

DSC_0096-7

Any questions? Post a comment below! And don’t forget to check out my Facebook page for more ideas and inspiration (link on the top right hand corner).

Sparkly Layered Snowflake Card

DSC_0035-5
This week’s card tutorial brings a fusion of sparkly elegance and vintage chic. I really wanted to do something with layered snowflakes because they are just so lovely layered up with different shapes and sizes. My Silhouette Cameo came in so handy for this because I could pick and choose a variety of different snowflake shapes, resize them however I want to and bam! A layered snowflake haha!

I’ve been taking advantage of my scraps of white and mint cardstock to make my snow flakes.

This snowflake card has 2 different types of embossing, the card background with a sizzix embossing folder and heat embossing for the “Merry Christmas” tag.

The supplies are as follows:

DSC_0048-8
1. One 4.25 x 5 inch card in white with envelope

2. 3x snowflakes of varying sizes cut from scrap white and mint green cardstock. I used my Silhouette Cameo to cut mine which I purchased from the Silhouette store and edited the size and shapes to suit my needs. If you need help with this step, please don’t hesitate to contact me for details. Also, you can always download a few snowflakes and print them on cardstock, then cut them by hand. But if you don’t have a cameo, I highly suggest you add that to your wishlist. Honestly the best machine I’ve ever owned! And hope to own again and again and again!

4. Stamp pads: VersaMark embossing stamp pad and a silver metallic stamp pad

5. Stickles in Star Dust

6. Ultrafine Gold Crystal Glitter

7. “Merry Christmas” stamp and acrylic block if needed

8. Snowflake stamp

9. Make-up sponge

10. Die-cut machine christmas themed embossing folder, I’m using the Sizzix Swirls Ribbons and Snowflakes

11. Ranger Sticky embossing powder

12. Heat Tool

13. Bejewelled brad

14. Hole punch

15. Quick-dry wet glue

16. Foam dots

Instructions

1. Cut a 9.5 x 5 inch card out of white cardstock. Score it down the centre at 4.25 inches. Then place the front flap of the card in the embossing folder, fold the back half around the back of the embossing folder and then run it through your die-cut machine.
DSC_0026-1

2. Take the make-up sponge and ink up the sponge with the silver metallic stamp pad. Gently rub the sponge across the raised embossed front surface of the card. This gives the the front of the card a silvery and wintery sheen and also makes the embossing really pop!

DSC_0031-2

3. Cut out the 3 snowflakes of different sizes. Use a different shade of cardstock for the middle snowflake, like a mint green or baby blue. Decide how you are going to layer the snowflakes on the card. Punch a hole through the centre of each snowflake.

4. Take the snowflake that is going to be the top-most layer. Use the versamark stamp pad and ink the entire surface of the card. Generously sprinkle the Ranger sticky embossing powder over it. Gently tap off the excess. Use the heat tool to heat the powder and then immediately sprinkle white glitter over it. I used Crystal Glitter in Gold which is really just a white colour. Tap the back gently to release loose glitter. I accidentally overheated my sticky embossing powder and it left a burned reddish colour. I tried to cover it with the gltter but it still showed through…which is fine because the reddish colour adds to the vintage effect so it actually worked out for the best!

5. Take the middle layer snowflake and place it on a piece of scrap paper. Ink up the snowflake stamp with silver metallic ink and stamp it randomly over the front of the snowflake. The design won’t show up really well but it looks really cool and shimmery with the silver stamping. Don’t worry about being neat or using the same consistency of colour. Sloppy stamping will actually enhance the vintage effect.

6. Use Ranger stickles, put dots of glitter glue all over the snowflake. Set the snowflake aside to dry for at least 15 mins. You can blast it with your heat tool after the first 5 mins if you want to speed up the drying process. But it won’t look as lovely as letting it dry naturally.

DSC_0032-3

7. Cut a half inch-wide strip of scrap blue cardstock in green. Cut the length to the length of your “Merry Christmas” expression stamp plus an extra half inch. Stamp the Merry Christmas expression with versamark on the little blue tag and sprinkle silver embossing powder over it. Then melt the powder with the heat tool. Snip the corners of the tag with a “V” shape. See picture below if this doesn’t make sense. Punch a hole in the opposite end of the tag.

Layer the green tag and snowflakes as follows starting with the top-most snowflake: top glittered snowflake, blue tag, middle green snowflake, bottom-most white snowflake. Take the top layer snowflake, blue tag and the middle snowflake and glue them together with dots of wet glue making sure to match the punched holes. Then put foam dots on the back of the middle green snowflake, avoiding the punched hole, and then adhere that to the bottom-most snowflake making sure to match the punched holes of the snowflakes.

DSC_0033-4

8. Use the wet glue and adhere the layered snowflake to the embossed white card halfway down the card and to the left towards the folded edge. And then you’re done! Easy peasy!

And that’s it, a great way to use white and green scraps from other Christmas projects, or if you’re like me and can’t bear to part with scraps, then perhaps scraps from last year lol!

Hopefully you have as much fun making this card as I have and I would love to see your layered snowflake cards as well!!!

As always, if you liked this tutorial, please like my facebook page located on the top right hand side of this page.

Up next week, I’ve been meaning to do something with ribbons so look forward to a ribbon card project!

 
DSC_0040-6