Tag Archives: sparkly

Romantic Vintage Valentine’s Card with Textured Embossing

With valentine’s day just around the corner, I wanted to share my most recent card creation with you all. I bought some gesso a while ago and I hadn’t really had a good chance to use it so I decided to use it in this card.

I’ve titled this card Romantic Fairytale Dream, doesn’t it look like a fairytale from a little girl’s dream? When I was much younger, I used to dream about what it would be like to be a fairy tale princess, to rule over all the land, protect my people and save prince charming. Yes, I know it’s typically the other way around, but I had a lot of strong females as my role models growing up. Us girls can take care of ourselves, and then some.

Romantic Vintage Valentine's Card

I started out with a 5 x 4.5 inch white sheet cardstock which I embossed using a sizzix embossing folder. Unfortunately I forgot the name of the folder but it has diamonds with vintage damasks within each diamond.
To make the damask image really pop, I sprayed a sponge with glimmer mist and gently rubbed the sponge across the surface so that it only stains the raised parts of the embossed image.

Romantic Vintage Valentine's Card


To mask the border because I felt it looked a little strange that it was just empty space, I used gesso, or otherwise known as embossing paste, all around the edge and merging partly into the embossed image. Using my fingertips I dabbed with an up and down motion to give the paste some texture. Embossing paste typically takes a few hours to dry completely depending on how much was used. If it’s a really thick layer, I’d wait until overnight which I did in this case. It wasn’t a particularly thick layer but it I just wanted to be sure.

Romantic Vintage Valentine's Card

I proceeded to make my centrepiece now that the background was complete. Using a piece of pink vellum, I cut out a circular shape with rounded border using a Spellbinders die. I then used a carriage stamp to stamp and emboss the vellum with Versamark and champagne coloured embossing powder.

*note: Vellum is really delicate and it’s really easy to over heat and warp the vellum. Don’t put the heat tool too close to the vellum and switch from heating the front to the back frequently.

Using my Crop-a-Dile, I applied eyelets to the top and bottom of the vellum and threaded pink ribbon to attach the vellum circle to the card. I made a bow with the flapping ends of the ribbon at the top of the eyelet.

Romantic Vintage Valentine's Card

Using a Tim Holtz crown stamp, I stamped using gold ink on kraft cardstock. I fussy cut out the crown and applied it to the edge of the fancy embossed carriage.

I then stamped a rounded rectangle with the words “Dream” and applied that to the corner of the vellum circle using 3D foam dots. Then I used gesso to go over the edges of the sentiment piece. Finally using Liquid Pearls in Platinum I made little droplets on every other circle in the border. Then I let everything dry overnight.

Romantic Vintage Valentine's Card

So there you have it, a fancy vintage valentine’s card. Reminds me of a fairy tale of princes and princesses riding in pumpkin carriages, being carried to their magical destiny.  Romantic Vintage Valentine's Card


So there you have it! I hope you’ve enjoyed this card as much as I’ve enjoyed making it. Hope that this Valentine’s day, you can spend it with someone you love, whether that be your beautiful self or with someone who’s dear and special to your heart.

XOXO~

How to prevent wet paper from wrinkling when dried

One of the things that I hate about using wet media when scrapbooking or crafting is that afterwards, the paper dries all wrinkly and ugly. As much as I like the wrinkly look for SOME projects, I don’t necessarily like it for ALL of my projects. So, I’ve adapted one of the techniques I normally use for watercolour painting to prevent my paper from curling, developing ridges and overall looking anything other than smooth.

How to prevent wet paper from wrinkling when dry

Measure out a piece of cardstock for your project and add 1/2 inch to each of the four sides. Cut it out.
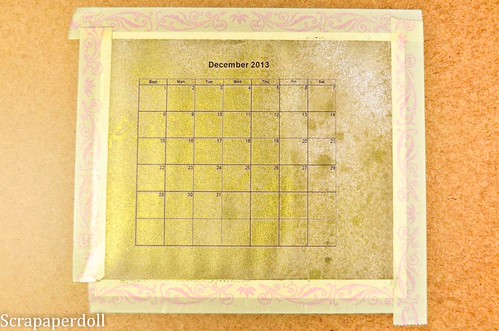
I’ve printed a picture of a calendar for a birthday card project and cut it down to size.

Tape that piece of cardstock to something hard, like a big fat heavy textbook or encyclopaedia. Or tape it to your craft table.

You can use washi tape or masking tape. Masking tape is better but whatever you have lying around is just fine.

I’m using washi tape in the above photo because I have this really terrible washi tape from K and Company’s Smash album. Terrible Terrible stuff. With a capital T. Thankfully, it won’t go to waste because I can just use it for taping stuff down like when I’m die-cutting for example.

MAKE SURE YOU TAPE DOWN EVERY ONE OF THE FOUR SIDES COMPLETELY.
This is essential to ensuring you have your desired final product free of wrinkles. If you miss even a little bit of the paper, you’ll have an imperfect paper after it dries. But hey, maybe that’s what you were going for?

How to prevent wet paper from wrinkling when dry

Spray your favourite glimmer mist or use your distressing inks or water colour pencils, etc. Have fun, go crazy, make a mess, it’s all good!

Mine looks like this after:

How to prevent wet paper from wrinkling when dry

Now let it dry completely.

It should look like this!
How to prevent wet paper from wrinkling when dry

See how flat it looks?

How to prevent wet paper from wrinkling when dry

And this is how it looks after I’ve cut it out!

I’m using a rectangle piece of cardstock for my project, but your project may need a different shape. Just use this method to ink up a larger sheet of cardstock and cut/punch out your desired shape after the paper dries. So simple right?

TROUBLESHOOTING

1. Tape lifts up from page after applying wet media.

Possible reasons why:

– Your tape is probably not suitable for wet media projects. Try masking tape, it’s awesome!
– You didn’t press your tape down firmly and there was a gap somewhere. It’s ok, just remove the piece that became unstuck, try to blot the wet area with a paper towel and then stick another piece of tape over it.

2. The paper dried wrinkly

Possible reasons why:

– Your cardstock was too thin. This technique doesn’t work with paper unfortunately because paper is so thin it’s flexible and can stretch a bit when wet. Try using a thicker cardstock next time like Baziill. I’m using Recollections cardstock here which works ok, not the best but ok…it’s cheap.

– Your tape may have come loose upon applying wet media or during the drying process. See above solutions.

And that’s it! Post a comment below if you have questions, this technique allows me to create vintage yet neat projects which I really love!

Have fun with all your wet media!