Tag Archives: recollections

How to prevent wet paper from wrinkling when dried

One of the things that I hate about using wet media when scrapbooking or crafting is that afterwards, the paper dries all wrinkly and ugly. As much as I like the wrinkly look for SOME projects, I don’t necessarily like it for ALL of my projects. So, I’ve adapted one of the techniques I normally use for watercolour painting to prevent my paper from curling, developing ridges and overall looking anything other than smooth.

How to prevent wet paper from wrinkling when dry

Measure out a piece of cardstock for your project and add 1/2 inch to each of the four sides. Cut it out.
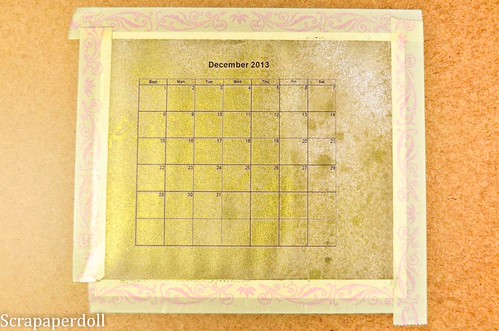
I’ve printed a picture of a calendar for a birthday card project and cut it down to size.

Tape that piece of cardstock to something hard, like a big fat heavy textbook or encyclopaedia. Or tape it to your craft table.

You can use washi tape or masking tape. Masking tape is better but whatever you have lying around is just fine.

I’m using washi tape in the above photo because I have this really terrible washi tape from K and Company’s Smash album. Terrible Terrible stuff. With a capital T. Thankfully, it won’t go to waste because I can just use it for taping stuff down like when I’m die-cutting for example.

MAKE SURE YOU TAPE DOWN EVERY ONE OF THE FOUR SIDES COMPLETELY.
This is essential to ensuring you have your desired final product free of wrinkles. If you miss even a little bit of the paper, you’ll have an imperfect paper after it dries. But hey, maybe that’s what you were going for?

How to prevent wet paper from wrinkling when dry

Spray your favourite glimmer mist or use your distressing inks or water colour pencils, etc. Have fun, go crazy, make a mess, it’s all good!

Mine looks like this after:

How to prevent wet paper from wrinkling when dry

Now let it dry completely.

It should look like this!
How to prevent wet paper from wrinkling when dry

See how flat it looks?

How to prevent wet paper from wrinkling when dry

And this is how it looks after I’ve cut it out!

I’m using a rectangle piece of cardstock for my project, but your project may need a different shape. Just use this method to ink up a larger sheet of cardstock and cut/punch out your desired shape after the paper dries. So simple right?

TROUBLESHOOTING

1. Tape lifts up from page after applying wet media.

Possible reasons why:

– Your tape is probably not suitable for wet media projects. Try masking tape, it’s awesome!
– You didn’t press your tape down firmly and there was a gap somewhere. It’s ok, just remove the piece that became unstuck, try to blot the wet area with a paper towel and then stick another piece of tape over it.

2. The paper dried wrinkly

Possible reasons why:

– Your cardstock was too thin. This technique doesn’t work with paper unfortunately because paper is so thin it’s flexible and can stretch a bit when wet. Try using a thicker cardstock next time like Baziill. I’m using Recollections cardstock here which works ok, not the best but ok…it’s cheap.

– Your tape may have come loose upon applying wet media or during the drying process. See above solutions.

And that’s it! Post a comment below if you have questions, this technique allows me to create vintage yet neat projects which I really love!

Have fun with all your wet media!

How to make vintage manly holiday cards tutorial

Vintage Christmas Cards

I made a series of vintage-styled Christmas cards that would be perfect for a male recipient if ever you needed a Christmas card for a dude or maybe just a manly female?

These cards deviate from my normal use of scraps to make cards as the only scraps I used were for the inside of the card for writing a message. However many of the embellies you may want to use for these card styles.

Tools you’ll need:

1. Christmas printed paper

2. Black cards and envelopes

3. Scissors

4. Glue/ATG gun

5. Paper cutter

6. Foam dots

7. Border punch – EK success film strip punch

8. Corner punch

I used a paper stack from Recollections called “Joyful Christmas“. I’ve really been enjoying a lot of the recollections prints, their Christmas collections are really quite well done, maybe better done than many other designer brands out there. So if you’re looking for a versatile paper stack where all the papers just match up really well, try a Recollections stack.

All these cards were made using black cardstock for the card base which I bought at Michaels.

Vintage Christmas Cards

I made three different card styles and 4 cards using just one sheet of 12×12 striped cardstock for the background of all 4 cards! To decorate the background pieces, I used a corner punch from Fiskars.

Style 1: 

Vintage Christmas Cards

Vintage Christmas Cards

I used a fat strip of border paper but then realized that it was too…cream-colored and blended in with the background color. So to make it pop, there was a paper in the collection that was black with white polka dots and I used 2 strips of the black to border the strip of cream. I cut V’s into the ends of the each of the border papers.

The “Joyful Christmas” stack has many sheets of tags and frames that can be cut out. Many of them  have holiday sentiments that just fit so perfectly for a card front. You can also make your own, but I really liked these tags that I didn’t bother making my own.  Vintage Christmas Cards

style 2:
Vintage Christmas Cards

Vintage Christmas Cards
This card just has a fat band through the middle and a sentiment tag slipped into the middle of the band at an angle. I then cut out a glittery santa and used 3D foam dots to adhere it to the band. Super easy right?

Style 3:
Vintage Christmas Cards

Notice that the background of this card is a little different as it has a strip of red printed and glittered paper at the bottom. Go ahead, mix it up a bit!

For this card, I used my EK success film strip punch to punch long black strips of film to overlay the general card template of sentiment tag over background. Then you I used a “tis the season” sentiment on foam dots to add a sentiment to just above the middle of the card.

And there you are, 3 gorgeous, easy, simple and fast vintage cards for all your vintage needs! 

Have fun making these and please LIKE MY FACEBOOK PAGE if you enjoyed this tutorial!

Until next time!

Merry Christmas Ornaments Card

DSC_0098-1

This week I present one of my favourite Christmas cards, which is a great way to use up some chunks of scrap printed papers from other projects as you only need bits and pieces of prints. I recycle this style of card pretty much every year because it’s just so versatile and helps to creatively recycle pretty bits of papers.

DSC_0099-2

I cut the card front out of green metallic cardstock using my Silhouette Cameo by just cutting out circles of different sizes. This can also be achieved if you have movers and shapers die from Sizzix or a circle cutter from EK success or Martha Stewart.

I used a Martha Stewart punch to punch out white sparkly snowflakes out of a white metallic paper by Recollections.

And all the papers I used are from the Recollections Sugar Plums paper pad which I purchase from Michaels last year and created a cute Christmas mini album. I adhered medium silver gems onto the centre of the snowflakes.

DSC_0104-4

One of the papers was this quilted pattern, I glued these tiny silver gems on the crosses of the paper. I bought these silver embellies from the Michael’s 1.50 rack. Wish I’d bought more hahaha! They’re so versatile!

DSC_0102-2

Finally, I stamped “Noel” on the last ornament and embossed it in silver. This is a Studio G stamp which I purchased on sale for a dollar at Michaels last year. Then I tied a sparkly green ribbon on top. I wanted to tie a silver one, but I realized that I don’t have silver ribbon haha!

Then to finish everything off, I used a silver sharpie and just embellished the tops and bottoms of the ornaments and drew curly string so that it looks like it’s being hung from a tree. I guess taught string would have been more realistic but I’m not good at drawing straight lines hahaha!

So that’s it, so simple and versatile. You can do just about anything with the ornaments and use any variety of papers. Be creative and have fun with it!

You know those little strips of patterned paper that we often just toss away? Save them! Next up is a holiday card that highlights the use of scrap strips of pretty patterned paper. Look forward to it!

Thanks so much for enjoying this card and please “LIKE” my Facebook page in the upper right hand corner if you enjoyed this card and support my blog!