Category Archives: Cards

Copic marker-colored Christmas cards

It’s been some time since I made a post, almost half a year in fact. My time flies! Life has been eventful in many good ways and I’m looking forward to sharing with you all many of my creations these past few months.

This slideshow requires JavaScript.

But first off, I’d like display some of the Christmas cards I’d made for my friends and family this past Christmas. Copic colouring has become a new hobby of mine and because they’re so pricey, I managed to snag a few cheaper knock off alcohol markers on Aliexpress. I’ll put up a blog post about that soon but from my initial foray into alcohol markers, they seem to work quite well!

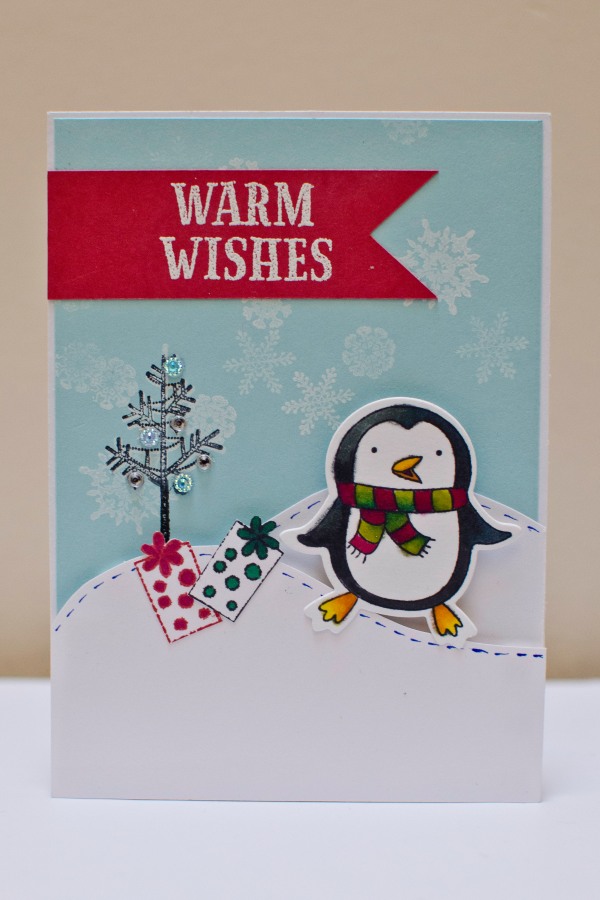
I wanted a cute and wintery theme for my cards so I used my Hampton Art Stamp and Die set – Penguins.
SC0714 Stamp & Die Set - Penguins

In order to use this die you need to have a Sizzix or cuttlebug die-cutting machine.

I stamped the image of the penguins using Memento in Tuxedo black by Tsukineko which is one of the best dye inks for alcohol marker coloring. After coloring the penguins, I cut them out using the penguin die.

To decorate the cards I used a few different kinds of backgrounds, here are a few:

1. staggered snow fields. I used foam dots to create dimension on the snow fields. I used a blue cardstock as the background and stamped white snow flakes .

dsc_0585

2.  A fat ornament on an embossed background. I purposely made the ornament enormous so that it would take up half the card. I cut the ornaments out using my silhouette cameo to the size I wanted. Finally I decorated the ornaments with rhinestones or ribbons.

Finally I used a banner with a white embossed greeting and attached the penguins with a foam dot to make it 3D.

I loved the rhinestone-embellished ornament so much that I made card featuring just the ornament on an embossed background!

Well that’s it I hope you enjoyed these cards and stay tuned for more!


Cheap Thrills and Pretty Frills – Scrapbooking on a Budget

As a student, I don’t have a lot of extra cash to splurge on expensive embellishments, fancy papers or even foam tape. Over the years, I’ve come to be very adept at looking for deals and cheap thrills when it comes to paper crafting. And who’s noticed that it’s almost impossible to get decently priced shipping of anything to Canada? The US economy would be booming if only they shipped to Canada at reasonable prices! So more often than not, I and my crafty friends opt out of cheap US prices and pay the premium at Michaels. It’s still cheaper than paying for shipping. But don’t worry, below are some ways I get around these problems.

So if you love to craft but can’t afford to splurge, there are still ways to achieve beautiful creations using thriftier methods. Read on to see my tips:

*Disclaimer, I am not paid to advertise these companies, these are just the ones I use and in my opinion the cheapest products I can get in Canada and I wanted to share these money saving tips with other scrapbookers.

  1. ATG double sided tape
    Who doesn’t love ATG tape or just using double sided tape in general? But at 16.99 CAD for two rolls, I used to tape just the corners of a square and pray that my paper would stick…
    So here’s a cheaper alternative to ATG tape, check out The Tape Depot

    For ~$26 USD, you can get 12 rolls of ATG-compatible double sided tape at a variety of sizes. My favorite size is 1/4 inch. This comes out to just over 2 bucks a roll! Much better than $8.50 per roll from Michaels and many other scrapbookers claim that this tape works even better than 3M brand ATG tape!

  2. Silhouette Cameo Accessories and ProductsThe Silhouette online store has a full line of silhouette products but they’re usually slightly more expensive than other online stores (but still half what they charge at Michaels).Some of the best prices I’ve found in Canada are on amazon. You can usually get mats, blades and tools for a few dollars cheaper and they’re often part of amazon prime or offered as part of a free shipping deal. For example, I can often buy blades for 10-12 dollars each.

    Others have used Silhouette “compatible” blades like the Graphtec CB09 which can cost only 2 dollars a blade. I’ve personally not tried this before but many claim that the blade stays sharper even longer than the silhouette brand ones.

    BLACK FRIDAY DEALS on the Silhouette online store
    There are really no silhouette deals like the silhouette black friday machine and accessory bundles. For example, a portrait bundle for $99. If ever my cameo broke, I’d wait until black friday to replace it, or if I wanted to try one of their new machines like the Mint. It’s the same price as normal but they throw in extra accessories.

    Check out the silhouette online store here.

    The Silhouette Design store has monthly design sales for up to 50% off. Sign up for their newsletter to be notified of all their deals.

  3. Heat Transfer Fabric/Vinyl       Heat transfer material is so awesome but they cost 16.99 a roll on the Silhouette website and $24 bucks at Michaels and you only get about 3 feet of the stuff. I can usually make…maybe 2-3 T shirts per roll.Well, there are a ton of websites out there that sell high quality heat transfer material or adhesive craft vinyl (not heated, just for sticking on smooth surfaces) for much cheaper. One I’ve used recently is Flex Heat Transfer Vinyl.
    Heat transfer and craft vinyl for $3-4 dollars a sheet and it comes in a 12″x 20″ sheet so that it feeds directly into my silhouette cameo.

    Check out the mailbox I made for my friends for their wedding using the craft vinyl: DSC_0403

  4. EmbellishmentsStickers and gemstones can be quite pricey but there are many nice adhesive rhinestones and 3D stickers, ribbons and storage containers from your local dollar store.
  5. Eyelets and BradsEyelets are commonly used in sewing and fashion and you can often find a variety of simple eyelets from fabric stores for very cheap. I get mine from Dressew for 25 cents for 50-100 eyelets. Yes, that’s 25 cents! They also sell a plethora of ribbons, beads and flowers for all your crafting needs. They also have a scrapbooking section but I find the quality of the products not up to my standards. But they would certainly be useful to someone trying out scrapbooking for the first time because they’re very cheap.
  6. Michaels CouponsMichaels sends out coupons every week and their best ones are the 50% off one regular priced item or the 25-30% off entire regular and sale purchase. Never buy anything from Michaels for full price because they mark up their items by like 300%.Best part is you don’t have to print out the coupons, just show them on your smartphone. You can find Michaels coupons on their website flyer.
  7. Pay US shipping prices (often free) even if you live in Canada.                   This tip only applies to people who live close to the US border. Ship your items to a shipping and receiving company (like Hagen’s of Blaine) and drive across the border to pick it up. And fill up on the cheap gas while you’re there!


There are many other cost cutting methods I use but they typically involve keeping an eye out for clearance items and finding deals. There are lots of deals at Michaels but the best ones usually sell out immediately so check back often or just be lucky!

What are some of your money-saving tips? Share them below!


Vintage Paris Card

I was looking through my old cards and came across a few of my favourite ones that I never got a chance to share. So I thought I’d share them here today.

I am exceedingly fond of vintage cards and scrapbooking ideas and there’s no one who does this better than Tim Holtz. So using his stamp set “I see Paris” by Stampers Anonymous, I created a set of cards as gifts for my friends. I’m sad to say that I actually don’t have a physical copy of any of the cards I make because I give them away to friends for birthdays and gifts. But I feel that creativity should be shared and not hoarded for oneself. So when I think about how happy my friend will be to receive a card from me, it really inspires me to create for them.

So here is a card I made for my friend who have always wanted to visit Paris but never got the chance to. So to encourage and motivate them to realize their dreams, I gave them this card:

P1020336

P1020341

I embossed a piece of black cardstock with Tim Holtz’s splatter embossing folder…I couldn’t find the name of this one, I don’t remember it and I couldn’t find it when I searched for it. But on the sizzix website, they have a new texture fade splatter set. That one will likely work too. But if you find out the name, please let me know!

I went over the raised parts with a brush dipped in gold acrylic paint.

I was really into mixed media back in the day.

Using my Silhouette Cameo, I cut out a shape of the Eiffel Tower and embossed it using one of Tim Holtz’s grid emobssing folders and then I went over the raised parts with gold acrylic paint. P1020339

To give the Carte Postale (post card) a vintage look, I tore the corners and distressed with a combination of vintage photo and walnut stain. I then brushed the top with a layer of clear crackle paint so that when it dried, it would have that lovely vintage cracked look.

P1020338

P1020340

To finish everything off, I embellished the card with flower punch outs and I used like blue pearls in the centre to accent.

So I hope you enjoyed looking at this project as much as I enjoyed making it.

Until next time!

Kitty Cat Silhouette Christmas Card

I’ve been meaning to upload a few last minute christmas cards that you could whip up really quickly. If you’re anything like me, you’ll likely be trying to pump these out the night before you meet your loved ones and friends so burning the midnight oil well into the night isn’t ideal. But not to worry this next card is so simple to complete, it is literally just choosing a design, some pasting work, add a little bling and you’re done!

Kitty cat christmas card

For this project I used my silhouette studio with the following design from the design studio: Cats on stack of presents.

I cut it out on shimmery black cardstock to give it some vibrancy for the holiday season. Likewise my scalloped border was punched out using the same shimmery cardstock.

Kitty cat christmas card

Then I selected a festive background from my stash of Christmas papers and applied the cat silhouette on top and scalloped border on the back. I then wrapped the piece in pink baker’s twine.

Afterwards, I stamped merry christmas with one of my hero arts christmas stamps using clear versamark and heat embossed with fine silver powder. I adhered this sentiment on a back piece of silver cardstock and then used foam dots to apply the sentiment on top of the baker’s twine.

Finally, I applied the whole piece to a 4.5×5 inch cream card using double sided tape.

Bingo Embossed Christmas Card

This card was so simple and easy to make using my Silhouette Cameo and quite frankly a lot of fun since I love cats. I had a great time being able to incorporate some of my favorite pets in a craft project.

But if you don’t like cats or you don’t have this particular sihouette cut out on hand, essentially any silhouette shape can work with a patterned background. Then a sentiment placed on top using foam dots to make it more 3D.

Have fun making this card, it’s great as a last minute card creation!

Calendar Style Birthday Card

Calendar Style Birthday Card

I made this card for my BFF a few months back for her birthday but just got around to uploading it. Sorry for being MIA for a while, my studies have been so super busy! I went away to present my research at a conference and although it was probably one of the best experiences of my life, it also left me very little free time for a while.

But I’m back in the game and super excited to share with you all my most recent creations, starting with the least recent haha!

I really wanted to showcase when my BFF’s birthday was which is the 29th of December so I printed out, stained and distressed a calendar that I found online.

I used some glimmer mist in Rouge and Cork using my technique on how to prevent paper from wrinkling after soaking it in wet media and letting it dry. You can find that tutorial here.

Once it dried, I stamped some swirls using Versamark and transparent embossing powder. You can see the glimmer mist underneath of it that way.

Then I just finished up the card by adding a gemstone over the top of the 29th of December because that’s the date of her birthday. And then I just embellished with a flower (I don’t remember what it’s called, an accordion flower? Somebody help!) I cut out with my Silhouette Cameo, but you can also use a Tim Holtz die to do that.

I mounted the calendar onto another piece of cardstock which I punched with a Martha Stewart doily punch just on one edge and then distressed the edges with Vintage Photo. 

Finally I mounted everything onto a card with a pretty pink background I dug out from my scraps stash from DCWV Garden Tea Party Stack.

Share your comments below!

How to prevent wet paper from wrinkling when dried

One of the things that I hate about using wet media when scrapbooking or crafting is that afterwards, the paper dries all wrinkly and ugly. As much as I like the wrinkly look for SOME projects, I don’t necessarily like it for ALL of my projects. So, I’ve adapted one of the techniques I normally use for watercolour painting to prevent my paper from curling, developing ridges and overall looking anything other than smooth.

How to prevent wet paper from wrinkling when dry

Measure out a piece of cardstock for your project and add 1/2 inch to each of the four sides. Cut it out.
I’ve printed a picture of a calendar for a birthday card project and cut it down to size.

Tape that piece of cardstock to something hard, like a big fat heavy textbook or encyclopaedia. Or tape it to your craft table.

You can use washi tape or masking tape. Masking tape is better but whatever you have lying around is just fine.

I’m using washi tape in the above photo because I have this really terrible washi tape from K and Company’s Smash album. Terrible Terrible stuff. With a capital T. Thankfully, it won’t go to waste because I can just use it for taping stuff down like when I’m die-cutting for example.

MAKE SURE YOU TAPE DOWN EVERY ONE OF THE FOUR SIDES COMPLETELY.
This is essential to ensuring you have your desired final product free of wrinkles. If you miss even a little bit of the paper, you’ll have an imperfect paper after it dries. But hey, maybe that’s what you were going for?

How to prevent wet paper from wrinkling when dry

Spray your favourite glimmer mist or use your distressing inks or water colour pencils, etc. Have fun, go crazy, make a mess, it’s all good!

Mine looks like this after:

How to prevent wet paper from wrinkling when dry

Now let it dry completely.

It should look like this!
How to prevent wet paper from wrinkling when dry

See how flat it looks?

How to prevent wet paper from wrinkling when dry

And this is how it looks after I’ve cut it out!

I’m using a rectangle piece of cardstock for my project, but your project may need a different shape. Just use this method to ink up a larger sheet of cardstock and cut/punch out your desired shape after the paper dries. So simple right?

TROUBLESHOOTING

1. Tape lifts up from page after applying wet media.

Possible reasons why:

– Your tape is probably not suitable for wet media projects. Try masking tape, it’s awesome!
– You didn’t press your tape down firmly and there was a gap somewhere. It’s ok, just remove the piece that became unstuck, try to blot the wet area with a paper towel and then stick another piece of tape over it.

2. The paper dried wrinkly

Possible reasons why:

– Your cardstock was too thin. This technique doesn’t work with paper unfortunately because paper is so thin it’s flexible and can stretch a bit when wet. Try using a thicker cardstock next time like Baziill. I’m using Recollections cardstock here which works ok, not the best but ok…it’s cheap.

– Your tape may have come loose upon applying wet media or during the drying process. See above solutions.

And that’s it! Post a comment below if you have questions, this technique allows me to create vintage yet neat projects which I really love!

Have fun with all your wet media!

Tutorial: fast last minute cards for every occasion

Have you ever gotten ready for bed on a Sunday night, hopped under the covers and curled up with a good book and then all of a sudden, you realized…you forgot to make an extra Christmas card for none other than your boss. So you bounce out of bed in a panic, what do you do? It’s already close to midnight!

So…being the clueless nut I often am I usually find myself in these awkward positions right before bedtime haha!

So I’ve designed a series of cards that follow a very basic pattern and they’re very easy to reproduce for many different occasions using the same basic pattern.

1. The banner bow card

20131222_014816-1

You need one banner piece that runs down the length of the card. Make it 1 to 1.5 inches wide and the length of your card minus 1/8th of an inch. Cut the bottom of the banner into an upside down “V”.

Tie a fat ribbon around the banner and adhere the knotted part of the ribbon onto the paper with a dot of glue.

Take a sheet of glimmery cardstock, such as Recollections shimmery paper lines including “gemstones” or “precious metals”. Make it 1/8th inch smaller than the size of your card on all four sides. Place the paper in an embossing folder of your choice and run it through a die-cut or embossing machine.

Then adhere the embossed sheet down to your card using your ATG.

20131222_014905-2

For the banner, I like to apply the “Rule of Thirds”, which is a photography/videography term. Imagine 2 lines diving the card vertically into thirds. Place the banner centred on one of the two lines. This makes the card look aesthetically appealing. Try this with other embellishments as well and you’ll notice that hey, your design looks really gorgeous.

2. Framed picture banner card

DSC_0161-1

This card follow the same pattern of banner placement as above. But this time instead of an embossed background, I just used a printed background, with a banner color that matched the background. Then i stamped an image of a snowman on a piece of vintage printed cardstock with a beige background and made a frame. Then I propped the framed snowman on the card using foam dots.

You can also embellish afterwards. I’ve put an eyelet on the top of the banner. but you can also embellish with other things like gemstones, flowers, etc.

3. Vellum double embossed card

20131222_015007-4

This card uses the same embossed background piece of metallic shimmery cardstock as the first card. Instead of a banner though, a die-cut piece of vellum is used to highlight the card. Stamp and heat emboss the vellum with any expression or image you’d like. then glue the vellum with small dots of glue to adhere it to the cardstock.

I’ve embellished the vellum with a holly sticker and 2 brass brads.

20131222_015002-3


These cards are all very easy to make and easy to reproduce. These patterns will come in handy in the event of an emergency and you need a last minute card.

Hope you have fun making and enjoying these cards and please share your creations too!

Next time, I’ll be doing a technique post on how to avoid wrinkly paper after using wet media.

Until then, tata!

How to make vintage manly holiday cards tutorial

Vintage Christmas Cards

I made a series of vintage-styled Christmas cards that would be perfect for a male recipient if ever you needed a Christmas card for a dude or maybe just a manly female?

These cards deviate from my normal use of scraps to make cards as the only scraps I used were for the inside of the card for writing a message. However many of the embellies you may want to use for these card styles.

Tools you’ll need:

1. Christmas printed paper

2. Black cards and envelopes

3. Scissors

4. Glue/ATG gun

5. Paper cutter

6. Foam dots

7. Border punch – EK success film strip punch

8. Corner punch

I used a paper stack from Recollections called “Joyful Christmas“. I’ve really been enjoying a lot of the recollections prints, their Christmas collections are really quite well done, maybe better done than many other designer brands out there. So if you’re looking for a versatile paper stack where all the papers just match up really well, try a Recollections stack.

All these cards were made using black cardstock for the card base which I bought at Michaels.

Vintage Christmas Cards

I made three different card styles and 4 cards using just one sheet of 12×12 striped cardstock for the background of all 4 cards! To decorate the background pieces, I used a corner punch from Fiskars.

Style 1: 

Vintage Christmas Cards

Vintage Christmas Cards

I used a fat strip of border paper but then realized that it was too…cream-colored and blended in with the background color. So to make it pop, there was a paper in the collection that was black with white polka dots and I used 2 strips of the black to border the strip of cream. I cut V’s into the ends of the each of the border papers.

The “Joyful Christmas” stack has many sheets of tags and frames that can be cut out. Many of them  have holiday sentiments that just fit so perfectly for a card front. You can also make your own, but I really liked these tags that I didn’t bother making my own.  Vintage Christmas Cards

style 2:
Vintage Christmas Cards

Vintage Christmas Cards
This card just has a fat band through the middle and a sentiment tag slipped into the middle of the band at an angle. I then cut out a glittery santa and used 3D foam dots to adhere it to the band. Super easy right?

Style 3:
Vintage Christmas Cards

Notice that the background of this card is a little different as it has a strip of red printed and glittered paper at the bottom. Go ahead, mix it up a bit!

For this card, I used my EK success film strip punch to punch long black strips of film to overlay the general card template of sentiment tag over background. Then you I used a “tis the season” sentiment on foam dots to add a sentiment to just above the middle of the card.

And there you are, 3 gorgeous, easy, simple and fast vintage cards for all your vintage needs! 

Have fun making these and please LIKE MY FACEBOOK PAGE if you enjoyed this tutorial!

Until next time!

Ribbon Card – Christmas style

DSC_0132-14

So I have a whole bunch of scrap ribbons that I always feel too attached to to throw out. Plus it’s such a waste and ribbon is not cheap!

Sometimes, when I’m working on a project and there’s just a little bit that I need to snip off except that it’s not long enough for a new project…I would save it in a small zip-lock bag and then create a card like this!

just snip little V’s into the ends of each piece of ribbon. It’s actually better if the pieces of ribbon are different in lengths. Then just put together a few pieces of ribbons that seem to match together.

Use double-sided tape or an ATG gun to glue down the ribbon because wet glue will seep through the fabric of the ribbons and show through.

Here I’ve made a Christmas style one using scraps of Christmas-colored ribbon from other projects.

Then I used a spellbinders frame die and my sizzix big shot to cut out half a frame to use as a border and put a Christmas sentiment on it.

That’s it! So simple and fast! I think i finished this card in about 15 minutes! The hard part was cutting the ribbon by hand haha~

Merry Christmas Ornaments Card

DSC_0098-1

This week I present one of my favourite Christmas cards, which is a great way to use up some chunks of scrap printed papers from other projects as you only need bits and pieces of prints. I recycle this style of card pretty much every year because it’s just so versatile and helps to creatively recycle pretty bits of papers.

DSC_0099-2

I cut the card front out of green metallic cardstock using my Silhouette Cameo by just cutting out circles of different sizes. This can also be achieved if you have movers and shapers die from Sizzix or a circle cutter from EK success or Martha Stewart.

I used a Martha Stewart punch to punch out white sparkly snowflakes out of a white metallic paper by Recollections.

And all the papers I used are from the Recollections Sugar Plums paper pad which I purchase from Michaels last year and created a cute Christmas mini album. I adhered medium silver gems onto the centre of the snowflakes.

DSC_0104-4

One of the papers was this quilted pattern, I glued these tiny silver gems on the crosses of the paper. I bought these silver embellies from the Michael’s 1.50 rack. Wish I’d bought more hahaha! They’re so versatile!

DSC_0102-2

Finally, I stamped “Noel” on the last ornament and embossed it in silver. This is a Studio G stamp which I purchased on sale for a dollar at Michaels last year. Then I tied a sparkly green ribbon on top. I wanted to tie a silver one, but I realized that I don’t have silver ribbon haha!

Then to finish everything off, I used a silver sharpie and just embellished the tops and bottoms of the ornaments and drew curly string so that it looks like it’s being hung from a tree. I guess taught string would have been more realistic but I’m not good at drawing straight lines hahaha!

So that’s it, so simple and versatile. You can do just about anything with the ornaments and use any variety of papers. Be creative and have fun with it!

You know those little strips of patterned paper that we often just toss away? Save them! Next up is a holiday card that highlights the use of scrap strips of pretty patterned paper. Look forward to it!

Thanks so much for enjoying this card and please “LIKE” my Facebook page in the upper right hand corner if you enjoyed this card and support my blog!