Tag Archives: scrapbooking

The Tape Depot 10% off code

unnamedthetapedepot

From now until Feb. 14th, 2016 save 10% off at the tape depot by using code VDSAVINGS at www.thetapedepot.com

Now would be a great time to stock up on some essentials like ATG tape and other assorted/double-sided tapes!

Disclaimer: I am not affiliated with thetapedepot.com, I just get their promo emails and I want to share with the community these awesome deals 😀


Cheap Thrills and Pretty Frills – Scrapbooking on a Budget

As a student, I don’t have a lot of extra cash to splurge on expensive embellishments, fancy papers or even foam tape. Over the years, I’ve come to be very adept at looking for deals and cheap thrills when it comes to paper crafting. And who’s noticed that it’s almost impossible to get decently priced shipping of anything to Canada? The US economy would be booming if only they shipped to Canada at reasonable prices! So more often than not, I and my crafty friends opt out of cheap US prices and pay the premium at Michaels. It’s still cheaper than paying for shipping. But don’t worry, below are some ways I get around these problems.

So if you love to craft but can’t afford to splurge, there are still ways to achieve beautiful creations using thriftier methods. Read on to see my tips:

*Disclaimer, I am not paid to advertise these companies, these are just the ones I use and in my opinion the cheapest products I can get in Canada and I wanted to share these money saving tips with other scrapbookers.

  1. ATG double sided tape
    Who doesn’t love ATG tape or just using double sided tape in general? But at 16.99 CAD for two rolls, I used to tape just the corners of a square and pray that my paper would stick…
    So here’s a cheaper alternative to ATG tape, check out The Tape Depot

    For ~$26 USD, you can get 12 rolls of ATG-compatible double sided tape at a variety of sizes. My favorite size is 1/4 inch. This comes out to just over 2 bucks a roll! Much better than $8.50 per roll from Michaels and many other scrapbookers claim that this tape works even better than 3M brand ATG tape!

  2. Silhouette Cameo Accessories and ProductsThe Silhouette online store has a full line of silhouette products but they’re usually slightly more expensive than other online stores (but still half what they charge at Michaels).Some of the best prices I’ve found in Canada are on amazon. You can usually get mats, blades and tools for a few dollars cheaper and they’re often part of amazon prime or offered as part of a free shipping deal. For example, I can often buy blades for 10-12 dollars each.

    Others have used Silhouette “compatible” blades like the Graphtec CB09 which can cost only 2 dollars a blade. I’ve personally not tried this before but many claim that the blade stays sharper even longer than the silhouette brand ones.

    BLACK FRIDAY DEALS on the Silhouette online store
    There are really no silhouette deals like the silhouette black friday machine and accessory bundles. For example, a portrait bundle for $99. If ever my cameo broke, I’d wait until black friday to replace it, or if I wanted to try one of their new machines like the Mint. It’s the same price as normal but they throw in extra accessories.

    Check out the silhouette online store here.

    The Silhouette Design store has monthly design sales for up to 50% off. Sign up for their newsletter to be notified of all their deals.

  3. Heat Transfer Fabric/Vinyl       Heat transfer material is so awesome but they cost 16.99 a roll on the Silhouette website and $24 bucks at Michaels and you only get about 3 feet of the stuff. I can usually make…maybe 2-3 T shirts per roll.Well, there are a ton of websites out there that sell high quality heat transfer material or adhesive craft vinyl (not heated, just for sticking on smooth surfaces) for much cheaper. One I’ve used recently is Flex Heat Transfer Vinyl.
    Heat transfer and craft vinyl for $3-4 dollars a sheet and it comes in a 12″x 20″ sheet so that it feeds directly into my silhouette cameo.

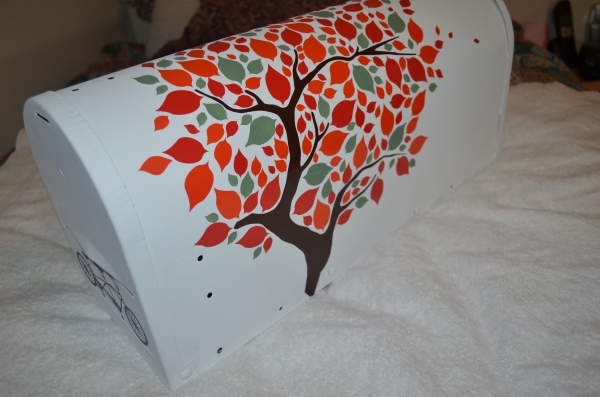
    Check out the mailbox I made for my friends for their wedding using the craft vinyl: DSC_0403

  4. EmbellishmentsStickers and gemstones can be quite pricey but there are many nice adhesive rhinestones and 3D stickers, ribbons and storage containers from your local dollar store.
  5. Eyelets and BradsEyelets are commonly used in sewing and fashion and you can often find a variety of simple eyelets from fabric stores for very cheap. I get mine from Dressew for 25 cents for 50-100 eyelets. Yes, that’s 25 cents! They also sell a plethora of ribbons, beads and flowers for all your crafting needs. They also have a scrapbooking section but I find the quality of the products not up to my standards. But they would certainly be useful to someone trying out scrapbooking for the first time because they’re very cheap.
  6. Michaels CouponsMichaels sends out coupons every week and their best ones are the 50% off one regular priced item or the 25-30% off entire regular and sale purchase. Never buy anything from Michaels for full price because they mark up their items by like 300%.Best part is you don’t have to print out the coupons, just show them on your smartphone. You can find Michaels coupons on their website flyer.
  7. Pay US shipping prices (often free) even if you live in Canada.                   This tip only applies to people who live close to the US border. Ship your items to a shipping and receiving company (like Hagen’s of Blaine) and drive across the border to pick it up. And fill up on the cheap gas while you’re there!


There are many other cost cutting methods I use but they typically involve keeping an eye out for clearance items and finding deals. There are lots of deals at Michaels but the best ones usually sell out immediately so check back often or just be lucky!

What are some of your money-saving tips? Share them below!


Getting started with calligraphy and hand lettering

2015-10-27 02.35.03

It seems like many scrapbookers like Kristina Werner, Heidi Swapp, etc are all getting into more hand lettering. As such, I’ve been really interested in learning how myself. I’ve already mastered the art of Chinese calligraphy as a child because of many opportunities to learn from experts as a kid, but western calligraphy has always eluded me.

So to jump on this band wagon, I began exploring at my local Michaels store to get started with hand lettering.  (Scroll down for a list of the cheapest essential tools to get started)

Dip nibs are cheap, traditional and the method that most people use to write calligraphy.

So here is what I did first, I initially purchased a round hand nib set by Manuscript:

This nib set is great for gothic style, italic and round hand fonts.

An excellent tutorial on how to get started with this type of font is here.

This is a very easy set to start with and was easy to pick up but some of the more elaborate gothic fonts, although beautiful required more practice. I wanted to accomplish other types of scripts though that these more traditional nibs were not able to achieve.

I soon found out that modern calligraphy and more stylish types of hand lettering required flexible pointed nibs. These nibs can also be used to write the beautiful cursive fonts like spencerian script or copperplate script.

Here is an example of modern calligraphy from Lindsey Bugbee

Cheating Calligraphy Tutorial | The Postman's Knock

So here is the list of items you need:

  1. small pot of water for rinsing ink off
  2. India Ink (Speedball brand ink gives the best results)
  3. Paper: The best paper for ink calligraphy is bristol, but this is quite expensive for practising. Therefore to practice, I use graph paper or higher quality lined paper by Hilroy like the “On the Edge” style of lined paper. It’s much smoother and less likely to bleed. Some of the best papers for fountain pen ink is by Rhodia or ClaireFontaine but these are a bit more expensive than lined/graph paper.


  4. pointed pen and nib set like this one from Michaels for about 10 dollars

These are the basics of what one needs to get started. Plenty of tutorials exist on youtube, pinterest and google. A quick search for cursive fonts or modern hand lettering will bring up a plethora of different fonts. At first it will be hard but practice makes perfect.

My favorite nibs of the above set are the Leonardt No. 41 and the Leornardt 33. 
Individual replacement nibs can be purchased online from the Manuscript website.

When holding the pen, hold closer to the nib and angle the arm such that the nib is not perpendicular to the paper but lowered at an angle. Also write with the pen pointing towards 10 o’clock or at a 130 degree angle.

Writing takes practice, and figuring out the best pressure for the chosen nib and ink take practice as well. Once you are comfortable with using india ink, you can start experimenting with other types of inks like water color, gouache, and acrylic inks. This is the power of dip nibs, you can use them with many different types of media.

I am by no means an expert and just starting out myself but this is what I’ve discovered based upon trial and error and save someone else the time, money and effort, I’ve compiled my findings here. Hopefully they will be helpful to someone else just starting out as I would have appreciated someone giving me some pointers on where to start.

Best of luck and what are your favourite tools to use to do calligraphy?

Vintage Paris Card

I was looking through my old cards and came across a few of my favourite ones that I never got a chance to share. So I thought I’d share them here today.

I am exceedingly fond of vintage cards and scrapbooking ideas and there’s no one who does this better than Tim Holtz. So using his stamp set “I see Paris” by Stampers Anonymous, I created a set of cards as gifts for my friends. I’m sad to say that I actually don’t have a physical copy of any of the cards I make because I give them away to friends for birthdays and gifts. But I feel that creativity should be shared and not hoarded for oneself. So when I think about how happy my friend will be to receive a card from me, it really inspires me to create for them.

So here is a card I made for my friend who have always wanted to visit Paris but never got the chance to. So to encourage and motivate them to realize their dreams, I gave them this card:

P1020336

P1020341

I embossed a piece of black cardstock with Tim Holtz’s splatter embossing folder…I couldn’t find the name of this one, I don’t remember it and I couldn’t find it when I searched for it. But on the sizzix website, they have a new texture fade splatter set. That one will likely work too. But if you find out the name, please let me know!

I went over the raised parts with a brush dipped in gold acrylic paint.

I was really into mixed media back in the day.

Using my Silhouette Cameo, I cut out a shape of the Eiffel Tower and embossed it using one of Tim Holtz’s grid emobssing folders and then I went over the raised parts with gold acrylic paint. P1020339

To give the Carte Postale (post card) a vintage look, I tore the corners and distressed with a combination of vintage photo and walnut stain. I then brushed the top with a layer of clear crackle paint so that when it dried, it would have that lovely vintage cracked look.

P1020338

P1020340

To finish everything off, I embellished the card with flower punch outs and I used like blue pearls in the centre to accent.

So I hope you enjoyed looking at this project as much as I enjoyed making it.

Until next time!

Hack: Prevent wet paper from wrinkling when dry using a sticky mat

As a lover of multiple forms of media when I do my crafting, I thoroughly enjoy using Tim Holtz’s distress mediums, adding water, watching the inks react. I also enjoy water coloring on my cards and projects. But the worst thing is when your wet media wrinkles the paper you’re working on.

Here’s another trick I discovered to prevent your paper from wrinkling.

  1. Obtain a Silhouette Cameo, Cricut or Sizzix adhesive cutting mat.

  1. Use either watercolour paper or multimedia paper. These can be purchased from any art store.

    Here is an example of a watercolor pad. I recommend getting the ones without the coil binding or getting the ones with the easy to rip little dotted cut marks on the inside. I forget what those are called.
  2. Apply your watercolor paper to the sticky mat. Make sure the edges are tacked down. If your mat is old, use a little temporary double sided adhesive on the underside of your paper to stick down the edges. Make sure ALL THE EDGES have adhered to the mat otherwise you’ll get wrinkles. The body of the paper does not need to be sticking to the mat so don’t worry if you have an older mat.
  3. Apply wet media. Inks, paints, water, etc.
  4. Let dry completely.
  5. Carefully remove the sheet from the sticky mat.

Troubleshooting:

  1. The paper wrinkled when I applied wet media.
    Solution: This is normal, the paper will wrinkle as it absorbs the liquid and expands. Just let it dry, it will contract and shrink back to be flat again just as long as you do not remove the paper from the mat before it fully dries.
  2. The paper is still wrinkly even though I let it dry completely on the mat.
    Solution: Always ensure the edges of the paper are all completely adhered to the mat. Check the paper you’re using. Watercolor paper is a heavier weight paper, unlike most cardstocks that don’t work very well with wet media even if you use any variety of methods to prevent wrinkling. The paper just wasn’t designed for media work like watercolor artist paper is.
    Solution: Try ironing it with a cloth between the paper and the iron to prevent burning.

Post a comment below if you have any questions or need help with this method!

Hack for the Silhouette Cameo Print and Cut – Read Registration Marks Fail

silhouettemainimage1

09-13-15 UPDATED SOLUTION AT THE BOTTOM
To avoid making the same silly mistake I did haha!

I don’t know why after the recent Silhouette studio software overhaul to version 3 there have been so many issues with my print and cut feature that I never experienced before with the old Studio software. Even with the most recent update V3.36 I still encounter the same issues. Looking around on the web hasn’t really fixed my problem because most people claim something magical and random happens when they try a combination of different things like load and unload or turn the machine on or off.

But with my issue, I found that the laser scanner just wasn’t moving the cutting mat far enough to even read the registration marks.

I’ve tried to do the whole manual registration function but I’ve never managed to get it to work, I’m not sure if I’m just doing it wrong or if this manual read function is just bogus.

Regardless, I found a solution to my problem and here’s my hack for getting the silhouette cameo to read the registration marks every time:

  1. Select image to print and cut.
  2. Print image with registration marks.
  3. Adhere printed sheet with registration marks to cutting mat.
  4. Feed/load the cutting mat into the machine.
  5. Turn off the machine. Yes, turn off the machine. Do not remove the cutting mat from the machine when you do this.
  6. Once the light is off, turn the machine back on.
  7. Press “enter” to load the cutting mat again. This will feed the mat a little further in, tricking the machine to think that it’s feeding it the first time around but this time the mat will actually feed more than if you unloaded and loaded again.
  8. In the Silhouette Studio software, press “send to silhouette”.
  9. Sit back and watch the magic happen.

I hope that this hack is useful to some of you who are having a heap of trouble with the print and cut feature like I was. There must be a solution to this problem that I’m missing, perhaps a calibration issue. I’ll keep doing my research and once I find out a solution, I’ll post it.
But in the meantime, if you were having the same problem as I was, perhaps this will solve your issues.

Another thing to consider is that I had to calibrate my cameo to work with my Pixscan mat as well which may have dislocated some virtual limb inside the machine.

Post your solutions/hacks to the Silhouette Cameo print and cut – registration marks fails below!

*UPDATE September 13, 2015
I figured it out.

Turns out on the machine before you even feed your material into the rollers, you use the up and down arrow keys to select whether you want to feed the cutting mat or other media not requiring cutting mat.

2015-09-13 15.49.53

On cutting mat option, the rollers feed the mat into further than with the “media” option. The “cutting mat” option is required for the print and cut function to work. I had selected the “media” option by accident and didn’t realize it, that’s why the rollers weren’t feeding my cutting mat far enough into the back of the machine for the registration marks to read. So there you go. If ever you run into the same problem as me, just double check your selection on the machine control screen. (See where that big black dot is on the upper left side of the screen? That’s the option you’ve currently selected.) Use the arrow keys to change it to the correct type of media.

I’ve tried manually reading the registration marks. I don’t quite understand why they have this function because it has never worked for me even when I have the correct feeding function selected.

Lucky St. Patty’s freebie – Nespresso grand crus holder/organizer

*update May 20, 2018
A nice visitor to my blog informed me that my old link no longer works so I’ve transferred the file to Dropbox. Just click the link here or below to access the free dispenser file! 


Happy March!

It’s the happiest month of the year, there is no better better month than March!

So in celebration of March and Saint Patrick’s day, I’ve created an organizer/holder for the nespresso grand crus. I didn’t want to shell out the money to pay for one because they’re so expensive.

Download the Nespresso dispenser here!

So I used my silhouette cameo to print 4 of them and then I assembled them by folding along the dotted lines.

2014-1

You can also line them up one next to the other so you have a row of them. You just insert the rectangular tubes in after opening. Every time you want to have a nespresso, just lift the box of the flavour you want and one capsule will pop out!

So easy! So this is how I’ve been storing my nespresso capsules!

2014-2

I would love to hear your comments or suggestions for improvement!

Enjoy~

Romantic Vintage Valentine’s Card with Textured Embossing

With valentine’s day just around the corner, I wanted to share my most recent card creation with you all. I bought some gesso a while ago and I hadn’t really had a good chance to use it so I decided to use it in this card.

I’ve titled this card Romantic Fairytale Dream, doesn’t it look like a fairytale from a little girl’s dream? When I was much younger, I used to dream about what it would be like to be a fairy tale princess, to rule over all the land, protect my people and save prince charming. Yes, I know it’s typically the other way around, but I had a lot of strong females as my role models growing up. Us girls can take care of ourselves, and then some.

Romantic Vintage Valentine's Card

I started out with a 5 x 4.5 inch white sheet cardstock which I embossed using a sizzix embossing folder. Unfortunately I forgot the name of the folder but it has diamonds with vintage damasks within each diamond.
To make the damask image really pop, I sprayed a sponge with glimmer mist and gently rubbed the sponge across the surface so that it only stains the raised parts of the embossed image.

Romantic Vintage Valentine's Card


To mask the border because I felt it looked a little strange that it was just empty space, I used gesso, or otherwise known as embossing paste, all around the edge and merging partly into the embossed image. Using my fingertips I dabbed with an up and down motion to give the paste some texture. Embossing paste typically takes a few hours to dry completely depending on how much was used. If it’s a really thick layer, I’d wait until overnight which I did in this case. It wasn’t a particularly thick layer but it I just wanted to be sure.

Romantic Vintage Valentine's Card

I proceeded to make my centrepiece now that the background was complete. Using a piece of pink vellum, I cut out a circular shape with rounded border using a Spellbinders die. I then used a carriage stamp to stamp and emboss the vellum with Versamark and champagne coloured embossing powder.

*note: Vellum is really delicate and it’s really easy to over heat and warp the vellum. Don’t put the heat tool too close to the vellum and switch from heating the front to the back frequently.

Using my Crop-a-Dile, I applied eyelets to the top and bottom of the vellum and threaded pink ribbon to attach the vellum circle to the card. I made a bow with the flapping ends of the ribbon at the top of the eyelet.

Romantic Vintage Valentine's Card

Using a Tim Holtz crown stamp, I stamped using gold ink on kraft cardstock. I fussy cut out the crown and applied it to the edge of the fancy embossed carriage.

I then stamped a rounded rectangle with the words “Dream” and applied that to the corner of the vellum circle using 3D foam dots. Then I used gesso to go over the edges of the sentiment piece. Finally using Liquid Pearls in Platinum I made little droplets on every other circle in the border. Then I let everything dry overnight.

Romantic Vintage Valentine's Card

So there you have it, a fancy vintage valentine’s card. Reminds me of a fairy tale of princes and princesses riding in pumpkin carriages, being carried to their magical destiny.  Romantic Vintage Valentine's Card


So there you have it! I hope you’ve enjoyed this card as much as I’ve enjoyed making it. Hope that this Valentine’s day, you can spend it with someone you love, whether that be your beautiful self or with someone who’s dear and special to your heart.

XOXO~

Kitty Cat Silhouette Christmas Card

I’ve been meaning to upload a few last minute christmas cards that you could whip up really quickly. If you’re anything like me, you’ll likely be trying to pump these out the night before you meet your loved ones and friends so burning the midnight oil well into the night isn’t ideal. But not to worry this next card is so simple to complete, it is literally just choosing a design, some pasting work, add a little bling and you’re done!

Kitty cat christmas card

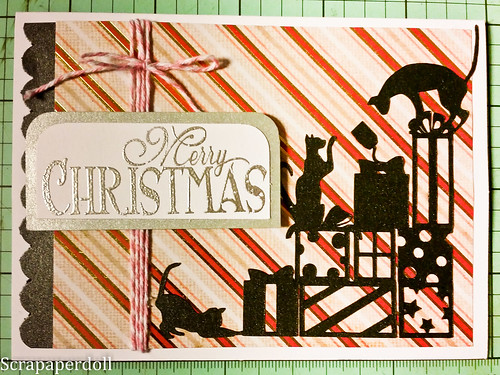
For this project I used my silhouette studio with the following design from the design studio: Cats on stack of presents.

I cut it out on shimmery black cardstock to give it some vibrancy for the holiday season. Likewise my scalloped border was punched out using the same shimmery cardstock.

Kitty cat christmas card

Then I selected a festive background from my stash of Christmas papers and applied the cat silhouette on top and scalloped border on the back. I then wrapped the piece in pink baker’s twine.

Afterwards, I stamped merry christmas with one of my hero arts christmas stamps using clear versamark and heat embossed with fine silver powder. I adhered this sentiment on a back piece of silver cardstock and then used foam dots to apply the sentiment on top of the baker’s twine.

Finally, I applied the whole piece to a 4.5×5 inch cream card using double sided tape.

Bingo Embossed Christmas Card

This card was so simple and easy to make using my Silhouette Cameo and quite frankly a lot of fun since I love cats. I had a great time being able to incorporate some of my favorite pets in a craft project.

But if you don’t like cats or you don’t have this particular sihouette cut out on hand, essentially any silhouette shape can work with a patterned background. Then a sentiment placed on top using foam dots to make it more 3D.

Have fun making this card, it’s great as a last minute card creation!

Scary Halloween Invite beckons my ghoulish presence

Halloween invitationMy BFF, Alice, who’s also an avid scrapper, sent me this gorgeous scary invitation to a halloween party. I was so pleased and amazed at the detail and work she put into it that I just had to showcase it here and show everyone else.

She picked up all the supplies from Michaels. Using a stamp with diamonds she made the background of the envelope and then embossed it. The invitation itself was stamped with different colours and then also embossed.

2014-10-26 00.21.10

She even made a few red paint splatters on the front of the envelope to make it look like someone’s blood spilled on it while she was busy working away. Very creepy indeed…I love it!

halloween envelope