Tag Archives: calendar

Calendar Style Birthday Card

Calendar Style Birthday Card

I made this card for my BFF a few months back for her birthday but just got around to uploading it. Sorry for being MIA for a while, my studies have been so super busy! I went away to present my research at a conference and although it was probably one of the best experiences of my life, it also left me very little free time for a while.

But I’m back in the game and super excited to share with you all my most recent creations, starting with the least recent haha!

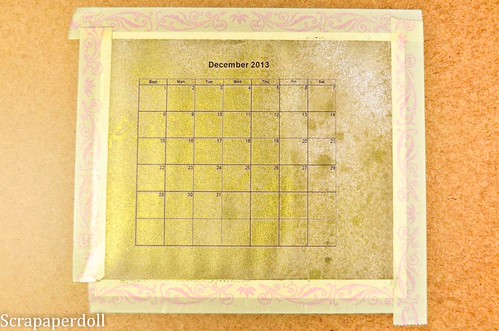
I really wanted to showcase when my BFF’s birthday was which is the 29th of December so I printed out, stained and distressed a calendar that I found online.

I used some glimmer mist in Rouge and Cork using my technique on how to prevent paper from wrinkling after soaking it in wet media and letting it dry. You can find that tutorial here.

Once it dried, I stamped some swirls using Versamark and transparent embossing powder. You can see the glimmer mist underneath of it that way.

Then I just finished up the card by adding a gemstone over the top of the 29th of December because that’s the date of her birthday. And then I just embellished with a flower (I don’t remember what it’s called, an accordion flower? Somebody help!) I cut out with my Silhouette Cameo, but you can also use a Tim Holtz die to do that.

I mounted the calendar onto another piece of cardstock which I punched with a Martha Stewart doily punch just on one edge and then distressed the edges with Vintage Photo. 

Finally I mounted everything onto a card with a pretty pink background I dug out from my scraps stash from DCWV Garden Tea Party Stack.

Share your comments below!

How to prevent wet paper from wrinkling when dried

One of the things that I hate about using wet media when scrapbooking or crafting is that afterwards, the paper dries all wrinkly and ugly. As much as I like the wrinkly look for SOME projects, I don’t necessarily like it for ALL of my projects. So, I’ve adapted one of the techniques I normally use for watercolour painting to prevent my paper from curling, developing ridges and overall looking anything other than smooth.

How to prevent wet paper from wrinkling when dry

Measure out a piece of cardstock for your project and add 1/2 inch to each of the four sides. Cut it out.
I’ve printed a picture of a calendar for a birthday card project and cut it down to size.

Tape that piece of cardstock to something hard, like a big fat heavy textbook or encyclopaedia. Or tape it to your craft table.

You can use washi tape or masking tape. Masking tape is better but whatever you have lying around is just fine.

I’m using washi tape in the above photo because I have this really terrible washi tape from K and Company’s Smash album. Terrible Terrible stuff. With a capital T. Thankfully, it won’t go to waste because I can just use it for taping stuff down like when I’m die-cutting for example.

MAKE SURE YOU TAPE DOWN EVERY ONE OF THE FOUR SIDES COMPLETELY.
This is essential to ensuring you have your desired final product free of wrinkles. If you miss even a little bit of the paper, you’ll have an imperfect paper after it dries. But hey, maybe that’s what you were going for?

How to prevent wet paper from wrinkling when dry

Spray your favourite glimmer mist or use your distressing inks or water colour pencils, etc. Have fun, go crazy, make a mess, it’s all good!

Mine looks like this after:

How to prevent wet paper from wrinkling when dry

Now let it dry completely.

It should look like this!
How to prevent wet paper from wrinkling when dry

See how flat it looks?

How to prevent wet paper from wrinkling when dry

And this is how it looks after I’ve cut it out!

I’m using a rectangle piece of cardstock for my project, but your project may need a different shape. Just use this method to ink up a larger sheet of cardstock and cut/punch out your desired shape after the paper dries. So simple right?

TROUBLESHOOTING

1. Tape lifts up from page after applying wet media.

Possible reasons why:

– Your tape is probably not suitable for wet media projects. Try masking tape, it’s awesome!
– You didn’t press your tape down firmly and there was a gap somewhere. It’s ok, just remove the piece that became unstuck, try to blot the wet area with a paper towel and then stick another piece of tape over it.

2. The paper dried wrinkly

Possible reasons why:

– Your cardstock was too thin. This technique doesn’t work with paper unfortunately because paper is so thin it’s flexible and can stretch a bit when wet. Try using a thicker cardstock next time like Baziill. I’m using Recollections cardstock here which works ok, not the best but ok…it’s cheap.

– Your tape may have come loose upon applying wet media or during the drying process. See above solutions.

And that’s it! Post a comment below if you have questions, this technique allows me to create vintage yet neat projects which I really love!

Have fun with all your wet media!