Tag Archives: hacks

Cheap Thrills and Pretty Frills – Scrapbooking on a Budget

As a student, I don’t have a lot of extra cash to splurge on expensive embellishments, fancy papers or even foam tape. Over the years, I’ve come to be very adept at looking for deals and cheap thrills when it comes to paper crafting. And who’s noticed that it’s almost impossible to get decently priced shipping of anything to Canada? The US economy would be booming if only they shipped to Canada at reasonable prices! So more often than not, I and my crafty friends opt out of cheap US prices and pay the premium at Michaels. It’s still cheaper than paying for shipping. But don’t worry, below are some ways I get around these problems.

So if you love to craft but can’t afford to splurge, there are still ways to achieve beautiful creations using thriftier methods. Read on to see my tips:

*Disclaimer, I am not paid to advertise these companies, these are just the ones I use and in my opinion the cheapest products I can get in Canada and I wanted to share these money saving tips with other scrapbookers.

  1. ATG double sided tape
    Who doesn’t love ATG tape or just using double sided tape in general? But at 16.99 CAD for two rolls, I used to tape just the corners of a square and pray that my paper would stick…
    So here’s a cheaper alternative to ATG tape, check out The Tape Depot

    For ~$26 USD, you can get 12 rolls of ATG-compatible double sided tape at a variety of sizes. My favorite size is 1/4 inch. This comes out to just over 2 bucks a roll! Much better than $8.50 per roll from Michaels and many other scrapbookers claim that this tape works even better than 3M brand ATG tape!

  2. Silhouette Cameo Accessories and ProductsThe Silhouette online store has a full line of silhouette products but they’re usually slightly more expensive than other online stores (but still half what they charge at Michaels).Some of the best prices I’ve found in Canada are on amazon. You can usually get mats, blades and tools for a few dollars cheaper and they’re often part of amazon prime or offered as part of a free shipping deal. For example, I can often buy blades for 10-12 dollars each.

    Others have used Silhouette “compatible” blades like the Graphtec CB09 which can cost only 2 dollars a blade. I’ve personally not tried this before but many claim that the blade stays sharper even longer than the silhouette brand ones.

    BLACK FRIDAY DEALS on the Silhouette online store
    There are really no silhouette deals like the silhouette black friday machine and accessory bundles. For example, a portrait bundle for $99. If ever my cameo broke, I’d wait until black friday to replace it, or if I wanted to try one of their new machines like the Mint. It’s the same price as normal but they throw in extra accessories.

    Check out the silhouette online store here.

    The Silhouette Design store has monthly design sales for up to 50% off. Sign up for their newsletter to be notified of all their deals.

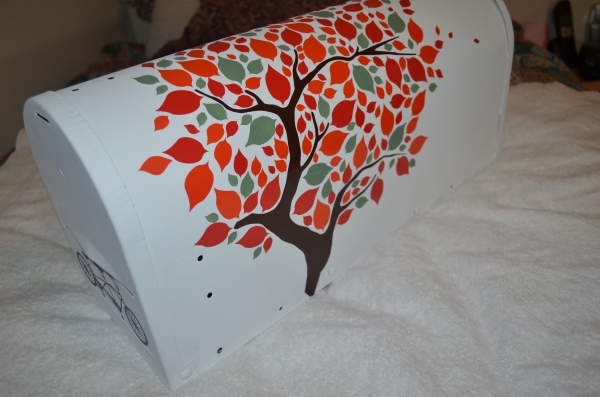
  3. Heat Transfer Fabric/Vinyl       Heat transfer material is so awesome but they cost 16.99 a roll on the Silhouette website and $24 bucks at Michaels and you only get about 3 feet of the stuff. I can usually make…maybe 2-3 T shirts per roll.Well, there are a ton of websites out there that sell high quality heat transfer material or adhesive craft vinyl (not heated, just for sticking on smooth surfaces) for much cheaper. One I’ve used recently is Flex Heat Transfer Vinyl.
    Heat transfer and craft vinyl for $3-4 dollars a sheet and it comes in a 12″x 20″ sheet so that it feeds directly into my silhouette cameo.

    Check out the mailbox I made for my friends for their wedding using the craft vinyl: DSC_0403

  4. EmbellishmentsStickers and gemstones can be quite pricey but there are many nice adhesive rhinestones and 3D stickers, ribbons and storage containers from your local dollar store.
  5. Eyelets and BradsEyelets are commonly used in sewing and fashion and you can often find a variety of simple eyelets from fabric stores for very cheap. I get mine from Dressew for 25 cents for 50-100 eyelets. Yes, that’s 25 cents! They also sell a plethora of ribbons, beads and flowers for all your crafting needs. They also have a scrapbooking section but I find the quality of the products not up to my standards. But they would certainly be useful to someone trying out scrapbooking for the first time because they’re very cheap.
  6. Michaels CouponsMichaels sends out coupons every week and their best ones are the 50% off one regular priced item or the 25-30% off entire regular and sale purchase. Never buy anything from Michaels for full price because they mark up their items by like 300%.Best part is you don’t have to print out the coupons, just show them on your smartphone. You can find Michaels coupons on their website flyer.
  7. Pay US shipping prices (often free) even if you live in Canada.                   This tip only applies to people who live close to the US border. Ship your items to a shipping and receiving company (like Hagen’s of Blaine) and drive across the border to pick it up. And fill up on the cheap gas while you’re there!


There are many other cost cutting methods I use but they typically involve keeping an eye out for clearance items and finding deals. There are lots of deals at Michaels but the best ones usually sell out immediately so check back often or just be lucky!

What are some of your money-saving tips? Share them below!


Hacks for the Silhouette PixScan – creative ways to use it!

Silhouette PixScan

As most people who own a Silhouette Cameo or Portrait already know, Silhouette America just came out with a new addition to their versatile cutting systems: the PixScan.

Honestly I’m surprised that this iconic machine didn’t come pre-built with the PixScan technology. But being the crowd-following individual I sadly am, I never questioned why it never existed even though I have, countless times over, tossed an idea in the trash because this technology wasn’t available in my moment of need. Therefore I am experiencing that sensation when you discover a new paper pad or Martha punch and you feel and overwhelming urge to just have that item in your possession. Yes, this is exactly how I feel about the PixScan mat.

So you might be wondering…what has gotten this crazy girl all obsessive about?

Well there are plenty of resources out there such as this fine blog which outlines the basic requirements for a Silhouette user (or non-Silhouette user if you so unfortunately happen to be one). Or check out the video from the Silhouette America website:

In short, it’s a sticky PixScan mat with registration marks already on it, you put your desired material/picture on it and then take a photo or scan it. Transfer the image file to your computer and import the image using the Silhouette studio 3.1 or higher software. The Software automatically detects the registration marks and makes a virtual flattened image of your picture (adjusting for angles, lopsidedness, overall shaky photography skills) at which point you can then proceed to create masks, outlines, shapes of every size, etc. etc. etc. to cut out of your material already tacked on to the PixScan mat. Just don’t readjust your picture or you’ll have to start all over again…

So why I’m excited about it…but first a little background on my experiences with cutting images out of paper…

It takes me forever to fussy cut a stamped image and I have never been able to master the detailed precision cutting that only my cameo could manage. And being the perfectionist I am, it is often frustrating when I can’t achieve the perfect cut of nice image from pretty printed papers. I always envied the crafty ladies who could cut such beautiful figures from their G45 papers or delicate flowers and whimsical animals off of a thin magazine page.

I remember one time when I was making a birthday card for my BFF and I had stamped a Tim Holtz’s stamp of a bird…I spent nearly an hour cutting out my stamped image…those little tiny legs and delicate feathers. Using a combination of scissors, xacto knife, sweat and blood, I finally managed to pry the wretched thing away from the cardstock. At any point during that one gruelling hour, I would have done anything for the PixScan technology…

Okay, so why I’m REALLY excited about the PixScan for the Silhouette:

1. cutting out stamped images

Instructions: Stamp an image using preferably medium to dark ink. Use PixScan as demonstrated above. Cut. Apply as desired.

You can probably use lighter inks as well but if you wanted to create a mask over your image to make an outline around it and cut around your irregular shape as close as possible (like print and cut), the software may not be able to pick up inks that are too light (like yellow).

You might be wondering now, how to cut around an image of choice (ie. print and cut)? Look at this video from UnderACherryTree.

I always admire the stamp and die sets that you can purchase from places like Simon Says Stamp and more recently at my local Michaels store. That is until you look at the astounding price tag and have a heart attack. Such a tiny stamp…with such a tiny die…for 50 dollars??? I could eat out for lunch and buy groceries for a week with 50 dollars! However cute the projects you could create with such a set, the notion of using one of these stamp/die sets is exactly that…a notion. It’s not easy being a student with an expensive hobby…that’s why I always have to be careful of how I spend my money. Which brings me to my next point:

2. It’s economical.

Instructions: buy a PixScan mat. And a Silhouette cutting machine if you don’t already own one.

Martha Stewart makes these little stamp and punch tools where you stamp an image and cut around the shape precisely. However they’ll run you for about $25 bucks a piece. As mentioned earlier, the die and stamp sets go anywhere from 20 dollars to 50 dollars.

The PixScan mat is 14.99 USD. almost half the price of other stamp/die sets. Buy it here.

However the Silhouette Cameo is $270 at Michaels.For a cheaper option, consider the Silhouette portrait which goes for $129 when it’s on sale. Check Amazon, they usually have good deals.

3. The possibilities are endless.

Instructions: Select ANY cute image for a project. Now use the PixScan to cut it out. Apply as desired.

You aren’t limited to just one image or just one shape to cut or just one type of material. You can try so many different things!

If you had a piece of patterned paper with say…many different stars of different sizes. You find that you don’t have the right paper punch and you need to cut out 2 dozen for cupcake toppers. This would take forever cutting out by hand…No problem, just send them through the PIxScan. Done in likely 5-10 mins.

4. Sketch precisely at any desired location on your patterned paper.

Instructions: Use Pixscan with desired paper. Sketch in appropriate location on paper.

I don’t know why Silhouette never really showcases their sketch feature but it’s actually quite capable of many different things. I have to say at this point, I do not know whether or not the software allows you to use the sketch feature with the PixScan but I can’t imagine why they wouldn’t allow you or why they wouldn’t implement this ability in the future.

For example, if you wanted to sketch something on patterned paper or a die-cut piece, you can do so using the PixScan.

I imagine this would be really popular for things such as invites, greeting cards, place cards, tags, etc. Or maybe you just have ugly writing and you’d rather your recipient be able to read your heartfelt sentiments on your irregular shaped paper. You can’t print on non-standard papers in the shapes of stars, moons and heart. Believe me…I’ve tried…it’s not pretty. But you can sketch on it with the PixScan! Cool huh?

5. Cut out your photographs with utmost precision!

Need to precisely cut a photograph to fit in a project piece like a specific frame? Or need to cut out your child’s head to paste on every imaginable surface within reach? Inanimate or animate? (Disclaimer: I do not have children, but I certainly admire the creativity, and sometimes voraciousness, exhibited by women who do).

Look no further, you can use the PixScan!!!

Okay…now I’m tired out from being overly excited about this. So now I’m going to put a damper on this technology as a warning of the possible pitfalls:

Why the PixScan may make you rip out your hair: 

As much as I love the Silhouette Studio software, I can’t say it doesn’t come with its limitations. Even being an advanced user of Adobe Illustrator, I sometimes struggle to make the perfect line, curve or outline using the studio software. Perhaps the Designer edition would diminish some of these frustrations but most Silhouette users will own only the studio software.

Therefore, take the PixScan technology with a grain of salt:

There is a learning curve to using the PixScan and adapting it to do what you need it to do for your projects. There are tons of youtube tutorials out there that teach you how to use the Studio software to its full potential but it’s not going to be a walk in the park and it will be time consuming. Hopefully the satisfaction you receive from creating a masterpiece exactly as you imagined it (or even better) will be reward enough for you to take the leap and learn a new skill. I personally feel the end result is worth the effort but it’s up to you what you feel you can do. You can still create beautiful, unique and one of a kind results with even just basic computer skills using the software  if handling some of the more advanced features are a little over your head.

So don’t be shy, hop over to youtube and get your brain juices on.

And don’t forget to comment below your thoughts and questions on the new PixScan from Silhouette.

Disclaimer: I do not work for Silhouette America, I just love their products and I want to share my wonderful experiences with the world. I have owned a PixScan for about 3 years now and have used it a few times but I haven’t taken advantage of the full capabilities of it which I am really looking forward to doing very soon!