Tag Archives: 3D

Tutorial – 3D light up marquee letters

If you’re just looking for the cutting file, the edited version of the letter “G” can be downloaded here

For tutorial, please see below!

Hello! It’s been some time since my last blog post! So much has happened and it’s been a whirlwind of activity. I finished my doctorate degree, moved across the continent to the east coast where I’ve set up my new home and started a post-doc fellowship. But I couldn’t leave without bringing with me my precious crafting supplies! I even packed my Silhouette Cameo in my luggage (I’d forgotten to pack it in the shipping cube…oops!).

After we got set up in our new home, our baby came join us in the east coast and he had a big road trip all the way from Vancouver!

IMG-5962

To welcome him home, I decorated his own little corner. I wanted to make it really special write his name out in lights! So I made 3D marquee letters that actually light up by remote control! It took a whole week’s worth of evenings but it was well worth it. It turned out better than I imagined!

I used paper to make the 3D letters using Carina Gardner’s marquee 3D letters cutting files from the Silhouette design store. The files and a tutorial from Carina Gardner can be found here.

In general, I really liked these letters; however, I found that some of the letters were somewhat confusing to assemble and some pieces were sized a little strangely so they weren’t the same size as the other letters. I don’t know if I assembled them erroneously as I found the that there were minimal instructions. There were some guidelines on Carina Gardner’s website. As a perfectionist, this bothered me a lot so I edited some of the pieces. For example, for the letter “G”, one piece was too long so I shortened it, and rounded out a bit more the front piece. This 3D “G” letter can be downloaded here. 

Some of the other rounded type letters like the R could also be shaped a bit better but the straight letters like the “I” or the “T” could very easily be assembled. For additional questions on assembly, check out Carina Gardner’s website or leave a comment below.

To make the letters light up, I purchased dimmable fairy lights from Amazon

The fairy lights came with a remote control too so that I could control brightness of the lights. The wire also bends so that I can make it into any shape I like. I really LOVE these fairy lights!!! Also they’re LED lights so they don’t heat up even after being on a long time so that there’s virtually no fire hazard. Remember that the letters are made of paper and if you use non-LED lights, they may heat up and burn the paper and cause a fire.

To attach the fairy lights, I lined up the lights with the holes in the marquee letters and just used a strong tape (here I used masking tape) to adhere the wire part to the back of the letters.

To hang the letters on the wall, made holes using a hole punch on the sides at the top of each letter and just strung a string through all the letters. I hung the letters to the wall using a dozen and half of these Command decorating tips. These are great because they don’t damage the wall.

And here’s the final product:

IMG-5932

IMG-5930


Hope this tutorial was easy enough to follow! Leave a comment below and let me know how you liked this tutorial!


Copic marker-colored Christmas cards

It’s been some time since I made a post, almost half a year in fact. My time flies! Life has been eventful in many good ways and I’m looking forward to sharing with you all many of my creations these past few months.

This slideshow requires JavaScript.

But first off, I’d like display some of the Christmas cards I’d made for my friends and family this past Christmas. Copic colouring has become a new hobby of mine and because they’re so pricey, I managed to snag a few cheaper knock off alcohol markers on Aliexpress. I’ll put up a blog post about that soon but from my initial foray into alcohol markers, they seem to work quite well!

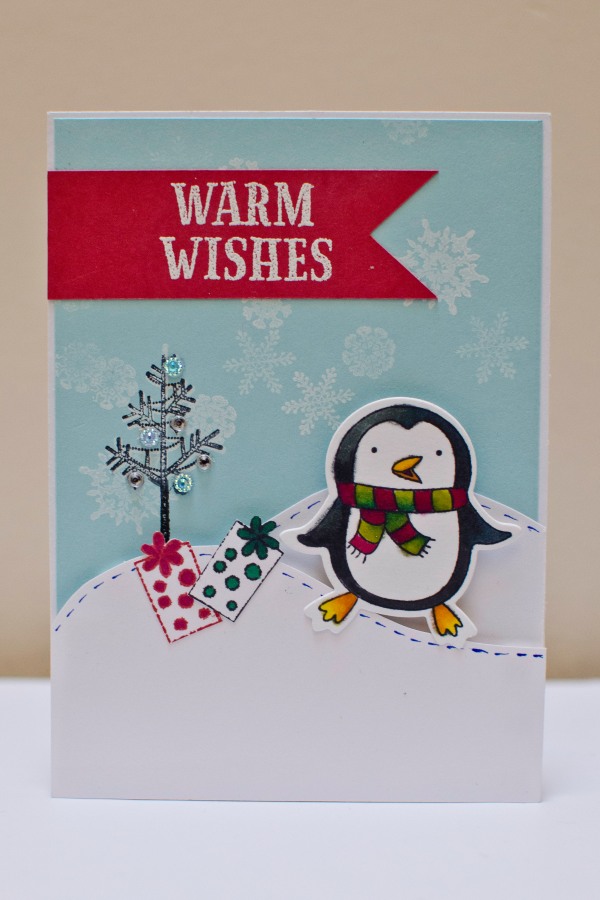
I wanted a cute and wintery theme for my cards so I used my Hampton Art Stamp and Die set – Penguins.
SC0714 Stamp & Die Set - Penguins

In order to use this die you need to have a Sizzix or cuttlebug die-cutting machine.

I stamped the image of the penguins using Memento in Tuxedo black by Tsukineko which is one of the best dye inks for alcohol marker coloring. After coloring the penguins, I cut them out using the penguin die.

To decorate the cards I used a few different kinds of backgrounds, here are a few:

1. staggered snow fields. I used foam dots to create dimension on the snow fields. I used a blue cardstock as the background and stamped white snow flakes .

dsc_0585

2.  A fat ornament on an embossed background. I purposely made the ornament enormous so that it would take up half the card. I cut the ornaments out using my silhouette cameo to the size I wanted. Finally I decorated the ornaments with rhinestones or ribbons.

Finally I used a banner with a white embossed greeting and attached the penguins with a foam dot to make it 3D.

I loved the rhinestone-embellished ornament so much that I made card featuring just the ornament on an embossed background!

Well that’s it I hope you enjoyed these cards and stay tuned for more!


Romantic Vintage Valentine’s Card with Textured Embossing

With valentine’s day just around the corner, I wanted to share my most recent card creation with you all. I bought some gesso a while ago and I hadn’t really had a good chance to use it so I decided to use it in this card.

I’ve titled this card Romantic Fairytale Dream, doesn’t it look like a fairytale from a little girl’s dream? When I was much younger, I used to dream about what it would be like to be a fairy tale princess, to rule over all the land, protect my people and save prince charming. Yes, I know it’s typically the other way around, but I had a lot of strong females as my role models growing up. Us girls can take care of ourselves, and then some.

Romantic Vintage Valentine's Card

I started out with a 5 x 4.5 inch white sheet cardstock which I embossed using a sizzix embossing folder. Unfortunately I forgot the name of the folder but it has diamonds with vintage damasks within each diamond.
To make the damask image really pop, I sprayed a sponge with glimmer mist and gently rubbed the sponge across the surface so that it only stains the raised parts of the embossed image.

Romantic Vintage Valentine's Card


To mask the border because I felt it looked a little strange that it was just empty space, I used gesso, or otherwise known as embossing paste, all around the edge and merging partly into the embossed image. Using my fingertips I dabbed with an up and down motion to give the paste some texture. Embossing paste typically takes a few hours to dry completely depending on how much was used. If it’s a really thick layer, I’d wait until overnight which I did in this case. It wasn’t a particularly thick layer but it I just wanted to be sure.

Romantic Vintage Valentine's Card

I proceeded to make my centrepiece now that the background was complete. Using a piece of pink vellum, I cut out a circular shape with rounded border using a Spellbinders die. I then used a carriage stamp to stamp and emboss the vellum with Versamark and champagne coloured embossing powder.

*note: Vellum is really delicate and it’s really easy to over heat and warp the vellum. Don’t put the heat tool too close to the vellum and switch from heating the front to the back frequently.

Using my Crop-a-Dile, I applied eyelets to the top and bottom of the vellum and threaded pink ribbon to attach the vellum circle to the card. I made a bow with the flapping ends of the ribbon at the top of the eyelet.

Romantic Vintage Valentine's Card

Using a Tim Holtz crown stamp, I stamped using gold ink on kraft cardstock. I fussy cut out the crown and applied it to the edge of the fancy embossed carriage.

I then stamped a rounded rectangle with the words “Dream” and applied that to the corner of the vellum circle using 3D foam dots. Then I used gesso to go over the edges of the sentiment piece. Finally using Liquid Pearls in Platinum I made little droplets on every other circle in the border. Then I let everything dry overnight.

Romantic Vintage Valentine's Card

So there you have it, a fancy vintage valentine’s card. Reminds me of a fairy tale of princes and princesses riding in pumpkin carriages, being carried to their magical destiny.  Romantic Vintage Valentine's Card


So there you have it! I hope you’ve enjoyed this card as much as I’ve enjoyed making it. Hope that this Valentine’s day, you can spend it with someone you love, whether that be your beautiful self or with someone who’s dear and special to your heart.

XOXO~

Kitty Cat Silhouette Christmas Card

I’ve been meaning to upload a few last minute christmas cards that you could whip up really quickly. If you’re anything like me, you’ll likely be trying to pump these out the night before you meet your loved ones and friends so burning the midnight oil well into the night isn’t ideal. But not to worry this next card is so simple to complete, it is literally just choosing a design, some pasting work, add a little bling and you’re done!

Kitty cat christmas card

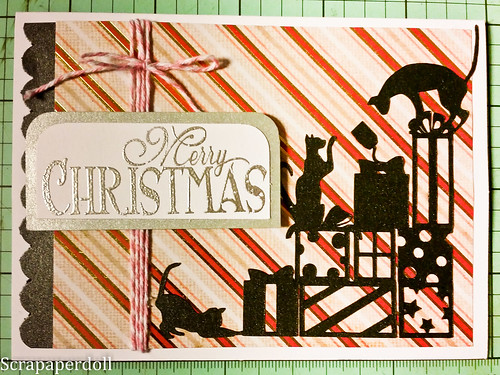
For this project I used my silhouette studio with the following design from the design studio: Cats on stack of presents.

I cut it out on shimmery black cardstock to give it some vibrancy for the holiday season. Likewise my scalloped border was punched out using the same shimmery cardstock.

Kitty cat christmas card

Then I selected a festive background from my stash of Christmas papers and applied the cat silhouette on top and scalloped border on the back. I then wrapped the piece in pink baker’s twine.

Afterwards, I stamped merry christmas with one of my hero arts christmas stamps using clear versamark and heat embossed with fine silver powder. I adhered this sentiment on a back piece of silver cardstock and then used foam dots to apply the sentiment on top of the baker’s twine.

Finally, I applied the whole piece to a 4.5×5 inch cream card using double sided tape.

Bingo Embossed Christmas Card

This card was so simple and easy to make using my Silhouette Cameo and quite frankly a lot of fun since I love cats. I had a great time being able to incorporate some of my favorite pets in a craft project.

But if you don’t like cats or you don’t have this particular sihouette cut out on hand, essentially any silhouette shape can work with a patterned background. Then a sentiment placed on top using foam dots to make it more 3D.

Have fun making this card, it’s great as a last minute card creation!

3D Star Wars Darth Vader bear cake

3D Vader Bear Cake2

As the year is drawing to a close, it’s time to update all the projects I’ve been working on this year.

This post has been waiting to be uploaded for a long time but I finally remembered to make it. I made this 3D darth vader bear cake for my boyfriend earlier this year for his birthday and surprised him with it at the mall of all places. I was deathly ill while making this cake but I really really wanted to surprise him with it so I spent the day making this cake and covering it american buttercream, then black fondant. It’s my first time covering an oddly shaped cake with fondant and my shapes/patterns.

3D Vader Bear Cake3

In some areas the buttercream softened the fondant so much that the fondant broke which gave me a couple of heart attacks…but I somehow managed to either cover it up or just push it back together. I still have a lot to learn about working with fondant and 3D cakes. I probably should have used a stiffer consistency of icing…

3D Vader Bear Cake

But this is certainly one of my favorite cake pans and a go to for many different shapes. I’ve seen online people who use this cake pan to make rabbits, owls and other animal shapes so I’m excited to try those out!

Calendar Style Birthday Card

Calendar Style Birthday Card

I made this card for my BFF a few months back for her birthday but just got around to uploading it. Sorry for being MIA for a while, my studies have been so super busy! I went away to present my research at a conference and although it was probably one of the best experiences of my life, it also left me very little free time for a while.

But I’m back in the game and super excited to share with you all my most recent creations, starting with the least recent haha!

I really wanted to showcase when my BFF’s birthday was which is the 29th of December so I printed out, stained and distressed a calendar that I found online.

I used some glimmer mist in Rouge and Cork using my technique on how to prevent paper from wrinkling after soaking it in wet media and letting it dry. You can find that tutorial here.

Once it dried, I stamped some swirls using Versamark and transparent embossing powder. You can see the glimmer mist underneath of it that way.

Then I just finished up the card by adding a gemstone over the top of the 29th of December because that’s the date of her birthday. And then I just embellished with a flower (I don’t remember what it’s called, an accordion flower? Somebody help!) I cut out with my Silhouette Cameo, but you can also use a Tim Holtz die to do that.

I mounted the calendar onto another piece of cardstock which I punched with a Martha Stewart doily punch just on one edge and then distressed the edges with Vintage Photo. 

Finally I mounted everything onto a card with a pretty pink background I dug out from my scraps stash from DCWV Garden Tea Party Stack.

Share your comments below!