Category Archives: paper cutting

Tutorial – 3D light up marquee letters

If you’re just looking for the cutting file, the edited version of the letter “G” can be downloaded here

For tutorial, please see below!

Hello! It’s been some time since my last blog post! So much has happened and it’s been a whirlwind of activity. I finished my doctorate degree, moved across the continent to the east coast where I’ve set up my new home and started a post-doc fellowship. But I couldn’t leave without bringing with me my precious crafting supplies! I even packed my Silhouette Cameo in my luggage (I’d forgotten to pack it in the shipping cube…oops!).

After we got set up in our new home, our baby came join us in the east coast and he had a big road trip all the way from Vancouver!

IMG-5962

To welcome him home, I decorated his own little corner. I wanted to make it really special write his name out in lights! So I made 3D marquee letters that actually light up by remote control! It took a whole week’s worth of evenings but it was well worth it. It turned out better than I imagined!

I used paper to make the 3D letters using Carina Gardner’s marquee 3D letters cutting files from the Silhouette design store. The files and a tutorial from Carina Gardner can be found here.

In general, I really liked these letters; however, I found that some of the letters were somewhat confusing to assemble and some pieces were sized a little strangely so they weren’t the same size as the other letters. I don’t know if I assembled them erroneously as I found the that there were minimal instructions. There were some guidelines on Carina Gardner’s website. As a perfectionist, this bothered me a lot so I edited some of the pieces. For example, for the letter “G”, one piece was too long so I shortened it, and rounded out a bit more the front piece. This 3D “G” letter can be downloaded here. 

Some of the other rounded type letters like the R could also be shaped a bit better but the straight letters like the “I” or the “T” could very easily be assembled. For additional questions on assembly, check out Carina Gardner’s website or leave a comment below.

To make the letters light up, I purchased dimmable fairy lights from Amazon

The fairy lights came with a remote control too so that I could control brightness of the lights. The wire also bends so that I can make it into any shape I like. I really LOVE these fairy lights!!! Also they’re LED lights so they don’t heat up even after being on a long time so that there’s virtually no fire hazard. Remember that the letters are made of paper and if you use non-LED lights, they may heat up and burn the paper and cause a fire.

To attach the fairy lights, I lined up the lights with the holes in the marquee letters and just used a strong tape (here I used masking tape) to adhere the wire part to the back of the letters.

To hang the letters on the wall, made holes using a hole punch on the sides at the top of each letter and just strung a string through all the letters. I hung the letters to the wall using a dozen and half of these Command decorating tips. These are great because they don’t damage the wall.

And here’s the final product:

IMG-5932

IMG-5930


Hope this tutorial was easy enough to follow! Leave a comment below and let me know how you liked this tutorial!


Copic marker-colored Christmas cards

It’s been some time since I made a post, almost half a year in fact. My time flies! Life has been eventful in many good ways and I’m looking forward to sharing with you all many of my creations these past few months.

This slideshow requires JavaScript.

But first off, I’d like display some of the Christmas cards I’d made for my friends and family this past Christmas. Copic colouring has become a new hobby of mine and because they’re so pricey, I managed to snag a few cheaper knock off alcohol markers on Aliexpress. I’ll put up a blog post about that soon but from my initial foray into alcohol markers, they seem to work quite well!

I wanted a cute and wintery theme for my cards so I used my Hampton Art Stamp and Die set – Penguins.
SC0714 Stamp & Die Set - Penguins

In order to use this die you need to have a Sizzix or cuttlebug die-cutting machine.

I stamped the image of the penguins using Memento in Tuxedo black by Tsukineko which is one of the best dye inks for alcohol marker coloring. After coloring the penguins, I cut them out using the penguin die.

To decorate the cards I used a few different kinds of backgrounds, here are a few:

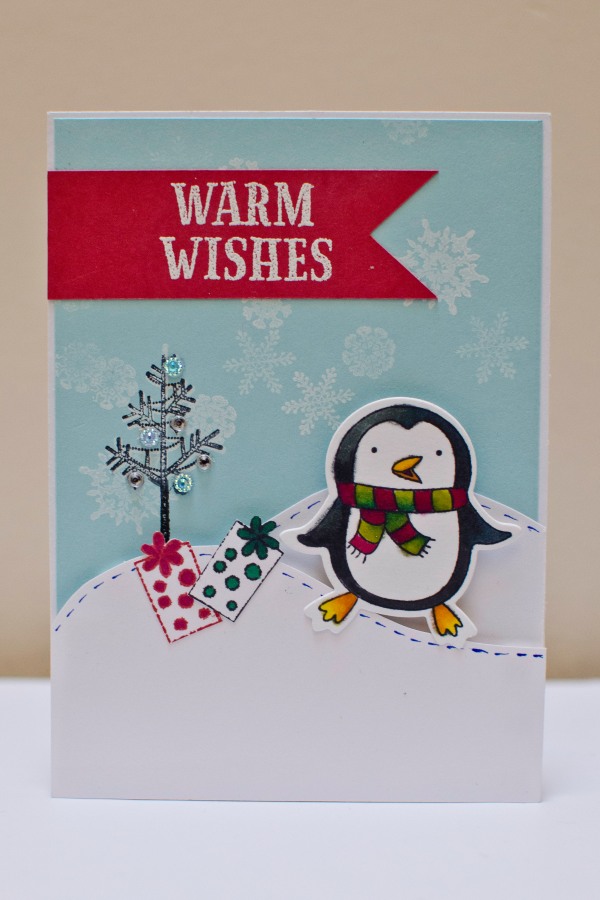
1. staggered snow fields. I used foam dots to create dimension on the snow fields. I used a blue cardstock as the background and stamped white snow flakes .

dsc_0585

2.  A fat ornament on an embossed background. I purposely made the ornament enormous so that it would take up half the card. I cut the ornaments out using my silhouette cameo to the size I wanted. Finally I decorated the ornaments with rhinestones or ribbons.

Finally I used a banner with a white embossed greeting and attached the penguins with a foam dot to make it 3D.

I loved the rhinestone-embellished ornament so much that I made card featuring just the ornament on an embossed background!

Well that’s it I hope you enjoyed these cards and stay tuned for more!


Hack for the Silhouette Cameo Print and Cut – Read Registration Marks Fail

silhouettemainimage1

09-13-15 UPDATED SOLUTION AT THE BOTTOM
To avoid making the same silly mistake I did haha!

I don’t know why after the recent Silhouette studio software overhaul to version 3 there have been so many issues with my print and cut feature that I never experienced before with the old Studio software. Even with the most recent update V3.36 I still encounter the same issues. Looking around on the web hasn’t really fixed my problem because most people claim something magical and random happens when they try a combination of different things like load and unload or turn the machine on or off.

But with my issue, I found that the laser scanner just wasn’t moving the cutting mat far enough to even read the registration marks.

I’ve tried to do the whole manual registration function but I’ve never managed to get it to work, I’m not sure if I’m just doing it wrong or if this manual read function is just bogus.

Regardless, I found a solution to my problem and here’s my hack for getting the silhouette cameo to read the registration marks every time:

  1. Select image to print and cut.
  2. Print image with registration marks.
  3. Adhere printed sheet with registration marks to cutting mat.
  4. Feed/load the cutting mat into the machine.
  5. Turn off the machine. Yes, turn off the machine. Do not remove the cutting mat from the machine when you do this.
  6. Once the light is off, turn the machine back on.
  7. Press “enter” to load the cutting mat again. This will feed the mat a little further in, tricking the machine to think that it’s feeding it the first time around but this time the mat will actually feed more than if you unloaded and loaded again.
  8. In the Silhouette Studio software, press “send to silhouette”.
  9. Sit back and watch the magic happen.

I hope that this hack is useful to some of you who are having a heap of trouble with the print and cut feature like I was. There must be a solution to this problem that I’m missing, perhaps a calibration issue. I’ll keep doing my research and once I find out a solution, I’ll post it.
But in the meantime, if you were having the same problem as I was, perhaps this will solve your issues.

Another thing to consider is that I had to calibrate my cameo to work with my Pixscan mat as well which may have dislocated some virtual limb inside the machine.

Post your solutions/hacks to the Silhouette Cameo print and cut – registration marks fails below!

*UPDATE September 13, 2015
I figured it out.

Turns out on the machine before you even feed your material into the rollers, you use the up and down arrow keys to select whether you want to feed the cutting mat or other media not requiring cutting mat.

2015-09-13 15.49.53

On cutting mat option, the rollers feed the mat into further than with the “media” option. The “cutting mat” option is required for the print and cut function to work. I had selected the “media” option by accident and didn’t realize it, that’s why the rollers weren’t feeding my cutting mat far enough into the back of the machine for the registration marks to read. So there you go. If ever you run into the same problem as me, just double check your selection on the machine control screen. (See where that big black dot is on the upper left side of the screen? That’s the option you’ve currently selected.) Use the arrow keys to change it to the correct type of media.

I’ve tried manually reading the registration marks. I don’t quite understand why they have this function because it has never worked for me even when I have the correct feeding function selected.

Lucky St. Patty’s freebie – Nespresso grand crus holder/organizer

*update May 20, 2018
A nice visitor to my blog informed me that my old link no longer works so I’ve transferred the file to Dropbox. Just click the link here or below to access the free dispenser file! 


Happy March!

It’s the happiest month of the year, there is no better better month than March!

So in celebration of March and Saint Patrick’s day, I’ve created an organizer/holder for the nespresso grand crus. I didn’t want to shell out the money to pay for one because they’re so expensive.

Download the Nespresso dispenser here!

So I used my silhouette cameo to print 4 of them and then I assembled them by folding along the dotted lines.

2014-1

You can also line them up one next to the other so you have a row of them. You just insert the rectangular tubes in after opening. Every time you want to have a nespresso, just lift the box of the flavour you want and one capsule will pop out!

So easy! So this is how I’ve been storing my nespresso capsules!

2014-2

I would love to hear your comments or suggestions for improvement!

Enjoy~