Tag Archives: troubleshooting

Hack for the Silhouette Cameo Print and Cut – Read Registration Marks Fail

silhouettemainimage1

09-13-15 UPDATED SOLUTION AT THE BOTTOM
To avoid making the same silly mistake I did haha!

I don’t know why after the recent Silhouette studio software overhaul to version 3 there have been so many issues with my print and cut feature that I never experienced before with the old Studio software. Even with the most recent update V3.36 I still encounter the same issues. Looking around on the web hasn’t really fixed my problem because most people claim something magical and random happens when they try a combination of different things like load and unload or turn the machine on or off.

But with my issue, I found that the laser scanner just wasn’t moving the cutting mat far enough to even read the registration marks.

I’ve tried to do the whole manual registration function but I’ve never managed to get it to work, I’m not sure if I’m just doing it wrong or if this manual read function is just bogus.

Regardless, I found a solution to my problem and here’s my hack for getting the silhouette cameo to read the registration marks every time:

  1. Select image to print and cut.
  2. Print image with registration marks.
  3. Adhere printed sheet with registration marks to cutting mat.
  4. Feed/load the cutting mat into the machine.
  5. Turn off the machine. Yes, turn off the machine. Do not remove the cutting mat from the machine when you do this.
  6. Once the light is off, turn the machine back on.
  7. Press “enter” to load the cutting mat again. This will feed the mat a little further in, tricking the machine to think that it’s feeding it the first time around but this time the mat will actually feed more than if you unloaded and loaded again.
  8. In the Silhouette Studio software, press “send to silhouette”.
  9. Sit back and watch the magic happen.

I hope that this hack is useful to some of you who are having a heap of trouble with the print and cut feature like I was. There must be a solution to this problem that I’m missing, perhaps a calibration issue. I’ll keep doing my research and once I find out a solution, I’ll post it.
But in the meantime, if you were having the same problem as I was, perhaps this will solve your issues.

Another thing to consider is that I had to calibrate my cameo to work with my Pixscan mat as well which may have dislocated some virtual limb inside the machine.

Post your solutions/hacks to the Silhouette Cameo print and cut – registration marks fails below!

*UPDATE September 13, 2015
I figured it out.

Turns out on the machine before you even feed your material into the rollers, you use the up and down arrow keys to select whether you want to feed the cutting mat or other media not requiring cutting mat.

2015-09-13 15.49.53

On cutting mat option, the rollers feed the mat into further than with the “media” option. The “cutting mat” option is required for the print and cut function to work. I had selected the “media” option by accident and didn’t realize it, that’s why the rollers weren’t feeding my cutting mat far enough into the back of the machine for the registration marks to read. So there you go. If ever you run into the same problem as me, just double check your selection on the machine control screen. (See where that big black dot is on the upper left side of the screen? That’s the option you’ve currently selected.) Use the arrow keys to change it to the correct type of media.

I’ve tried manually reading the registration marks. I don’t quite understand why they have this function because it has never worked for me even when I have the correct feeding function selected.

How to prevent wet paper from wrinkling when dried

One of the things that I hate about using wet media when scrapbooking or crafting is that afterwards, the paper dries all wrinkly and ugly. As much as I like the wrinkly look for SOME projects, I don’t necessarily like it for ALL of my projects. So, I’ve adapted one of the techniques I normally use for watercolour painting to prevent my paper from curling, developing ridges and overall looking anything other than smooth.

How to prevent wet paper from wrinkling when dry

Measure out a piece of cardstock for your project and add 1/2 inch to each of the four sides. Cut it out.
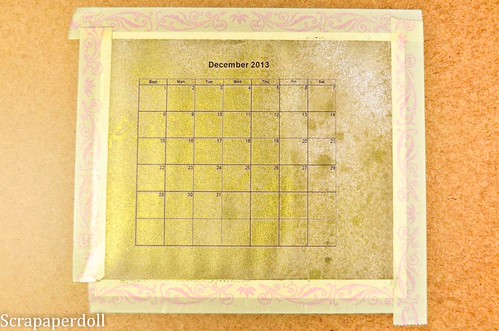
I’ve printed a picture of a calendar for a birthday card project and cut it down to size.

Tape that piece of cardstock to something hard, like a big fat heavy textbook or encyclopaedia. Or tape it to your craft table.

You can use washi tape or masking tape. Masking tape is better but whatever you have lying around is just fine.

I’m using washi tape in the above photo because I have this really terrible washi tape from K and Company’s Smash album. Terrible Terrible stuff. With a capital T. Thankfully, it won’t go to waste because I can just use it for taping stuff down like when I’m die-cutting for example.

MAKE SURE YOU TAPE DOWN EVERY ONE OF THE FOUR SIDES COMPLETELY.
This is essential to ensuring you have your desired final product free of wrinkles. If you miss even a little bit of the paper, you’ll have an imperfect paper after it dries. But hey, maybe that’s what you were going for?

How to prevent wet paper from wrinkling when dry

Spray your favourite glimmer mist or use your distressing inks or water colour pencils, etc. Have fun, go crazy, make a mess, it’s all good!

Mine looks like this after:

How to prevent wet paper from wrinkling when dry

Now let it dry completely.

It should look like this!
How to prevent wet paper from wrinkling when dry

See how flat it looks?

How to prevent wet paper from wrinkling when dry

And this is how it looks after I’ve cut it out!

I’m using a rectangle piece of cardstock for my project, but your project may need a different shape. Just use this method to ink up a larger sheet of cardstock and cut/punch out your desired shape after the paper dries. So simple right?

TROUBLESHOOTING

1. Tape lifts up from page after applying wet media.

Possible reasons why:

– Your tape is probably not suitable for wet media projects. Try masking tape, it’s awesome!
– You didn’t press your tape down firmly and there was a gap somewhere. It’s ok, just remove the piece that became unstuck, try to blot the wet area with a paper towel and then stick another piece of tape over it.

2. The paper dried wrinkly

Possible reasons why:

– Your cardstock was too thin. This technique doesn’t work with paper unfortunately because paper is so thin it’s flexible and can stretch a bit when wet. Try using a thicker cardstock next time like Baziill. I’m using Recollections cardstock here which works ok, not the best but ok…it’s cheap.

– Your tape may have come loose upon applying wet media or during the drying process. See above solutions.

And that’s it! Post a comment below if you have questions, this technique allows me to create vintage yet neat projects which I really love!

Have fun with all your wet media!