Category Archives: Scrapbooking

Cherry Blossom Watercolor Tutorial

I’ve been really into watercolors and the versatility of them. However, I have very little skill in drawing, which makes watercoloring difficult…or so I thought. I recently started watching Art Impressions tutorials on Youtube where they use their watercolor stamps with water-based markers to stamp with. Then they go in with a waterbrush and just smudge out the lines to color in the structures. The end result is a gorgeous watercolor scenery that took minimal effort to make. They make it look so easy.

Unfortunately, I don’t have any Art Impressions stamp sets but I did pick up “Birch Land” stamp set from Altenew (one of my favorite brands!!!) on a previous haul. This stamp set features a beautiful tree with branch pieces and different sized arrays of leaves.

Birch Land Stamp Set - Altenew

The details in this stamp set is beautiful, the lines are super crisp and the stamp set was meant to be layered. I love the sentiments in this stamp set and how I can mix and match words to make a custom sentiment.

I used Tombow Dual Brush pens in the Landscape Palette to stamp the tree, branches and bird house. I also used Distress Inks to stamp the leaves.

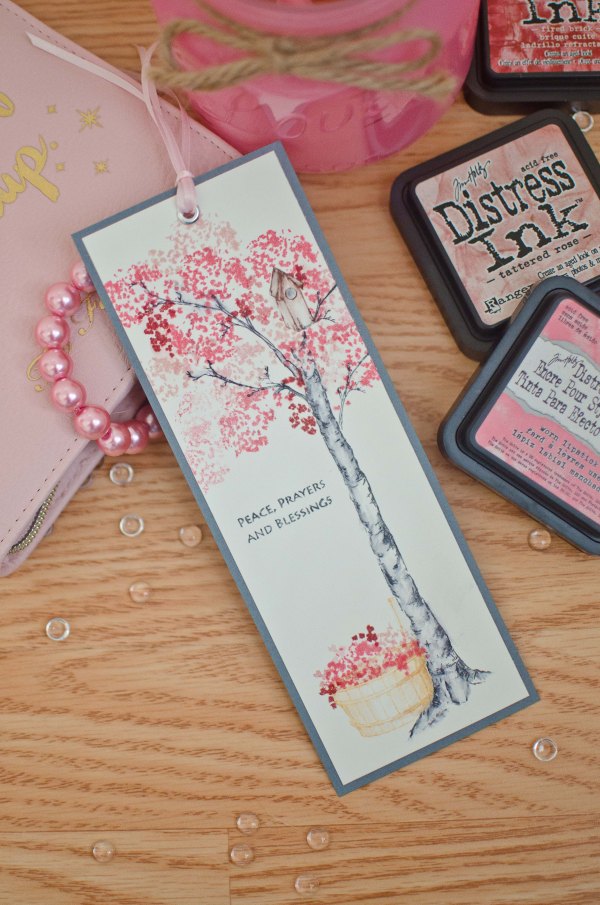
And this is what I came up with!

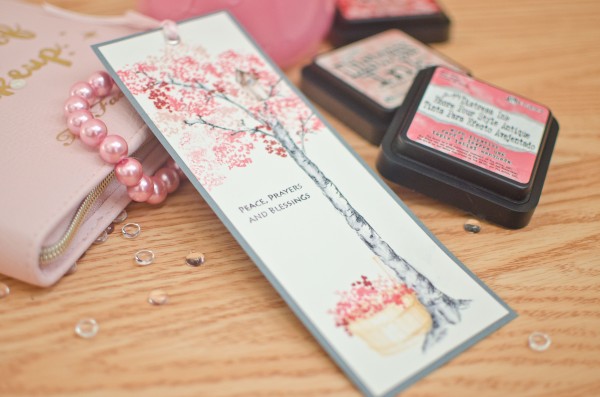
Cherry blossome bookmark (1 of 5)

I started with a long strip of water color paper that I had left over from another project.

For the tree and branches I used Tombow N25. Then taking a waterbrush (a wet watercolor brush will work fine too) I went over some of the inked parts on the tree and branches and started pulling some of the ink towards the centre of the tree to color it in. I made sure not to color the entire tree “grey” so that there are some dark spots and some light spots to add additional dimension. This part may need some practice as pulling too much ink inwards could blur the lines and lose detail in the work.

For the birdhouse I used Tombow 899. Again I used the waterbrush to color in the birdhouse.

The blossoms were stamped using a mix of Distress inks in work lipstick, tattered rose and fired brick. Layering these worked really well just keep in mind that if you’re unsure of where to begin, always start with the lightest color first. You can always stamp over it with a darker color later.

The basket was stamped in Distress Ink dried marigold. Then I stamped the same ink pad on an acrylic block and picked up some of the color with a damp brush and started coloring the basket in, leaving a bright/light spot in the middle to give the basket more dimension.

Finally, I finished the wet media part by stamping a sentiment.

Cherry blossome bookmark (4 of 5)

To finish everything off, I cut the top white space of water color paper off the top and adhered it onto a grey piece of cardstock. Then I added a silver eyelet at the top and strung some strands of pink ribbon through.

To preserve the watercolor and prevent it from fading and smearing, spray it with a light mist of cheap hairspray to seal everything. Learned this trick from my watercolor instructor when I still took art lessons.

Cherry blossome bookmark (3 of 5)

Hope you enjoyed this tutorial, let me know what you think in the comment box below. And let me know if you tried this or if you have any questions about what I did!


Copic marker-colored Christmas cards

It’s been some time since I made a post, almost half a year in fact. My time flies! Life has been eventful in many good ways and I’m looking forward to sharing with you all many of my creations these past few months.

This slideshow requires JavaScript.

But first off, I’d like display some of the Christmas cards I’d made for my friends and family this past Christmas. Copic colouring has become a new hobby of mine and because they’re so pricey, I managed to snag a few cheaper knock off alcohol markers on Aliexpress. I’ll put up a blog post about that soon but from my initial foray into alcohol markers, they seem to work quite well!

I wanted a cute and wintery theme for my cards so I used my Hampton Art Stamp and Die set – Penguins.
SC0714 Stamp & Die Set - Penguins

In order to use this die you need to have a Sizzix or cuttlebug die-cutting machine.

I stamped the image of the penguins using Memento in Tuxedo black by Tsukineko which is one of the best dye inks for alcohol marker coloring. After coloring the penguins, I cut them out using the penguin die.

To decorate the cards I used a few different kinds of backgrounds, here are a few:

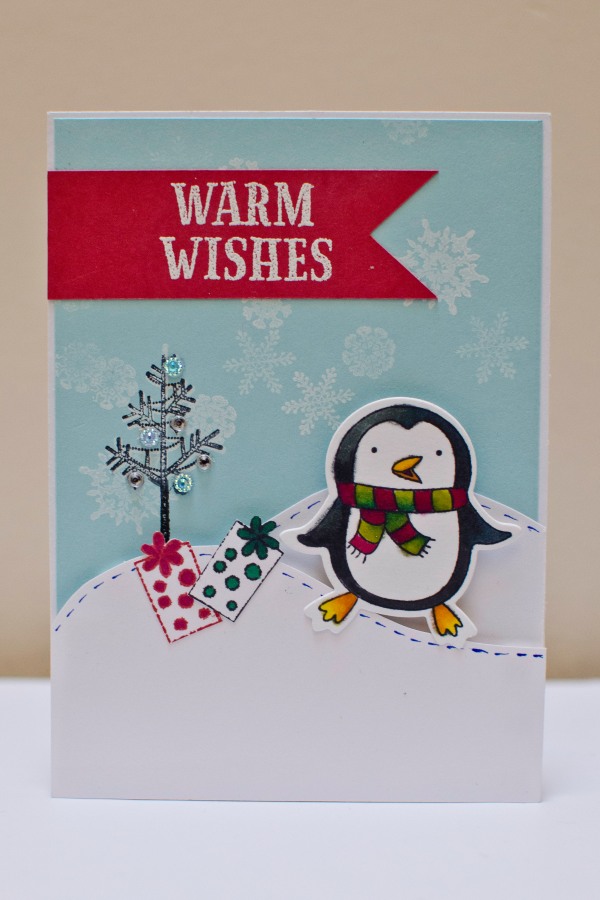
1. staggered snow fields. I used foam dots to create dimension on the snow fields. I used a blue cardstock as the background and stamped white snow flakes .

dsc_0585

2.  A fat ornament on an embossed background. I purposely made the ornament enormous so that it would take up half the card. I cut the ornaments out using my silhouette cameo to the size I wanted. Finally I decorated the ornaments with rhinestones or ribbons.

Finally I used a banner with a white embossed greeting and attached the penguins with a foam dot to make it 3D.

I loved the rhinestone-embellished ornament so much that I made card featuring just the ornament on an embossed background!

Well that’s it I hope you enjoyed these cards and stay tuned for more!


Cheap Thrills and Pretty Frills – Scrapbooking on a Budget

As a student, I don’t have a lot of extra cash to splurge on expensive embellishments, fancy papers or even foam tape. Over the years, I’ve come to be very adept at looking for deals and cheap thrills when it comes to paper crafting. And who’s noticed that it’s almost impossible to get decently priced shipping of anything to Canada? The US economy would be booming if only they shipped to Canada at reasonable prices! So more often than not, I and my crafty friends opt out of cheap US prices and pay the premium at Michaels. It’s still cheaper than paying for shipping. But don’t worry, below are some ways I get around these problems.

So if you love to craft but can’t afford to splurge, there are still ways to achieve beautiful creations using thriftier methods. Read on to see my tips:

*Disclaimer, I am not paid to advertise these companies, these are just the ones I use and in my opinion the cheapest products I can get in Canada and I wanted to share these money saving tips with other scrapbookers.

  1. ATG double sided tape
    Who doesn’t love ATG tape or just using double sided tape in general? But at 16.99 CAD for two rolls, I used to tape just the corners of a square and pray that my paper would stick…
    So here’s a cheaper alternative to ATG tape, check out The Tape Depot

    For ~$26 USD, you can get 12 rolls of ATG-compatible double sided tape at a variety of sizes. My favorite size is 1/4 inch. This comes out to just over 2 bucks a roll! Much better than $8.50 per roll from Michaels and many other scrapbookers claim that this tape works even better than 3M brand ATG tape!

  2. Silhouette Cameo Accessories and ProductsThe Silhouette online store has a full line of silhouette products but they’re usually slightly more expensive than other online stores (but still half what they charge at Michaels).Some of the best prices I’ve found in Canada are on amazon. You can usually get mats, blades and tools for a few dollars cheaper and they’re often part of amazon prime or offered as part of a free shipping deal. For example, I can often buy blades for 10-12 dollars each.

    Others have used Silhouette “compatible” blades like the Graphtec CB09 which can cost only 2 dollars a blade. I’ve personally not tried this before but many claim that the blade stays sharper even longer than the silhouette brand ones.

    BLACK FRIDAY DEALS on the Silhouette online store
    There are really no silhouette deals like the silhouette black friday machine and accessory bundles. For example, a portrait bundle for $99. If ever my cameo broke, I’d wait until black friday to replace it, or if I wanted to try one of their new machines like the Mint. It’s the same price as normal but they throw in extra accessories.

    Check out the silhouette online store here.

    The Silhouette Design store has monthly design sales for up to 50% off. Sign up for their newsletter to be notified of all their deals.

  3. Heat Transfer Fabric/Vinyl       Heat transfer material is so awesome but they cost 16.99 a roll on the Silhouette website and $24 bucks at Michaels and you only get about 3 feet of the stuff. I can usually make…maybe 2-3 T shirts per roll.Well, there are a ton of websites out there that sell high quality heat transfer material or adhesive craft vinyl (not heated, just for sticking on smooth surfaces) for much cheaper. One I’ve used recently is Flex Heat Transfer Vinyl.
    Heat transfer and craft vinyl for $3-4 dollars a sheet and it comes in a 12″x 20″ sheet so that it feeds directly into my silhouette cameo.

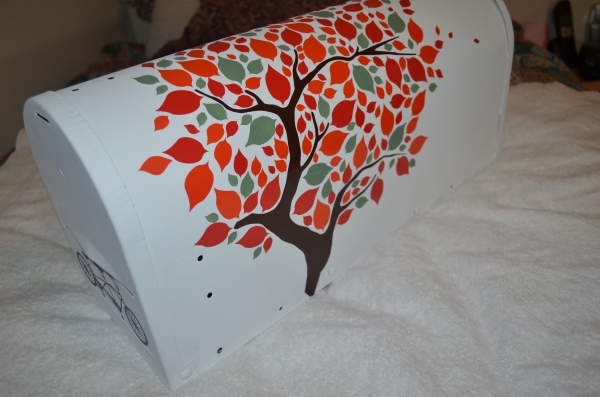
    Check out the mailbox I made for my friends for their wedding using the craft vinyl: DSC_0403

  4. EmbellishmentsStickers and gemstones can be quite pricey but there are many nice adhesive rhinestones and 3D stickers, ribbons and storage containers from your local dollar store.
  5. Eyelets and BradsEyelets are commonly used in sewing and fashion and you can often find a variety of simple eyelets from fabric stores for very cheap. I get mine from Dressew for 25 cents for 50-100 eyelets. Yes, that’s 25 cents! They also sell a plethora of ribbons, beads and flowers for all your crafting needs. They also have a scrapbooking section but I find the quality of the products not up to my standards. But they would certainly be useful to someone trying out scrapbooking for the first time because they’re very cheap.
  6. Michaels CouponsMichaels sends out coupons every week and their best ones are the 50% off one regular priced item or the 25-30% off entire regular and sale purchase. Never buy anything from Michaels for full price because they mark up their items by like 300%.Best part is you don’t have to print out the coupons, just show them on your smartphone. You can find Michaels coupons on their website flyer.
  7. Pay US shipping prices (often free) even if you live in Canada.                   This tip only applies to people who live close to the US border. Ship your items to a shipping and receiving company (like Hagen’s of Blaine) and drive across the border to pick it up. And fill up on the cheap gas while you’re there!


There are many other cost cutting methods I use but they typically involve keeping an eye out for clearance items and finding deals. There are lots of deals at Michaels but the best ones usually sell out immediately so check back often or just be lucky!

What are some of your money-saving tips? Share them below!


Getting started with calligraphy and hand lettering

2015-10-27 02.35.03

It seems like many scrapbookers like Kristina Werner, Heidi Swapp, etc are all getting into more hand lettering. As such, I’ve been really interested in learning how myself. I’ve already mastered the art of Chinese calligraphy as a child because of many opportunities to learn from experts as a kid, but western calligraphy has always eluded me.

So to jump on this band wagon, I began exploring at my local Michaels store to get started with hand lettering.  (Scroll down for a list of the cheapest essential tools to get started)

Dip nibs are cheap, traditional and the method that most people use to write calligraphy.

So here is what I did first, I initially purchased a round hand nib set by Manuscript:

This nib set is great for gothic style, italic and round hand fonts.

An excellent tutorial on how to get started with this type of font is here.

This is a very easy set to start with and was easy to pick up but some of the more elaborate gothic fonts, although beautiful required more practice. I wanted to accomplish other types of scripts though that these more traditional nibs were not able to achieve.

I soon found out that modern calligraphy and more stylish types of hand lettering required flexible pointed nibs. These nibs can also be used to write the beautiful cursive fonts like spencerian script or copperplate script.

Here is an example of modern calligraphy from Lindsey Bugbee

Cheating Calligraphy Tutorial | The Postman's Knock

So here is the list of items you need:

  1. small pot of water for rinsing ink off
  2. India Ink (Speedball brand ink gives the best results)
  3. Paper: The best paper for ink calligraphy is bristol, but this is quite expensive for practising. Therefore to practice, I use graph paper or higher quality lined paper by Hilroy like the “On the Edge” style of lined paper. It’s much smoother and less likely to bleed. Some of the best papers for fountain pen ink is by Rhodia or ClaireFontaine but these are a bit more expensive than lined/graph paper.


  4. pointed pen and nib set like this one from Michaels for about 10 dollars

These are the basics of what one needs to get started. Plenty of tutorials exist on youtube, pinterest and google. A quick search for cursive fonts or modern hand lettering will bring up a plethora of different fonts. At first it will be hard but practice makes perfect.

My favorite nibs of the above set are the Leonardt No. 41 and the Leornardt 33. 
Individual replacement nibs can be purchased online from the Manuscript website.

When holding the pen, hold closer to the nib and angle the arm such that the nib is not perpendicular to the paper but lowered at an angle. Also write with the pen pointing towards 10 o’clock or at a 130 degree angle.

Writing takes practice, and figuring out the best pressure for the chosen nib and ink take practice as well. Once you are comfortable with using india ink, you can start experimenting with other types of inks like water color, gouache, and acrylic inks. This is the power of dip nibs, you can use them with many different types of media.

I am by no means an expert and just starting out myself but this is what I’ve discovered based upon trial and error and save someone else the time, money and effort, I’ve compiled my findings here. Hopefully they will be helpful to someone else just starting out as I would have appreciated someone giving me some pointers on where to start.

Best of luck and what are your favourite tools to use to do calligraphy?

Lucky St. Patty’s freebie – Nespresso grand crus holder/organizer

*update May 20, 2018
A nice visitor to my blog informed me that my old link no longer works so I’ve transferred the file to Dropbox. Just click the link here or below to access the free dispenser file! 


Happy March!

It’s the happiest month of the year, there is no better better month than March!

So in celebration of March and Saint Patrick’s day, I’ve created an organizer/holder for the nespresso grand crus. I didn’t want to shell out the money to pay for one because they’re so expensive.

Download the Nespresso dispenser here!

So I used my silhouette cameo to print 4 of them and then I assembled them by folding along the dotted lines.

2014-1

You can also line them up one next to the other so you have a row of them. You just insert the rectangular tubes in after opening. Every time you want to have a nespresso, just lift the box of the flavour you want and one capsule will pop out!

So easy! So this is how I’ve been storing my nespresso capsules!

2014-2

I would love to hear your comments or suggestions for improvement!

Enjoy~

Romantic Vintage Valentine’s Card with Textured Embossing

With valentine’s day just around the corner, I wanted to share my most recent card creation with you all. I bought some gesso a while ago and I hadn’t really had a good chance to use it so I decided to use it in this card.

I’ve titled this card Romantic Fairytale Dream, doesn’t it look like a fairytale from a little girl’s dream? When I was much younger, I used to dream about what it would be like to be a fairy tale princess, to rule over all the land, protect my people and save prince charming. Yes, I know it’s typically the other way around, but I had a lot of strong females as my role models growing up. Us girls can take care of ourselves, and then some.

Romantic Vintage Valentine's Card

I started out with a 5 x 4.5 inch white sheet cardstock which I embossed using a sizzix embossing folder. Unfortunately I forgot the name of the folder but it has diamonds with vintage damasks within each diamond.
To make the damask image really pop, I sprayed a sponge with glimmer mist and gently rubbed the sponge across the surface so that it only stains the raised parts of the embossed image.

Romantic Vintage Valentine's Card


To mask the border because I felt it looked a little strange that it was just empty space, I used gesso, or otherwise known as embossing paste, all around the edge and merging partly into the embossed image. Using my fingertips I dabbed with an up and down motion to give the paste some texture. Embossing paste typically takes a few hours to dry completely depending on how much was used. If it’s a really thick layer, I’d wait until overnight which I did in this case. It wasn’t a particularly thick layer but it I just wanted to be sure.

Romantic Vintage Valentine's Card

I proceeded to make my centrepiece now that the background was complete. Using a piece of pink vellum, I cut out a circular shape with rounded border using a Spellbinders die. I then used a carriage stamp to stamp and emboss the vellum with Versamark and champagne coloured embossing powder.

*note: Vellum is really delicate and it’s really easy to over heat and warp the vellum. Don’t put the heat tool too close to the vellum and switch from heating the front to the back frequently.

Using my Crop-a-Dile, I applied eyelets to the top and bottom of the vellum and threaded pink ribbon to attach the vellum circle to the card. I made a bow with the flapping ends of the ribbon at the top of the eyelet.

Romantic Vintage Valentine's Card

Using a Tim Holtz crown stamp, I stamped using gold ink on kraft cardstock. I fussy cut out the crown and applied it to the edge of the fancy embossed carriage.

I then stamped a rounded rectangle with the words “Dream” and applied that to the corner of the vellum circle using 3D foam dots. Then I used gesso to go over the edges of the sentiment piece. Finally using Liquid Pearls in Platinum I made little droplets on every other circle in the border. Then I let everything dry overnight.

Romantic Vintage Valentine's Card

So there you have it, a fancy vintage valentine’s card. Reminds me of a fairy tale of princes and princesses riding in pumpkin carriages, being carried to their magical destiny.  Romantic Vintage Valentine's Card


So there you have it! I hope you’ve enjoyed this card as much as I’ve enjoyed making it. Hope that this Valentine’s day, you can spend it with someone you love, whether that be your beautiful self or with someone who’s dear and special to your heart.

XOXO~

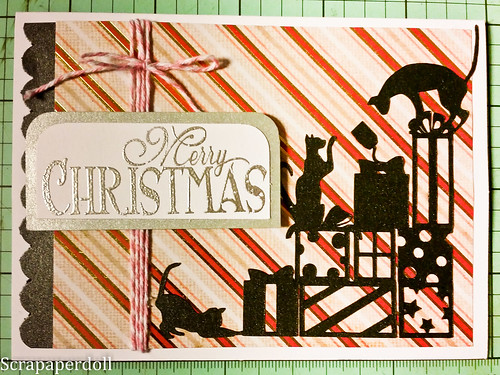
Kitty Cat Silhouette Christmas Card

I’ve been meaning to upload a few last minute christmas cards that you could whip up really quickly. If you’re anything like me, you’ll likely be trying to pump these out the night before you meet your loved ones and friends so burning the midnight oil well into the night isn’t ideal. But not to worry this next card is so simple to complete, it is literally just choosing a design, some pasting work, add a little bling and you’re done!

Kitty cat christmas card

For this project I used my silhouette studio with the following design from the design studio: Cats on stack of presents.

I cut it out on shimmery black cardstock to give it some vibrancy for the holiday season. Likewise my scalloped border was punched out using the same shimmery cardstock.

Kitty cat christmas card

Then I selected a festive background from my stash of Christmas papers and applied the cat silhouette on top and scalloped border on the back. I then wrapped the piece in pink baker’s twine.

Afterwards, I stamped merry christmas with one of my hero arts christmas stamps using clear versamark and heat embossed with fine silver powder. I adhered this sentiment on a back piece of silver cardstock and then used foam dots to apply the sentiment on top of the baker’s twine.

Finally, I applied the whole piece to a 4.5×5 inch cream card using double sided tape.

Bingo Embossed Christmas Card

This card was so simple and easy to make using my Silhouette Cameo and quite frankly a lot of fun since I love cats. I had a great time being able to incorporate some of my favorite pets in a craft project.

But if you don’t like cats or you don’t have this particular sihouette cut out on hand, essentially any silhouette shape can work with a patterned background. Then a sentiment placed on top using foam dots to make it more 3D.

Have fun making this card, it’s great as a last minute card creation!

Scary Halloween Invite beckons my ghoulish presence

Halloween invitationMy BFF, Alice, who’s also an avid scrapper, sent me this gorgeous scary invitation to a halloween party. I was so pleased and amazed at the detail and work she put into it that I just had to showcase it here and show everyone else.

She picked up all the supplies from Michaels. Using a stamp with diamonds she made the background of the envelope and then embossed it. The invitation itself was stamped with different colours and then also embossed.

2014-10-26 00.21.10

She even made a few red paint splatters on the front of the envelope to make it look like someone’s blood spilled on it while she was busy working away. Very creepy indeed…I love it!

halloween envelope

Review on silhouette stamping material and Silhouette haul

Silhouette Stamp

Today I wanted to review some of the products in my latest Amazon and Silhouette America haul. I drove all the way down to the states to pick it all up since prices for shipping to Canada is what I personally consider thievery. Taking advantage of the free shipping to the US and 30% off heat transfer material I grabbed a whole bunch of different supplies:

1. transfer material: yellow, glitter black, more white (because it’s so generic and useful) and this lovely teal colour that I’m sure is going to match so well with the yellow and white!

2. Stamping material and the perforated mat

3. Silhouette Fabric blade – which BTW is supposed to be the same as the normal black blade, just a different colour so you don’t get yourself all mixed up. You’re not supposed to cut fabric and paper with the same blade because it dulls the blade that way. That’s also why you never cut paper with your fabric shears.

4. thumb notch punching tool from WeRMemoryKeepers for my project life needs

5. project life photo pocket pages in design G and a WRMK one #50032-3

6. pick me up tool – for rhinestones and very small pieces of paper my chubby fingers are too indelicate to handle.

7. the much raved about pixscan mat which I personally raved about in my earlier blog post.

So the first thing I did with all my brand new loot was create a pretty stamp using the silhouette stamping material.

My BFF requested a stamp to personalize her creations so I created a logo for her using the silhouette studio software which you can take a look at below:

Cut-out stamp mounted on an acrylic block and inked with red pigment ink
Silhouette Stamp

Stamped red on white cardstock with the cut-out stamp below it
Silhouette Stamp

So here are my thoughts on the silhouette stamping material:

Who would benefit the most from creating their own stamps using the silhouette:

In general, I think that anyone who is comfortable using the basic functions of the silhouette studio free software and the usual troubleshooting involved would be able to handle cutting the stamping material.

The individuals who would benefit the most are those who are comfortable using the more advanced functions of Studio, both free and designer versions. For example, if you understand how to weld, cut, trace, then you could make some pretty cool personalized designs.

PROs:

1. Make my own stamps to suit my crafty needs.

I really love the idea of being able to create my own stamps to use with whatever project I want. For example making a personalized logo which I can just stamp on all my projects before I give them away or as a way to promote my brand.

2. Cool and unique stamps can be made even using the free studio software.

I only have the free version of the software and I managed to make that really cool stamp design by welding the words, editing points, cutting and merging where necessary. All of these tools were available to me through the free studio software.

I would love to get the designer version of the software but unfortunately, it’s a little too expensive right now so I’m waiting for a sale.

3. The material inks up and stamps really well!

As you can see above, I get a clear, crisp image which I was not expecting. I thought it would be just a little blotchy or irregularly shaped as the cut isn’t perfect. But upon stamping, it was totally fine and those little areas where the cutting wasn’t as smooth didn’t even show up after stamping on cardstock. I am using Colorbox pigment ink. 

Despite the ink also inking up on the acrylic block, when I stamped, none of the off-target inking transferred to the cardstock which is amazing! Even commercial stamps I get frustrated sometimes because if you press just ever so slightly harder than the sweet spot, you get a big splotchy image. But not with this stamp.

3.  Designs are fairly intricate.
The box instructions do say “Make sure all cut lines are 1/16 inch apart“. I didn’t measure it exactly but as you can probably tell by the ruler in the photograph, the stamp I cut out was about 4 cm in width and 2.5 cm in height. I’ve got some pretty thin lines in this image. I’m not sure if I could get it any thinner than that but I probably could since I’ve seen other people do it. I just haven’t tried yet since this was my first shot.

But not bad for my first shot eh?

4. Fun!

It has been a lot of fun learning how to use the silhouette studio software, the user interface is very much like adobe illustrator (but not as complex) and lots of people actually use it to design commercial products/projects.

It feels very rewarding to come up with a creative idea and then have the tools to make it come to fruition. I thoroughly enjoyed every step from the initial brainstorming and vision to creating my design to actually cutting it out and stamping with it.

CONs:

1. There’s a limit to how small a line you can cut and sometimes for the smaller pieces like holes in the “O’s” etc. the pieces of stamp material get stuck and you have to rip them out. That ripping part created a jagged edge and sometimes causes tears in the stamp itself.

For example, the first time I made this stamp, I made it about 3.5 cm in width and when I ripped out the centre part of the “O” which was stuck pretty firmly, it ripped the top part of the “O”. So it looked more like a “U”.

After some troubleshooting on size of stamp to cut and careful extraction procedures using a combo of nails and exacto knife, my second stamp attempt resulted in an intact “O”.

2. Stamp material flimsy.

So it’s great that the material is soft enough that you can cut it with the silhouette but afterwards it’s flimsy and flexible. Unless you have an acrylic block with grid marks on it, it would be near impossible to have a stamp mounted straight. So I suggest investing in a good acrylic block with grid lines so you can align your stamp to the grid to make it actually stamp the way you want to. I suggest the one offered by Martha Stewart with the little foam pads (as shown above).

If you ever remove your stamp from the block and then put it back on, you won’t get the same stamped image twice unless you cut out a rather chunky and solid stamp. If the material were a little sturdier that would be nice. Not a huge deal if you aren’t a perfectionist.

3. Choice of inks is limited to the pigment variety.

The best type of ink to use with this material is a nice pigment ink. Not even the distress inks will do because it will just bead up on the stamp. Use something like colorbox pigment ink or there is also the generic Michaels brand pigment inks. Tsukineko also makes some good ones as well.

Avoid the archival dye inks because those will just create beads and you’ll get a stamped image of bubbles…unless that was the look you were going for.

Anyone else try other types of inks that worked?

Anyways, tons of possibilities and I’m just starting. Can’t wait to try out my Pixscan mat so stay tuned for that!

Hacks for the Silhouette PixScan – creative ways to use it!

Silhouette PixScan

As most people who own a Silhouette Cameo or Portrait already know, Silhouette America just came out with a new addition to their versatile cutting systems: the PixScan.

Honestly I’m surprised that this iconic machine didn’t come pre-built with the PixScan technology. But being the crowd-following individual I sadly am, I never questioned why it never existed even though I have, countless times over, tossed an idea in the trash because this technology wasn’t available in my moment of need. Therefore I am experiencing that sensation when you discover a new paper pad or Martha punch and you feel and overwhelming urge to just have that item in your possession. Yes, this is exactly how I feel about the PixScan mat.

So you might be wondering…what has gotten this crazy girl all obsessive about?

Well there are plenty of resources out there such as this fine blog which outlines the basic requirements for a Silhouette user (or non-Silhouette user if you so unfortunately happen to be one). Or check out the video from the Silhouette America website:

In short, it’s a sticky PixScan mat with registration marks already on it, you put your desired material/picture on it and then take a photo or scan it. Transfer the image file to your computer and import the image using the Silhouette studio 3.1 or higher software. The Software automatically detects the registration marks and makes a virtual flattened image of your picture (adjusting for angles, lopsidedness, overall shaky photography skills) at which point you can then proceed to create masks, outlines, shapes of every size, etc. etc. etc. to cut out of your material already tacked on to the PixScan mat. Just don’t readjust your picture or you’ll have to start all over again…

So why I’m excited about it…but first a little background on my experiences with cutting images out of paper…

It takes me forever to fussy cut a stamped image and I have never been able to master the detailed precision cutting that only my cameo could manage. And being the perfectionist I am, it is often frustrating when I can’t achieve the perfect cut of nice image from pretty printed papers. I always envied the crafty ladies who could cut such beautiful figures from their G45 papers or delicate flowers and whimsical animals off of a thin magazine page.

I remember one time when I was making a birthday card for my BFF and I had stamped a Tim Holtz’s stamp of a bird…I spent nearly an hour cutting out my stamped image…those little tiny legs and delicate feathers. Using a combination of scissors, xacto knife, sweat and blood, I finally managed to pry the wretched thing away from the cardstock. At any point during that one gruelling hour, I would have done anything for the PixScan technology…

Okay, so why I’m REALLY excited about the PixScan for the Silhouette:

1. cutting out stamped images

Instructions: Stamp an image using preferably medium to dark ink. Use PixScan as demonstrated above. Cut. Apply as desired.

You can probably use lighter inks as well but if you wanted to create a mask over your image to make an outline around it and cut around your irregular shape as close as possible (like print and cut), the software may not be able to pick up inks that are too light (like yellow).

You might be wondering now, how to cut around an image of choice (ie. print and cut)? Look at this video from UnderACherryTree.

I always admire the stamp and die sets that you can purchase from places like Simon Says Stamp and more recently at my local Michaels store. That is until you look at the astounding price tag and have a heart attack. Such a tiny stamp…with such a tiny die…for 50 dollars??? I could eat out for lunch and buy groceries for a week with 50 dollars! However cute the projects you could create with such a set, the notion of using one of these stamp/die sets is exactly that…a notion. It’s not easy being a student with an expensive hobby…that’s why I always have to be careful of how I spend my money. Which brings me to my next point:

2. It’s economical.

Instructions: buy a PixScan mat. And a Silhouette cutting machine if you don’t already own one.

Martha Stewart makes these little stamp and punch tools where you stamp an image and cut around the shape precisely. However they’ll run you for about $25 bucks a piece. As mentioned earlier, the die and stamp sets go anywhere from 20 dollars to 50 dollars.

The PixScan mat is 14.99 USD. almost half the price of other stamp/die sets. Buy it here.

However the Silhouette Cameo is $270 at Michaels.For a cheaper option, consider the Silhouette portrait which goes for $129 when it’s on sale. Check Amazon, they usually have good deals.

3. The possibilities are endless.

Instructions: Select ANY cute image for a project. Now use the PixScan to cut it out. Apply as desired.

You aren’t limited to just one image or just one shape to cut or just one type of material. You can try so many different things!

If you had a piece of patterned paper with say…many different stars of different sizes. You find that you don’t have the right paper punch and you need to cut out 2 dozen for cupcake toppers. This would take forever cutting out by hand…No problem, just send them through the PIxScan. Done in likely 5-10 mins.

4. Sketch precisely at any desired location on your patterned paper.

Instructions: Use Pixscan with desired paper. Sketch in appropriate location on paper.

I don’t know why Silhouette never really showcases their sketch feature but it’s actually quite capable of many different things. I have to say at this point, I do not know whether or not the software allows you to use the sketch feature with the PixScan but I can’t imagine why they wouldn’t allow you or why they wouldn’t implement this ability in the future.

For example, if you wanted to sketch something on patterned paper or a die-cut piece, you can do so using the PixScan.

I imagine this would be really popular for things such as invites, greeting cards, place cards, tags, etc. Or maybe you just have ugly writing and you’d rather your recipient be able to read your heartfelt sentiments on your irregular shaped paper. You can’t print on non-standard papers in the shapes of stars, moons and heart. Believe me…I’ve tried…it’s not pretty. But you can sketch on it with the PixScan! Cool huh?

5. Cut out your photographs with utmost precision!

Need to precisely cut a photograph to fit in a project piece like a specific frame? Or need to cut out your child’s head to paste on every imaginable surface within reach? Inanimate or animate? (Disclaimer: I do not have children, but I certainly admire the creativity, and sometimes voraciousness, exhibited by women who do).

Look no further, you can use the PixScan!!!

Okay…now I’m tired out from being overly excited about this. So now I’m going to put a damper on this technology as a warning of the possible pitfalls:

Why the PixScan may make you rip out your hair: 

As much as I love the Silhouette Studio software, I can’t say it doesn’t come with its limitations. Even being an advanced user of Adobe Illustrator, I sometimes struggle to make the perfect line, curve or outline using the studio software. Perhaps the Designer edition would diminish some of these frustrations but most Silhouette users will own only the studio software.

Therefore, take the PixScan technology with a grain of salt:

There is a learning curve to using the PixScan and adapting it to do what you need it to do for your projects. There are tons of youtube tutorials out there that teach you how to use the Studio software to its full potential but it’s not going to be a walk in the park and it will be time consuming. Hopefully the satisfaction you receive from creating a masterpiece exactly as you imagined it (or even better) will be reward enough for you to take the leap and learn a new skill. I personally feel the end result is worth the effort but it’s up to you what you feel you can do. You can still create beautiful, unique and one of a kind results with even just basic computer skills using the software  if handling some of the more advanced features are a little over your head.

So don’t be shy, hop over to youtube and get your brain juices on.

And don’t forget to comment below your thoughts and questions on the new PixScan from Silhouette.

Disclaimer: I do not work for Silhouette America, I just love their products and I want to share my wonderful experiences with the world. I have owned a PixScan for about 3 years now and have used it a few times but I haven’t taken advantage of the full capabilities of it which I am really looking forward to doing very soon!