Tag Archives: punch

Kitty Cat Silhouette Christmas Card

I’ve been meaning to upload a few last minute christmas cards that you could whip up really quickly. If you’re anything like me, you’ll likely be trying to pump these out the night before you meet your loved ones and friends so burning the midnight oil well into the night isn’t ideal. But not to worry this next card is so simple to complete, it is literally just choosing a design, some pasting work, add a little bling and you’re done!

Kitty cat christmas card

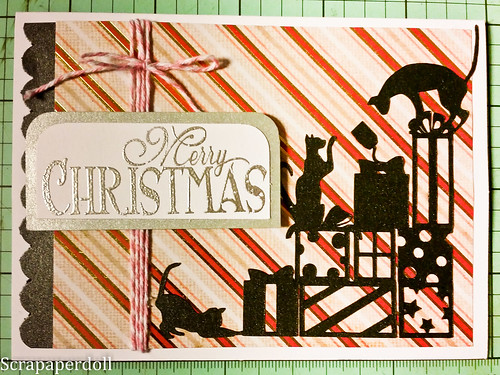
For this project I used my silhouette studio with the following design from the design studio: Cats on stack of presents.

I cut it out on shimmery black cardstock to give it some vibrancy for the holiday season. Likewise my scalloped border was punched out using the same shimmery cardstock.

Kitty cat christmas card

Then I selected a festive background from my stash of Christmas papers and applied the cat silhouette on top and scalloped border on the back. I then wrapped the piece in pink baker’s twine.

Afterwards, I stamped merry christmas with one of my hero arts christmas stamps using clear versamark and heat embossed with fine silver powder. I adhered this sentiment on a back piece of silver cardstock and then used foam dots to apply the sentiment on top of the baker’s twine.

Finally, I applied the whole piece to a 4.5×5 inch cream card using double sided tape.

Bingo Embossed Christmas Card

This card was so simple and easy to make using my Silhouette Cameo and quite frankly a lot of fun since I love cats. I had a great time being able to incorporate some of my favorite pets in a craft project.

But if you don’t like cats or you don’t have this particular sihouette cut out on hand, essentially any silhouette shape can work with a patterned background. Then a sentiment placed on top using foam dots to make it more 3D.

Have fun making this card, it’s great as a last minute card creation!

Calendar Style Birthday Card

Calendar Style Birthday Card

I made this card for my BFF a few months back for her birthday but just got around to uploading it. Sorry for being MIA for a while, my studies have been so super busy! I went away to present my research at a conference and although it was probably one of the best experiences of my life, it also left me very little free time for a while.

But I’m back in the game and super excited to share with you all my most recent creations, starting with the least recent haha!

I really wanted to showcase when my BFF’s birthday was which is the 29th of December so I printed out, stained and distressed a calendar that I found online.

I used some glimmer mist in Rouge and Cork using my technique on how to prevent paper from wrinkling after soaking it in wet media and letting it dry. You can find that tutorial here.

Once it dried, I stamped some swirls using Versamark and transparent embossing powder. You can see the glimmer mist underneath of it that way.

Then I just finished up the card by adding a gemstone over the top of the 29th of December because that’s the date of her birthday. And then I just embellished with a flower (I don’t remember what it’s called, an accordion flower? Somebody help!) I cut out with my Silhouette Cameo, but you can also use a Tim Holtz die to do that.

I mounted the calendar onto another piece of cardstock which I punched with a Martha Stewart doily punch just on one edge and then distressed the edges with Vintage Photo. 

Finally I mounted everything onto a card with a pretty pink background I dug out from my scraps stash from DCWV Garden Tea Party Stack.

Share your comments below!

How to make vintage manly holiday cards tutorial

Vintage Christmas Cards

I made a series of vintage-styled Christmas cards that would be perfect for a male recipient if ever you needed a Christmas card for a dude or maybe just a manly female?

These cards deviate from my normal use of scraps to make cards as the only scraps I used were for the inside of the card for writing a message. However many of the embellies you may want to use for these card styles.

Tools you’ll need:

1. Christmas printed paper

2. Black cards and envelopes

3. Scissors

4. Glue/ATG gun

5. Paper cutter

6. Foam dots

7. Border punch – EK success film strip punch

8. Corner punch

I used a paper stack from Recollections called “Joyful Christmas“. I’ve really been enjoying a lot of the recollections prints, their Christmas collections are really quite well done, maybe better done than many other designer brands out there. So if you’re looking for a versatile paper stack where all the papers just match up really well, try a Recollections stack.

All these cards were made using black cardstock for the card base which I bought at Michaels.

Vintage Christmas Cards

I made three different card styles and 4 cards using just one sheet of 12×12 striped cardstock for the background of all 4 cards! To decorate the background pieces, I used a corner punch from Fiskars.

Style 1: 

Vintage Christmas Cards

Vintage Christmas Cards

I used a fat strip of border paper but then realized that it was too…cream-colored and blended in with the background color. So to make it pop, there was a paper in the collection that was black with white polka dots and I used 2 strips of the black to border the strip of cream. I cut V’s into the ends of the each of the border papers.

The “Joyful Christmas” stack has many sheets of tags and frames that can be cut out. Many of them  have holiday sentiments that just fit so perfectly for a card front. You can also make your own, but I really liked these tags that I didn’t bother making my own.  Vintage Christmas Cards

style 2:
Vintage Christmas Cards

Vintage Christmas Cards
This card just has a fat band through the middle and a sentiment tag slipped into the middle of the band at an angle. I then cut out a glittery santa and used 3D foam dots to adhere it to the band. Super easy right?

Style 3:
Vintage Christmas Cards

Notice that the background of this card is a little different as it has a strip of red printed and glittered paper at the bottom. Go ahead, mix it up a bit!

For this card, I used my EK success film strip punch to punch long black strips of film to overlay the general card template of sentiment tag over background. Then you I used a “tis the season” sentiment on foam dots to add a sentiment to just above the middle of the card.

And there you are, 3 gorgeous, easy, simple and fast vintage cards for all your vintage needs! 

Have fun making these and please LIKE MY FACEBOOK PAGE if you enjoyed this tutorial!

Until next time!