Cherry Blossom Watercolor Tutorial

I’ve been really into watercolors and the versatility of them. However, I have very little skill in drawing, which makes watercoloring difficult…or so I thought. I recently started watching Art Impressions tutorials on Youtube where they use their watercolor stamps with water-based markers to stamp with. Then they go in with a waterbrush and just smudge out the lines to color in the structures. The end result is a gorgeous watercolor scenery that took minimal effort to make. They make it look so easy.

Unfortunately, I don’t have any Art Impressions stamp sets but I did pick up “Birch Land” stamp set from Altenew (one of my favorite brands!!!) on a previous haul. This stamp set features a beautiful tree with branch pieces and different sized arrays of leaves.

Birch Land Stamp Set - Altenew

The details in this stamp set is beautiful, the lines are super crisp and the stamp set was meant to be layered. I love the sentiments in this stamp set and how I can mix and match words to make a custom sentiment.

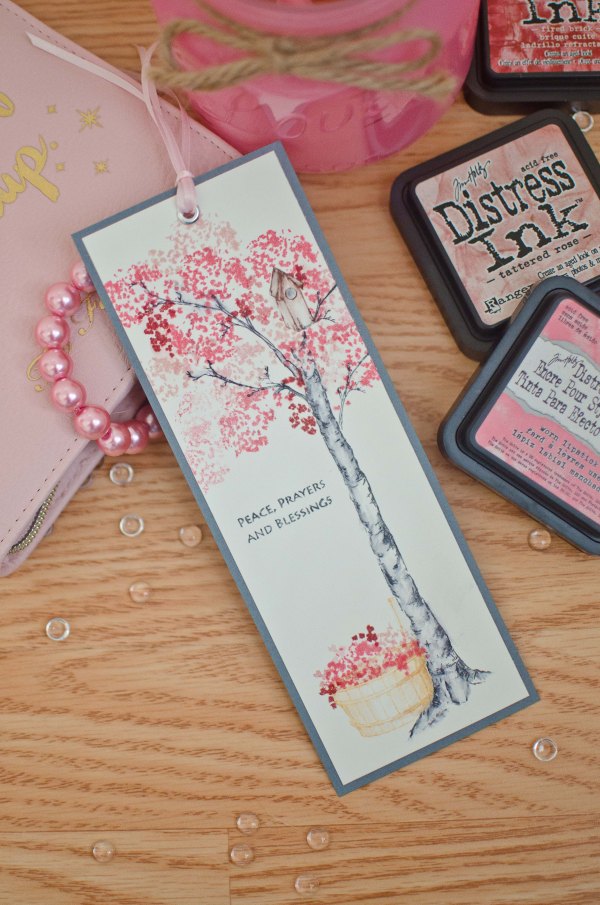
I used Tombow Dual Brush pens in the Landscape Palette to stamp the tree, branches and bird house. I also used Distress Inks to stamp the leaves.

And this is what I came up with!

Cherry blossome bookmark (1 of 5)

I started with a long strip of water color paper that I had left over from another project.

For the tree and branches I used Tombow N25. Then taking a waterbrush (a wet watercolor brush will work fine too) I went over some of the inked parts on the tree and branches and started pulling some of the ink towards the centre of the tree to color it in. I made sure not to color the entire tree “grey” so that there are some dark spots and some light spots to add additional dimension. This part may need some practice as pulling too much ink inwards could blur the lines and lose detail in the work.

For the birdhouse I used Tombow 899. Again I used the waterbrush to color in the birdhouse.

The blossoms were stamped using a mix of Distress inks in work lipstick, tattered rose and fired brick. Layering these worked really well just keep in mind that if you’re unsure of where to begin, always start with the lightest color first. You can always stamp over it with a darker color later.

The basket was stamped in Distress Ink dried marigold. Then I stamped the same ink pad on an acrylic block and picked up some of the color with a damp brush and started coloring the basket in, leaving a bright/light spot in the middle to give the basket more dimension.

Finally, I finished the wet media part by stamping a sentiment.
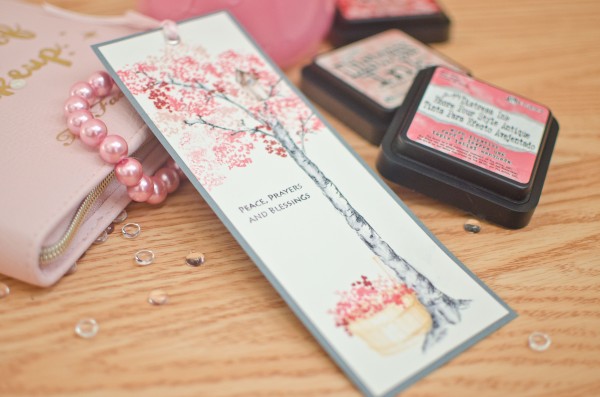
Cherry blossome bookmark (4 of 5)

To finish everything off, I cut the top white space of water color paper off the top and adhered it onto a grey piece of cardstock. Then I added a silver eyelet at the top and strung some strands of pink ribbon through.

To preserve the watercolor and prevent it from fading and smearing, spray it with a light mist of cheap hairspray to seal everything. Learned this trick from my watercolor instructor when I still took art lessons.
Cherry blossome bookmark (3 of 5)

Hope you enjoyed this tutorial, let me know what you think in the comment box below. And let me know if you tried this or if you have any questions about what I did!

 

Free Dog Rules Poster Cutting File

07-22-2018

A new updated file can be downloaded here~

dog poster.jpg

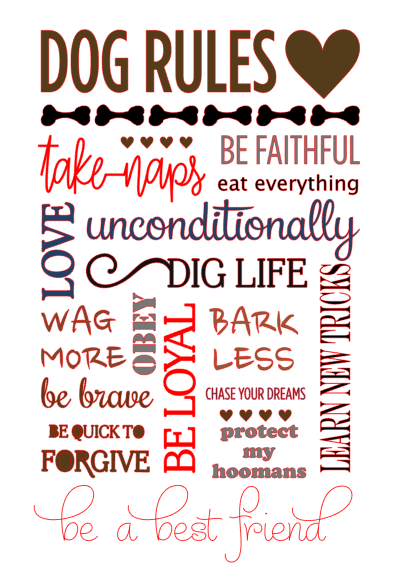
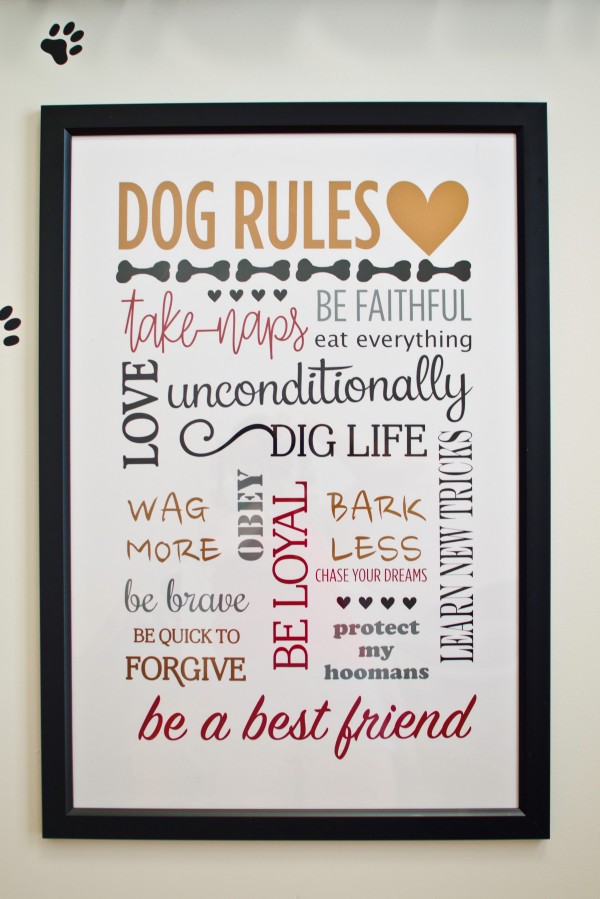
A new cutting file for the silhouette cameo! I have been planning to make a poster for my pooch Trigger for some time now! I was contacted by Shopcraftables shortly before I started my project and the following design is in collaboration with them.  Check them out for all your vinyl and heat transfer material needs!

Screen Shot 2018-06-10 at 10.25.05 PM

Download the file here.

The design is for a 20×30 inch poster and in a .studio format. If other formats are desired, please post a message below!

I will be posting pictures of the completed project using vinyl from Shopcraftables soon!

Tutorial – 3D light up marquee letters

If you’re just looking for the cutting file, the edited version of the letter “G” can be downloaded here

For tutorial, please see below!

Hello! It’s been some time since my last blog post! So much has happened and it’s been a whirlwind of activity. I finished my doctorate degree, moved across the continent to the east coast where I’ve set up my new home and started a post-doc fellowship. But I couldn’t leave without bringing with me my precious crafting supplies! I even packed my Silhouette Cameo in my luggage (I’d forgotten to pack it in the shipping cube…oops!).

After we got set up in our new home, our baby came join us in the east coast and he had a big road trip all the way from Vancouver!

IMG-5962

To welcome him home, I decorated his own little corner. I wanted to make it really special write his name out in lights! So I made 3D marquee letters that actually light up by remote control! It took a whole week’s worth of evenings but it was well worth it. It turned out better than I imagined!

I used paper to make the 3D letters using Carina Gardner’s marquee 3D letters cutting files from the Silhouette design store. The files and a tutorial from Carina Gardner can be found here.

In general, I really liked these letters; however, I found that some of the letters were somewhat confusing to assemble and some pieces were sized a little strangely so they weren’t the same size as the other letters. I don’t know if I assembled them erroneously as I found the that there were minimal instructions. There were some guidelines on Carina Gardner’s website. As a perfectionist, this bothered me a lot so I edited some of the pieces. For example, for the letter “G”, one piece was too long so I shortened it, and rounded out a bit more the front piece. This 3D “G” letter can be downloaded here. 

Some of the other rounded type letters like the R could also be shaped a bit better but the straight letters like the “I” or the “T” could very easily be assembled. For additional questions on assembly, check out Carina Gardner’s website or leave a comment below.

To make the letters light up, I purchased dimmable fairy lights from Amazon

The fairy lights came with a remote control too so that I could control brightness of the lights. The wire also bends so that I can make it into any shape I like. I really LOVE these fairy lights!!! Also they’re LED lights so they don’t heat up even after being on a long time so that there’s virtually no fire hazard. Remember that the letters are made of paper and if you use non-LED lights, they may heat up and burn the paper and cause a fire.

To attach the fairy lights, I lined up the lights with the holes in the marquee letters and just used a strong tape (here I used masking tape) to adhere the wire part to the back of the letters.

To hang the letters on the wall, made holes using a hole punch on the sides at the top of each letter and just strung a string through all the letters. I hung the letters to the wall using a dozen and half of these Command decorating tips. These are great because they don’t damage the wall.

And here’s the final product:

IMG-5932

IMG-5930


Hope this tutorial was easy enough to follow! Leave a comment below and let me know how you liked this tutorial!


Watercolor bridal shower cake with cardstock cake topper

DSC_0008-2

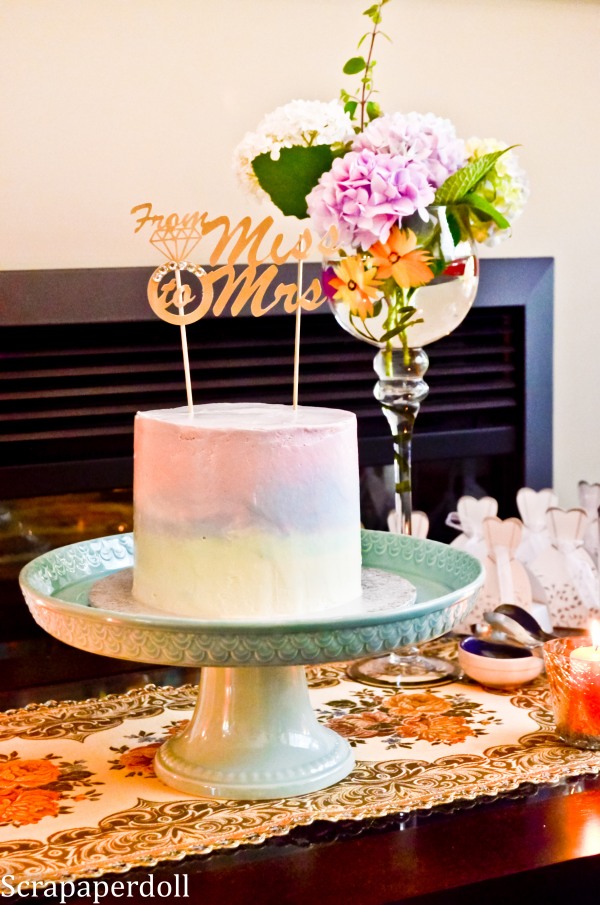
For my lab mate’s bridal shower, I was so inspired by the beautiful cakes I’ve seen on instagram I decided to make one of my own. I decided to use the same colors as the theme of the party, pastel pinks and purples.

Using a rich french meringue buttercream and several layers of my favorite white cake recipe, the cake was a hit!

I cut a cake topper using my silhouette cameo and silhouette studio and attached long wooden foodsafe skewers to insert into the cake.

I have another bridal shower coming up soon and I need some good ideas on decorating so please comment below if you have any!


Copic marker-colored Christmas cards

It’s been some time since I made a post, almost half a year in fact. My time flies! Life has been eventful in many good ways and I’m looking forward to sharing with you all many of my creations these past few months.

This slideshow requires JavaScript.

But first off, I’d like display some of the Christmas cards I’d made for my friends and family this past Christmas. Copic colouring has become a new hobby of mine and because they’re so pricey, I managed to snag a few cheaper knock off alcohol markers on Aliexpress. I’ll put up a blog post about that soon but from my initial foray into alcohol markers, they seem to work quite well!

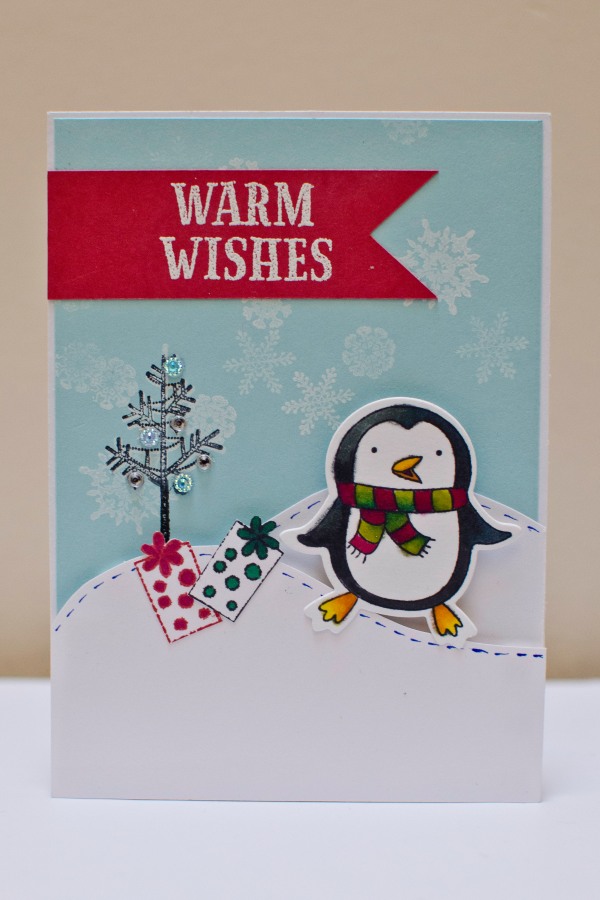
I wanted a cute and wintery theme for my cards so I used my Hampton Art Stamp and Die set – Penguins.
SC0714 Stamp & Die Set - Penguins

In order to use this die you need to have a Sizzix or cuttlebug die-cutting machine.

I stamped the image of the penguins using Memento in Tuxedo black by Tsukineko which is one of the best dye inks for alcohol marker coloring. After coloring the penguins, I cut them out using the penguin die.

To decorate the cards I used a few different kinds of backgrounds, here are a few:

1. staggered snow fields. I used foam dots to create dimension on the snow fields. I used a blue cardstock as the background and stamped white snow flakes .

dsc_0585

2.  A fat ornament on an embossed background. I purposely made the ornament enormous so that it would take up half the card. I cut the ornaments out using my silhouette cameo to the size I wanted. Finally I decorated the ornaments with rhinestones or ribbons.

Finally I used a banner with a white embossed greeting and attached the penguins with a foam dot to make it 3D.

I loved the rhinestone-embellished ornament so much that I made card featuring just the ornament on an embossed background!

Well that’s it I hope you enjoyed these cards and stay tuned for more!


Gorgeous Barefoot Sandals and Life Updates

DSC_0935

Barefoot Sandals:

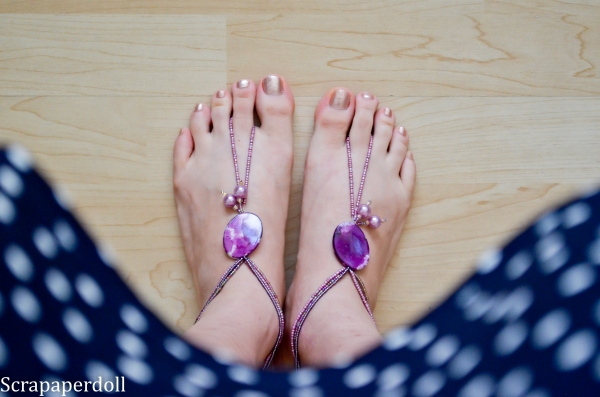
My friend brought me a pair of these gorgeous barefoot sandals that she handcrafted and designed all by herself. What an exciting gift because it made me think about all the adventures that I will now embark on with my new barefoot sandals! These are perfect for walking on the beach without your sandals, but having accessorised feet! She even made some wedding-themed ones for her sister in law who is getting married!

I wanted to share with you her beautiful creation, if she lets me, I will try to film her making one of these as a tutorial on how to make it!


Life Update:

Recently I’ve been away for a few months because I’ve been struggling a lot with the different events in my personal and academic life. 2016 thus far has been quite eventful and not necessarily in a good way. There have been many high points but also many low points too. All of this culminated in being hospitalised and having emergency surgery for appendicitis. But by God’s grace this may have been the best thing that’s happened to me all year because it’s reminded me of the first time I was there, lying on a stretcher, waiting to go under the knife and scared about the consequences. But just like the first time, a spirit of peace came to me, and then I wasn’t scared. It reminded me that God has a plan for me and that He plans to give me hope and a future. With that kind of encouragement, I found great peace and joy in closing some doors in my life while opening others. I am eager to see where my God leads me in the future!

During my recovery  many friends came to visit with me, sit with me, let me chatter on about my life. They encouraged and prayed over me to receive healing. I am so grateful for their expression of love.

I am hopeful that I can be more present on my blog from now on and continue to document all of my creations!


The Tape Depot 10% off code

unnamedthetapedepot

From now until Feb. 14th, 2016 save 10% off at the tape depot by using code VDSAVINGS at www.thetapedepot.com

Now would be a great time to stock up on some essentials like ATG tape and other assorted/double-sided tapes!

Disclaimer: I am not affiliated with thetapedepot.com, I just get their promo emails and I want to share with the community these awesome deals 😀


Cheap Thrills and Pretty Frills – Scrapbooking on a Budget

As a student, I don’t have a lot of extra cash to splurge on expensive embellishments, fancy papers or even foam tape. Over the years, I’ve come to be very adept at looking for deals and cheap thrills when it comes to paper crafting. And who’s noticed that it’s almost impossible to get decently priced shipping of anything to Canada? The US economy would be booming if only they shipped to Canada at reasonable prices! So more often than not, I and my crafty friends opt out of cheap US prices and pay the premium at Michaels. It’s still cheaper than paying for shipping. But don’t worry, below are some ways I get around these problems.

So if you love to craft but can’t afford to splurge, there are still ways to achieve beautiful creations using thriftier methods. Read on to see my tips:

*Disclaimer, I am not paid to advertise these companies, these are just the ones I use and in my opinion the cheapest products I can get in Canada and I wanted to share these money saving tips with other scrapbookers.

  1. ATG double sided tape
    Who doesn’t love ATG tape or just using double sided tape in general? But at 16.99 CAD for two rolls, I used to tape just the corners of a square and pray that my paper would stick…
    So here’s a cheaper alternative to ATG tape, check out The Tape Depot

    For ~$26 USD, you can get 12 rolls of ATG-compatible double sided tape at a variety of sizes. My favorite size is 1/4 inch. This comes out to just over 2 bucks a roll! Much better than $8.50 per roll from Michaels and many other scrapbookers claim that this tape works even better than 3M brand ATG tape!

  2. Silhouette Cameo Accessories and ProductsThe Silhouette online store has a full line of silhouette products but they’re usually slightly more expensive than other online stores (but still half what they charge at Michaels).Some of the best prices I’ve found in Canada are on amazon. You can usually get mats, blades and tools for a few dollars cheaper and they’re often part of amazon prime or offered as part of a free shipping deal. For example, I can often buy blades for 10-12 dollars each.

    Others have used Silhouette “compatible” blades like the Graphtec CB09 which can cost only 2 dollars a blade. I’ve personally not tried this before but many claim that the blade stays sharper even longer than the silhouette brand ones.

    BLACK FRIDAY DEALS on the Silhouette online store
    There are really no silhouette deals like the silhouette black friday machine and accessory bundles. For example, a portrait bundle for $99. If ever my cameo broke, I’d wait until black friday to replace it, or if I wanted to try one of their new machines like the Mint. It’s the same price as normal but they throw in extra accessories.

    Check out the silhouette online store here.

    The Silhouette Design store has monthly design sales for up to 50% off. Sign up for their newsletter to be notified of all their deals.

  3. Heat Transfer Fabric/Vinyl       Heat transfer material is so awesome but they cost 16.99 a roll on the Silhouette website and $24 bucks at Michaels and you only get about 3 feet of the stuff. I can usually make…maybe 2-3 T shirts per roll.Well, there are a ton of websites out there that sell high quality heat transfer material or adhesive craft vinyl (not heated, just for sticking on smooth surfaces) for much cheaper. One I’ve used recently is Flex Heat Transfer Vinyl.
    Heat transfer and craft vinyl for $3-4 dollars a sheet and it comes in a 12″x 20″ sheet so that it feeds directly into my silhouette cameo.

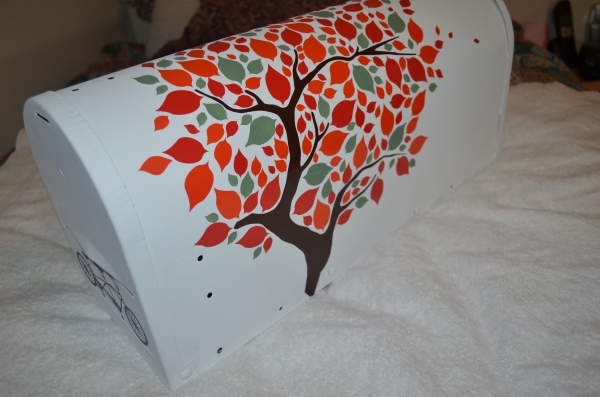
    Check out the mailbox I made for my friends for their wedding using the craft vinyl: DSC_0403

  4. EmbellishmentsStickers and gemstones can be quite pricey but there are many nice adhesive rhinestones and 3D stickers, ribbons and storage containers from your local dollar store.
  5. Eyelets and BradsEyelets are commonly used in sewing and fashion and you can often find a variety of simple eyelets from fabric stores for very cheap. I get mine from Dressew for 25 cents for 50-100 eyelets. Yes, that’s 25 cents! They also sell a plethora of ribbons, beads and flowers for all your crafting needs. They also have a scrapbooking section but I find the quality of the products not up to my standards. But they would certainly be useful to someone trying out scrapbooking for the first time because they’re very cheap.
  6. Michaels CouponsMichaels sends out coupons every week and their best ones are the 50% off one regular priced item or the 25-30% off entire regular and sale purchase. Never buy anything from Michaels for full price because they mark up their items by like 300%.Best part is you don’t have to print out the coupons, just show them on your smartphone. You can find Michaels coupons on their website flyer.
  7. Pay US shipping prices (often free) even if you live in Canada.                   This tip only applies to people who live close to the US border. Ship your items to a shipping and receiving company (like Hagen’s of Blaine) and drive across the border to pick it up. And fill up on the cheap gas while you’re there!


There are many other cost cutting methods I use but they typically involve keeping an eye out for clearance items and finding deals. There are lots of deals at Michaels but the best ones usually sell out immediately so check back often or just be lucky!

What are some of your money-saving tips? Share them below!


Getting started with calligraphy and hand lettering

2015-10-27 02.35.03

It seems like many scrapbookers like Kristina Werner, Heidi Swapp, etc are all getting into more hand lettering. As such, I’ve been really interested in learning how myself. I’ve already mastered the art of Chinese calligraphy as a child because of many opportunities to learn from experts as a kid, but western calligraphy has always eluded me.

So to jump on this band wagon, I began exploring at my local Michaels store to get started with hand lettering.  (Scroll down for a list of the cheapest essential tools to get started)

Dip nibs are cheap, traditional and the method that most people use to write calligraphy.

So here is what I did first, I initially purchased a round hand nib set by Manuscript:

This nib set is great for gothic style, italic and round hand fonts.

An excellent tutorial on how to get started with this type of font is here.

This is a very easy set to start with and was easy to pick up but some of the more elaborate gothic fonts, although beautiful required more practice. I wanted to accomplish other types of scripts though that these more traditional nibs were not able to achieve.

I soon found out that modern calligraphy and more stylish types of hand lettering required flexible pointed nibs. These nibs can also be used to write the beautiful cursive fonts like spencerian script or copperplate script.

Here is an example of modern calligraphy from Lindsey Bugbee

Cheating Calligraphy Tutorial | The Postman's Knock

So here is the list of items you need:

  1. small pot of water for rinsing ink off
  2. India Ink (Speedball brand ink gives the best results)
  3. Paper: The best paper for ink calligraphy is bristol, but this is quite expensive for practising. Therefore to practice, I use graph paper or higher quality lined paper by Hilroy like the “On the Edge” style of lined paper. It’s much smoother and less likely to bleed. Some of the best papers for fountain pen ink is by Rhodia or ClaireFontaine but these are a bit more expensive than lined/graph paper.


  4. pointed pen and nib set like this one from Michaels for about 10 dollars

These are the basics of what one needs to get started. Plenty of tutorials exist on youtube, pinterest and google. A quick search for cursive fonts or modern hand lettering will bring up a plethora of different fonts. At first it will be hard but practice makes perfect.

My favorite nibs of the above set are the Leonardt No. 41 and the Leornardt 33. 
Individual replacement nibs can be purchased online from the Manuscript website.

When holding the pen, hold closer to the nib and angle the arm such that the nib is not perpendicular to the paper but lowered at an angle. Also write with the pen pointing towards 10 o’clock or at a 130 degree angle.

Writing takes practice, and figuring out the best pressure for the chosen nib and ink take practice as well. Once you are comfortable with using india ink, you can start experimenting with other types of inks like water color, gouache, and acrylic inks. This is the power of dip nibs, you can use them with many different types of media.

I am by no means an expert and just starting out myself but this is what I’ve discovered based upon trial and error and save someone else the time, money and effort, I’ve compiled my findings here. Hopefully they will be helpful to someone else just starting out as I would have appreciated someone giving me some pointers on where to start.

Best of luck and what are your favourite tools to use to do calligraphy?

Vintage Paris Card

I was looking through my old cards and came across a few of my favourite ones that I never got a chance to share. So I thought I’d share them here today.

I am exceedingly fond of vintage cards and scrapbooking ideas and there’s no one who does this better than Tim Holtz. So using his stamp set “I see Paris” by Stampers Anonymous, I created a set of cards as gifts for my friends. I’m sad to say that I actually don’t have a physical copy of any of the cards I make because I give them away to friends for birthdays and gifts. But I feel that creativity should be shared and not hoarded for oneself. So when I think about how happy my friend will be to receive a card from me, it really inspires me to create for them.

So here is a card I made for my friend who have always wanted to visit Paris but never got the chance to. So to encourage and motivate them to realize their dreams, I gave them this card:

P1020336

P1020341

I embossed a piece of black cardstock with Tim Holtz’s splatter embossing folder…I couldn’t find the name of this one, I don’t remember it and I couldn’t find it when I searched for it. But on the sizzix website, they have a new texture fade splatter set. That one will likely work too. But if you find out the name, please let me know!

I went over the raised parts with a brush dipped in gold acrylic paint.

I was really into mixed media back in the day.

Using my Silhouette Cameo, I cut out a shape of the Eiffel Tower and embossed it using one of Tim Holtz’s grid emobssing folders and then I went over the raised parts with gold acrylic paint. P1020339

To give the Carte Postale (post card) a vintage look, I tore the corners and distressed with a combination of vintage photo and walnut stain. I then brushed the top with a layer of clear crackle paint so that when it dried, it would have that lovely vintage cracked look.

P1020338

P1020340

To finish everything off, I embellished the card with flower punch outs and I used like blue pearls in the centre to accent.

So I hope you enjoyed looking at this project as much as I enjoyed making it.

Until next time!